English (US) – Page 179

Stablecoin vs. Bitcoin: Which is Right for You?

Learn the key differences between stablecoin vs. Bitcoin. Understand which cryptocurrency is better for your goals, from investing to everyday transactions.

English (US)

Cryptocurrencies like Bitcoin offer exciting possibilities, but their prices can change quickly. This can be worrying if you’re looking for a more predictable way to manage your digital money. This is where stablecoins come in. They are designed to hold a steady value, offering a different kind of digital asset.

Understanding the difference between stablecoin vs. Bitcoin is important for anyone interested in cryptocurrency. Bitcoin is known for its potential to grow in value, but it also comes with higher risk due to price swings. Stablecoins, on the other hand, aim to provide the benefits of digital currency—like fast, global transactions—without the volatility. This guide will explain how each works, their main differences, and what to consider when deciding which might be a better fit for your financial goals.

What is Bitcoin?

Bitcoin is the world’s first decentralized digital currency. Created in 2009 by an unknown person or group using the name Satoshi Nakamoto, it operates on a technology called blockchain. A blockchain is a public ledger that records all transactions. Because it’s decentralized, no single entity like a bank or government controls it.

How Bitcoin Works

  • Peer-to-Peer Network: Transactions are made directly between users without an intermediary.
  • Mining: New bitcoins are created through a process called “mining,” where powerful computers solve complex mathematical problems. This process also verifies and adds new transactions to the blockchain.
  • Limited Supply: There will only ever be 21 million bitcoins created. This fixed supply is a key feature that can influence its value.

Bitcoin’s value is determined by supply and demand. Because its price can fluctuate significantly, it is often seen as a long-term investment or a “store of value,” similar to digital gold.

What is a Stablecoin?

A stablecoin is a type of cryptocurrency designed to maintain a stable value. Unlike Bitcoin, its price is not meant to change dramatically. Instead, it is “pegged” or tied to a more stable asset, like a national currency or a commodity.

How Stablecoins Work

Stablecoins achieve their price stability through different methods. The most common types include:

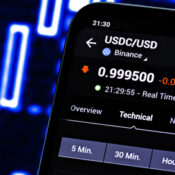
  • Fiat-Collateralized Stablecoins: These are the most common. For every stablecoin issued, there is an equivalent amount of a fiat currency (like the U.S. dollar) held in a reserve. Examples include Tether (USDT) and USD Coin (USDC). This backing ensures the stablecoin can be redeemed for its equivalent cash value.
  • Crypto-Collateralized Stablecoins: These are backed by other cryptocurrencies. To account for the volatility of the backing crypto, these stablecoins are usually “over-collateralized.” This means they hold more cryptocurrency in reserves than the value of the stablecoins they issue. MakerDAO’s Dai (DAI) is a well-known example.
  • Algorithmic Stablecoins: These stablecoins use complex algorithms and smart contracts to manage their supply and maintain a stable price. They automatically increase or decrease the number of coins in circulation to keep the price steady. This type is more experimental and can carry higher risks.

The main purpose of a stablecoin is to provide a reliable digital asset for transactions, savings, or as a temporary safe haven from the volatility of other cryptocurrencies.

Key Differences: Stablecoin vs. Bitcoin

While both are digital currencies, their fundamental purposes and characteristics are very different. Here’s a direct comparison of stablecoin vs. Bitcoin.

Price Stability

This is the most significant difference.

  • Bitcoin: Highly volatile. Its price can experience large swings in short periods, influenced by market sentiment, regulatory news, and economic factors.
  • Stablecoin: Designed for stability. Its value is pegged to another asset, usually a 1:1 ratio with a fiat currency like the U.S. dollar. This makes it predictable and reliable for daily use.

Purpose and Use Case

Their intended uses also set them apart.

  • Bitcoin: Often used as a long-term investment or a speculative asset. Some also see it as a hedge against inflation and a way to store wealth outside of traditional financial systems.
  • Stablecoin: Functions more like digital cash. It’s ideal for making payments, transferring funds across borders, and as a stable unit of account within the crypto ecosystem. Many traders use stablecoins to “park” their funds during times of high market volatility without having to convert back to traditional currency.

Control and Centralization

The way they are managed differs significantly.

  • Bitcoin: Fully decentralized. No single person, company, or government controls the network. It is maintained by a global community of miners and node operators.
  • Stablecoin: Often centralized. Fiat-collateralized stablecoins are issued and managed by a central entity. This company is responsible for maintaining the reserves that back the coin’s value. This introduces an element of trust in that central issuer.

Supply Mechanism

How new coins are created is another key distinction.

  • Bitcoin: Has a finite supply of 21 million coins, which are released at a predictable rate through mining. This scarcity is a core part of its economic model.
  • Stablecoin: Has a flexible supply. The issuing entity can create or burn coins based on demand to ensure the peg to its underlying asset is maintained. If more people want to buy the stablecoin, more are created; if they sell, coins are taken out of circulation.

Which is Better for You?

Choosing between stablecoin vs. Bitcoin depends entirely on your financial goals and your comfort level with risk.

Consider Bitcoin if:

  • You are a long-term investor: If you believe in the future of decentralized finance and are willing to hold an asset through price volatility, Bitcoin could be an option.
  • You have a high risk tolerance: Bitcoin’s price can be unpredictable. It offers the potential for high returns, but also carries the risk of significant losses.
  • You want to diversify your portfolio: Some investors add Bitcoin to their portfolios as a way to diversify away from traditional assets like stocks and bonds.

Consider a Stablecoin if:

  • You need a stable digital asset for transactions: If you want to send money, pay for goods and services, or move funds between crypto exchanges without worrying about price changes, a stablecoin is a practical choice.
  • You have a low risk tolerance: Stablecoins are designed to protect your capital from market volatility. They provide the benefits of crypto—fast transactions and low fees—with the stability of traditional currency.
  • You want to earn interest: Many decentralized finance (DeFi) platforms allow you to lend or “stake” your stablecoins to earn a yield, often at higher rates than traditional savings accounts.

A Simpler Way Forward

Understanding the differences between Bitcoin and stablecoins is key to navigating the world of digital currencies. Bitcoin offers the potential for growth as a decentralized asset, while stablecoins provide the reliability and stability of traditional money in a digital form. Your choice depends on whether your priority is investment and speculation or stability and everyday usability.

As you explore digital finance, it’s important to use services you can trust. Whether you’re interested in volatile assets like Bitcoin or stable options, knowing your funds are secure provides peace of mind.

Frequently Asked Questions (FAQs)

What is the main difference between Bitcoin and stablecoins?

Bitcoin is a decentralized digital currency known for its price volatility, while stablecoins are designed to maintain a steady value by being tied (or “pegged”) to an external asset such as the U.S. dollar. Bitcoin is often used as a long-term investment, whereas stablecoins function more like digital cash.

Are stablecoins safer than Bitcoin?

Stablecoins are generally less volatile than Bitcoin because their value is backed by fiat currency, crypto collateral, or managed by algorithms. However, they are not risk-free. Stablecoins can face risks related to their reserve management, transparency, or the stability of the issuing company.

Can you use Bitcoin and stablecoins for everyday transactions?

You can use both, but stablecoins are better suited for everyday transactions because their value remains stable. Bitcoin’s price can fluctuate significantly within hours, which makes it less practical for daily purchases.

How do stablecoins maintain their value?

Stablecoins maintain their value through reserves (like U.S. dollars, gold, or crypto assets) or through algorithmic mechanisms that adjust the supply of the coin. The goal is to keep the price as close as possible to the asset it is pegged to—usually 1:1 with a fiat currency.

Which is better for investing: Bitcoin or stablecoins?

Bitcoin may be a better choice for long-term investors who are comfortable with risk and believe in its potential for value growth. Stablecoins are not typically used for investment growth—they are better for stability, transfers, and earning interest through DeFi platforms.

Can you earn interest with stablecoins?

Yes. Many DeFi platforms and some centralized crypto services offer interest on stablecoins through lending or staking. The rates are often higher than traditional savings accounts, but returns depend on the platform and come with associated risks.

Is Bitcoin really decentralized?

Yes. Bitcoin operates on a global, decentralized network with no central authority. Transactions are verified by miners and recorded on a public blockchain. Most stablecoins, however, are issued and managed by centralized companies.

Are stablecoins always backed 1:1 with real money?

Not always. Fiat-collateralized stablecoins typically aim for full 1:1 backing with assets like U.S. dollars. Crypto-collateralized stablecoins are backed by other cryptocurrencies and are often over-collateralized. Algorithmic stablecoins are not backed by reserves and instead use code to try to maintain their peg.

Which should I choose if I want predictable value?

A stablecoin is the more predictable option because it is designed to keep a stable price. It’s useful if you want to avoid market volatility or need a reliable asset for payments and transfers.

Can stablecoins replace traditional money?

Stablecoins can mimic many features of traditional money—speed, low fees, and stability—but they rely on technological infrastructure and regulatory acceptance. They complement traditional money rather than fully replacing it at the current stage.

If you are exploring the world of cryptocurrency, you may have questions about the different types of digital assets available. Two terms you will often hear are Ethereum and stablecoins. It is important to understand the difference between them.

This post will explain what Ethereum is, what stablecoins are, and why Ethereum is not a stablecoin. Knowing this difference is essential for anyone looking to understand the cryptocurrency market. We will provide clear definitions and simple comparisons to help you feel confident in your knowledge.

What is Ethereum?

Ethereum is a global, decentralized platform for digital money, global payments, and applications. It is best known for its native cryptocurrency, Ether (ETH). When people refer to buying or selling “Ethereum,” they are usually talking about Ether.

The price of Ether is volatile. This means its value can change quickly and unpredictably based on supply and demand in the market. Many factors influence its price, including technological updates, investor sentiment, and broader economic trends. Because of this volatility, Ether is considered a speculative asset. People buy it hoping its value will increase over time.

Beyond being a digital currency, the Ethereum network allows developers to build and run decentralized applications (dApps) and smart contracts. These are programs that run exactly as programmed without any possibility of downtime, fraud, or third-party interference. This functionality makes Ethereum a foundational layer for much of the decentralized finance (DeFi) ecosystem.

What is a Stablecoin?

A stablecoin is a type of cryptocurrency designed to have a stable value. Unlike volatile cryptocurrencies like Ether or Bitcoin, a stablecoin’s price is “pegged” or tied to a more stable asset. This asset is often a fiat currency, such as the U.S. dollar. For example, one unit of a dollar-pegged stablecoin aims to be worth exactly $1.

To maintain this stable value, stablecoin issuers hold reserves of the asset they are pegged to. If a stablecoin is backed by the U.S. dollar, the issuer holds an equivalent amount of U.S. dollars in a bank account. This ensures that for every stablecoin in circulation, there is a real dollar to back it up. This backing gives users confidence that they can redeem their stablecoins for fiat currency at a 1:1 ratio.

The primary purpose of a stablecoin is to offer the benefits of a cryptocurrency—such as fast, low-cost global transactions—without the price volatility. This makes them useful for daily transactions, trading, and as a store of value within the crypto ecosystem.

Key Differences Between Ethereum and Stablecoins

Now that we have defined both terms, let’s compare them directly to understand why Ethereum is not a stablecoin.

Volatility vs. Stability

The most significant difference is price stability.

  • Ethereum (ETH): The price of Ether is highly volatile. Its value fluctuates daily, driven by market speculation and demand. This makes it a high-risk, high-reward investment.
  • Stablecoins: Stablecoins are designed for stability. Their value is pegged to a stable asset, like the U.S. dollar, to minimize price fluctuations.

Primary Purpose

Their intended uses are also very different.

  • Ethereum (ETH): Ether serves two main functions. It acts as a digital currency for transactions on the Ethereum network and is used to power decentralized applications and smart contracts. It is also a speculative investment.
  • Stablecoins: The main purpose of stablecoins is to function as a stable medium of exchange and a store of value. They bridge the gap between traditional finance and the crypto world, allowing users to transact without worrying about price swings.

How Value is Determined

The source of their value is fundamentally different.

  • Ethereum (ETH): The value of Ether comes from supply and demand on the open market, as well as the utility and growth of the Ethereum network itself.
  • Stablecoins: The value of a stablecoin is derived from the reserves backing it. A stablecoin pegged to the U.S. dollar holds its value because it is backed by an equivalent amount of U.S. dollars.

Are There Stablecoins on the Ethereum Network?

Yes, and this is an important point that can cause confusion. While Ethereum (ETH) itself is not a stablecoin, the Ethereum network hosts many of the most popular stablecoins.

Because Ethereum supports smart contracts, developers can create new tokens that run on its blockchain. These are known as ERC-20 tokens. Many major stablecoins, including Tether (USDT), USD Coin (USDC), and Dai (DAI), are ERC-20 tokens.

This means you can hold, send, and receive these stablecoins using an Ethereum wallet. They benefit from the security and decentralization of the Ethereum network. However, they are distinct assets from Ether (ETH). Owning a stablecoin like USDC on the Ethereum network is not the same as owning Ether.

Making Informed Choices

Understanding that Ethereum is not a stablecoin is a key step in navigating the world of digital assets.

  • Ethereum (ETH) is a volatile cryptocurrency that powers a global, decentralized computing platform. It offers the potential for high returns but comes with significant risk.
  • Stablecoins are a class of cryptocurrency designed to maintain a stable value by being pegged to another asset, like the U.S. dollar. They provide a stable medium of exchange within the crypto ecosystem.

Both play important roles, but they serve different needs. By knowing the difference, you can make more informed decisions that align with your financial goals.

Frequently Asked Questions (FAQ)

Is Ethereum a stablecoin?

No. Ethereum’s native cryptocurrency, Ether (ETH), is volatile and its value changes based on market conditions. Stablecoins, by contrast, are designed to keep a steady value, usually pegged to a fiat currency like the U.S. dollar.

Why is Ether (ETH) considered volatile?

Ether’s price can rise or fall quickly due to factors like investor demand, technological updates, economic news, and market speculation. These fluctuations make ETH a speculative asset rather than a stable one.

What makes a stablecoin “stable”?

Stablecoins maintain a steady value by being backed or “pegged” to a reserve asset such as U.S. dollars. Issuers hold real assets in reserve so that each stablecoin can be redeemed at a 1:1 ratio for the asset it represents.

Are there stablecoins on the Ethereum network?

Yes. Many of the most popular stablecoins—such as USDT, USDC, and DAI—are built on the Ethereum network as ERC-20 tokens. They run on Ethereum but are completely separate from Ether (ETH).

Is owning a stablecoin on Ethereum the same as owning Ether?

No. Holding a stablecoin like USDC or USDT on Ethereum means you own a token built on the Ethereum blockchain. Ether is the native cryptocurrency of the network and serves different functions.

Why do people use stablecoins instead of Ethereum?

People often use stablecoins for transactions, trading, and saving because their value doesn’t fluctuate. Ethereum, meanwhile, is used to power decentralized applications, pay transaction fees, and invest for long-term potential.

How is the value of Ether determined?

Ether’s value is driven by supply and demand on the open market, along with the growth, usage, and development of the Ethereum network. It is not tied to any external asset.

Which stablecoins run on Ethereum?

Some of the most widely used stablecoins on Ethereum include:

  • Tether (USDT)
  • USD Coin (USDC)
  • Dai (DAI)

Is Ethereum better than stablecoins?

Neither one is “better”—they serve different purposes. Ethereum is useful for decentralized applications and long-term investing, while stablecoins are ideal for stable transactions and avoiding price volatility.

Finding a secure place to store your digital currency is essential. If you own USD Coin (USDC), you need a compatible wallet that keeps your assets safe while allowing you to send, receive, and manage them easily.

This guide will explain what a USDC wallet is and how to choose the right one for your needs. We will cover the different types of wallets available and list some of the most reliable options on the market. By the end, you will have the information you need to select a wallet with confidence.

What is a USDC Wallet?

A USDC wallet is a digital wallet that allows you to store and manage your USD Coin. Since USDC is a stablecoin that runs on multiple blockchain networks, a compatible wallet must support the specific network your USDC is on, such as Ethereum (ERC-20), Solana, or Polygon.

Think of it like a bank account for your digital currency. It provides you with a unique address to receive funds and lets you send USDC to others. Good wallets also offer security features to protect your assets from unauthorized access.

Types of USDC Wallets

There are several types of wallets, each offering different levels of security and convenience. Understanding the differences will help you choose the best fit for you.

Software Wallets (Hot Wallets)

Software wallets are applications you can install on your computer or smartphone. They are often called “hot wallets” because they are connected to the internet, which makes sending and receiving crypto quick and easy.

  • Desktop Wallets: These are installed on your laptop or desktop computer, giving you full control over your funds.
  • Mobile Wallets: These are apps for your smartphone, allowing you to manage your USDC on the go. They are very convenient for daily transactions.
  • Web Wallets: These are accessed through a web browser and are often the simplest to use. However, they can be less secure if the provider’s servers are compromised.

Software wallets are great for beginners and those who need frequent access to their funds.

Hardware Wallets (Cold Wallets)

Hardware wallets are physical devices that store your private keys offline. They are known as “cold wallets” because they are not connected to the internet, which makes them highly secure against online threats like hacking and malware.

When you want to make a transaction, you connect the device to your computer or phone, approve the transaction on the device itself, and then disconnect. This process ensures your keys are never exposed online. Hardware wallets are the recommended choice for storing large amounts of cryptocurrency or for long-term holding.

Exchange Wallets

When you buy USDC on a cryptocurrency exchange like Coinbase or Binance, the funds are typically held in a wallet provided by the exchange. While this is convenient for trading, it means you do not have full control over your private keys. The exchange holds them for you.

This is known as a custodial wallet. It is generally not recommended to store large amounts of crypto on an exchange long-term, as exchanges can be targets for hackers.

How to Choose a USDC Wallet

Selecting the right wallet depends on your priorities. Here are the key factors to consider:

Security Features

Security is the most important aspect of any crypto wallet. Look for wallets that offer features like two-factor authentication (2FA), PIN codes, and biometric verification (fingerprint or face ID). For hardware wallets, ensure the device is purchased from the official manufacturer to avoid tampering.

You should also check if the wallet gives you control over your private keys. A non-custodial wallet ensures that only you can access your funds.

Blockchain Support

USDC is available on several different blockchains. The most common is Ethereum, where USDC exists as an ERC-20 token. However, it is also on other networks like Solana, Polygon, Avalanche, and TRON. Make sure the wallet you choose supports the specific blockchain network your USDC is on. Most popular wallets support multiple networks, but it’s always best to check.

Ease of Use

A good wallet should have a clean, intuitive interface that makes it easy to navigate. Sending, receiving, and checking your balance should be straightforward. If you are new to crypto, look for a wallet with a simple setup process and clear instructions.

Customer Support

If you run into any issues, reliable customer support is crucial. Check what kind of support options the wallet provider offers, such as email, live chat, or a comprehensive help center. Reading user reviews can give you an idea of how responsive and helpful their support team is.

Popular USDC Compatible Wallets

Here are some of the most trusted and widely used wallets that support USDC:

Trust Wallet

Trust Wallet is a popular mobile wallet that supports a vast range of cryptocurrencies, including USDC on multiple blockchains. It is non-custodial, meaning you have full control of your private keys. Its user-friendly interface makes it a great option for beginners, and it includes a built-in browser for accessing decentralized applications (dApps).

MetaMask

MetaMask is one of the most popular wallets for interacting with the Ethereum ecosystem. It is available as a browser extension and a mobile app. While it was originally for Ethereum, MetaMask can be configured to support other networks where USDC is available, like Polygon and Avalanche. It is a favorite among those who use dApps and DeFi platforms.

Ledger

Ledger is a leading manufacturer of hardware wallets, with popular models like the Ledger Nano S Plus and Ledger Nano X. These devices offer top-tier security by keeping your private keys offline. You can manage your USDC through the Ledger Live application, which provides a secure and user-friendly interface for your desktop or mobile device.

Trezor

Trezor is another highly respected hardware wallet brand. Like Ledger, Trezor devices store your private keys offline, protecting them from online threats. The Trezor Model One and Model T both support USDC and can be managed through the Trezor Suite application. It’s a strong choice for anyone prioritizing security for their long-term holdings.

Coinbase Wallet

Coinbase offers a non-custodial wallet that is separate from its exchange. Coinbase Wallet gives you full control over your private keys while integrating smoothly with the Coinbase exchange. It supports thousands of tokens, including USDC on various networks, and provides a simple way to explore the world of dApps and DeFi.

Securing Your Digital Assets

Choosing a reliable USDC wallet is the first step toward securing your digital assets. No matter which wallet you select, remember to follow security best practices. Always keep your private keys and recovery phrase in a safe, offline location. Never share them with anyone, and be cautious of phishing scams.

By taking these precautions and selecting a wallet that fits your needs, you can manage your USDC with peace of mind

Frequently Asked Questions (FAQs)

What is USDC?

USDC (USD Coin) is a type of stablecoin that is pegged to the value of the US dollar. This means that 1 USDC is intended to always equal $1, providing a reliable digital currency for transactions and storage.

Are hardware wallets better than software wallets for storing USDC?

Hardware wallets are generally considered more secure because they store your private keys offline, protecting them from online threats like hacking or malware. However, software wallets can still be a good option for everyday transactions or if you prefer convenient access on your mobile or desktop.

Can I recover my USDC if I lose my wallet?

You can recover your USDC if you have securely stored your recovery phrase or seed phrase. This phrase allows you to restore access to your wallet on a new device. If you lose this information, recovering your funds may not be possible.

Is there a fee for sending or receiving USDC?

While USDC itself does not charge fees for transactions, you might still incur blockchain network fees (e.g., Ethereum gas fees) depending on the network you use for the transaction.

How do I choose the best wallet for USDC?

The best wallet for USDC depends on your specific needs. Hardware wallets are ideal for long-term storage and maximum security, while software wallets are more suited for active trading and frequent transactions. Consider factors like security, ease of use, and compatibility with the blockchain network you plan to use.

Is USDC safe to use?

USDC is designed to be a secure and stable digital currency. It is backed by reserves of fiat currency and is audited regularly to ensure transparency and trustworthiness. However, your safety also depends on how well you secure your wallet and private keys.

As modern finance becomes more and more digital, many consumers wonder if cryptocurrencies could take the place of traditional currencies. However, most cryptocurrencies are still too volatile for everyday use. Prices for Bitcoin and Ethereum can rise and fall drastically in minutes, making them unreliable for payments or savings. 

Stablecoins were created to address this problem. They are a digital asset designed to provide users with the benefits of digital money without the wild price swings of cryptocurrencies. Understanding stablecoins is essential if you want to use a digital currency for everyday payments and savings. 

We’ve created this guide at Remitly to explain what stablecoins are, how they work, the different types available, and why they matter in today’s digital economy. Whether you’re new to crypto or just curious, read on to learn the basics of stablecoin.

What is a stablecoin, exactly?

A stablecoin is a type of cryptocurrency that maintains a steady value by being pegged to another currency, such as the US dollar, the Euro, or even gold. Its main purpose is to stay stable and avoid the price swings that coins like Bitcoin and Ethereum often experience. For example, a stablecoin linked to the US dollar is generally worth $1 at all times. 

Think of it like a casino chip. You exchange your cash for a chip that keeps a fixed value, making it easy to spend. Stablecoins work the same way in the digital world, giving you a simple and predictable way to use, store, and send money online.

How do stablecoins stay stable? 

To remain stable, stablecoins use different backing methods that work like safety nets, helping them keep a steady value even when the crypto market fluctuates.

Here’s a simple breakdown of the four main types of stablecoins and how each one stays stable:

Fiat-collateralized stablecoins

These are the most common stablecoins. Each is backed by an equal amount of traditional or fiat currency, like the US dollar, kept safely in a bank account. This means that for every stablecoin in circulation, there’s a matching dollar (or another fiat currency) set aside to support it. 

So when you use fiat-collateralized stablecoins, you can trust each coin is backed one-to-one with real-world currency. Popular examples include Tether (USDT), issued by Tether Limited, and USD Coin (USDC), created by Circle and Coinbase

Crypto-collateralized stablecoins

Instead of being backed by cash, these stablecoins are supported by other cryptocurrencies. Because crypto prices can swing quickly, these stablecoins use extra collateral to keep their value steady. 

This means you may need to lock up more crypto than the actual value of the stablecoins you want to create. For example, you might deposit $200 worth of cryptocurrency to mint $100 worth of a stablecoin like Dai. The extra collateral acts as a buffer, helping the stablecoin stay stable even if the crypto used as backing drops in price. 

Commodity-collateralized stablecoins

These stablecoins are backed by real-world assets like gold, silver, or oil. Each coin represents a claim to a specific amount of that commodity, allowing you to benefit from its value without having to store anything physically.

Stablecoins like Paxos Gold (PAXG) give you digital ownership of gold, with each coin linked to one gram of real gold held in a secure vault. This backing gives the stablecoin true value, appealing to those who want a safer, traditional asset in digital form. It’s a simple way to get exposure to commodities without the hassle of handling them yourself.

Algorithmic stablecoins

Algorithmic stablecoins work differently because they aren’t backed by assets. Instead, they use smart contracts—automated programs on a blockchain—to control the coin’s supply. If the price goes above the target value, the system creates more coins to bring it down. If it drops below the target, the supply shrinks to push the price back up.

This fully automated approach is innovative, but also riskier. A well-known example is TerraUSD (UST), which collapsed in 2022 after losing its dollar peg and caused large losses for users. This shows that while algorithmic stablecoins can be creative solutions, their stability depends entirely on the algorithm performing as expected.

Why do people use stablecoins?

Before we discuss the risks, let’s take a closer look at how people use stablecoins.

A safe haven from crypto volatility

Stablecoins give investors a way to protect their money during market swings. For example, if you hold Bitcoin and see the price dropping, you can convert it into USDC or USDT to preserve value without leaving the crypto ecosystem. This keeps funds accessible for future trades or investments without having to cash out in dollars.

Everyday transactions

Stablecoins are increasingly used for daily payments and peer-to-peer transfers. Imagine paying a friend back for lunch while traveling abroad. Sending USDC can be faster and cheaper than traditional bank transfers. Some online merchants, like Travala.com and Shopify, also accept stablecoins, which reduces reliance on credit cards and high processing fees.

Accessing Decentralized Finance (DeFi)

Stablecoins play a key role in DeFi because their stable value makes financial planning safer. You can lend Dai on a DeFi platform and earn interest without worrying about sudden price drops. They’re also used as collateral to borrow other cryptocurrencies, giving you more control over their digital assets.

Hedging against inflation

In countries where local currencies lose value quickly, stablecoins can serve as a hedge against inflation. For example, if you’re in Mexico, you can convert pesos into a USD-backed stablecoin to protect savings from high inflation. This helps maintain purchasing power and safeguard long-term funds without relying entirely on banks.

Simplifying cross-border commerce

Stablecoins are also an attractive choice for businesses involved in international money transfers. For example, if you’re a designer in the Philippines, you could receive USDT from a US client within minutes, avoiding bank fees and long transfer times. This streamlines global transactions and makes commerce more efficient.

Supporting smart contract applications

Stablecoins are ideal for automated blockchain transactions that need a predictable value. For example, on a decentralized insurance platform, you can set payments in USDC so the recipients get a fixed amount regardless of market swings. 

You can also use stablecoins for recurring subscriptions or escrow services, ensuring reliable and smooth executions of agreements.

What are the risks and concerns?

Stablecoins bring stability and convenience to the crypto world, but they come with certain risks:

  • Transparency of reserves: Users need to be sure that there is actually enough currency backing the stablecoins. Independent audits can help prove that reserves actually exist and each coin is fully supported. 
  • De-pegging risk: Even stablecoins can temporarily lose their value, especially during market turbulence. For example, an algorithmic or crypto-backed stablecoin might drop below its target if many people sell at once or if the backing assets lose value.
  • Regulatory scrutiny: Governments and financial authorities are closely watching stablecoins. New rules could affect how they’re issued, traded, or used, and might require stricter reporting.
  • Counterparty risk: Holding a stable coin requires that you trust the issuer, or, in some cases, a smart contract, to manage the system responsibly. If the issuer goes bankrupt or a smart contract malfunctions, you could lose some or all of your digital currency holdings. 
  • Limited adoption and liquidity: Not all stablecoins are widely accepted. Some may not be available on major exchanges or might have low trading volumes, making it harder to convert them into cash or other cryptocurrencies.

A stable bridge to the future

Stablecoins help solve the crypto volatility problem that makes many cryptocurrencies hard to use. They’re tied to assets like the US dollar, gold, or even other cryptocurrencies. This helps maintain a predictable value that users can trust. They make it easier to avoid sudden price swings, store value, and join the digital finance world with confidence.

By being a stable digital asset, stablecoins enable fast, low-cost transactions and power major parts of the DeFi ecosystem, including lending, borrowing, and trading. While they still come with risks, stablecoins serve as an important bridge between traditional finance and digital assets, keeping things more predictable.

FAQs

Is stablecoin a good investment?

Stablecoins aren’t meant to grow in value like regular investments. Their main purpose is to stay at a steady price, which makes them useful for transactions or short-term storage of money. If you’re hoping for long-term growth, other cryptocurrencies or investment options may be a better fit.

Is Bitcoin a stablecoin?

No, Bitcoin is not a stablecoin. Its price moves up and down based on market supply and demand, which makes it more volatile. Stablecoins are designed to stay at a consistent value, giving users more predictability. 

Are stablecoins safe?

The safety of a stablecoin depends on how it’s backed. Stablecoins supported by real-world assets and issued by trusted companies are usually considered more secure. Algorithmic stablecoins can be riskier because they depend entirely on code and market behavior. Be sure to research the issuer and understand what supports the coin.

Where can I buy stablecoins?

You can buy popular stablecoins like USDT and USDC on most major cryptocurrency exchanges, such as Coinbase, Binance, and Kraken. Some crypto wallets and payment apps also let you purchase them directly. Just be sure to use a secure platform and check fees before buying.

Can stablecoins be used internationally?

Yes, stablecoins can be sent across borders almost instantly and often with much lower fees than traditional banks. They’re especially helpful for international payments and remittances, making them a practical option for anyone dealing with multiple currencies. 

Do stablecoins earn interest?

Some stablecoins can earn interest when you use them on lending platforms or certain DeFi apps. The interest rate depends on the platform and the specific stablecoin you choose. Be sure to read the terms carefully and understand the risks before depositing your coins to earn interest.

Planning a move to Portugal? You’re not alone. Attracted by the country’s world-class healthcare, rich culture, and affordable cost of living, the American expat community in Portugal has more than tripled since 2019.

At Remitly, we understand that choosing a place to live in a new country can be daunting. This guide takes a look at some of the most popular destinations for American expats in Portugal, from bustling tech hubs to laid-back coastal towns.

What are the best cities for expats in Portugal?

In recent years, nearly 15,000 Americans have moved to Portugal and made their new home in vibrant coastal communities and historic inland spots.

We’ve evaluated each Portuguese city based on housing costs, job markets, healthcare facilities, expat communities, and quality of life to help you make an informed choice.

Lisbon: cosmopolitan, historic, and vibrant

Portugal’s capital city combines historic charm with modern infrastructure, making it the country’s most popular destination for American expats. In addition to its vibrant culture and friendly locals, Lisbon offers a variety of neighborhoods that cater to different lifestyles, from historic Alfama to the contemporary hub of Bairro Alto. For those considering life in Europe, it’s often compared to the top cities in Spain for expats, such as Barcelona and Madrid, which also boast unique attractions and amenities. With affordable living and stunning landscapes, it’s no wonder Lisbon is a favored choice for newcomers looking to experience life abroad.

Pros

  • Large and diverse expat community, making it easy to get to know other Americans and English speakers.
  • Thriving startup and digital nomad scene, providing job opportunities for skilled professionals.
  • Excellent international connectivity, with the country’s largest international airport practically in the city.

Cons

  • More expensive than any other Portuguese city, particularly in terms of housing.
  • Very crowded all year round, especially in the most touristy areas.

Outside the city center, Americans often choose to settle in neighboring Cascais, Sintra, or Setúbal, all of which offer access to Lisbon’s opportunities while affording different lifestyle advantages.

Porto: proud, soulful, and artistic

Also known as “Invicta” (the Undefeated), the largest city in Northern Portugal offers a more authentic experience that appeals to many U.S. expats.

Pros

  • Rich history and cultural heritage, including a UNESCO-protected historic center, outstanding local cuisine, and world-famous port wine culture.
  • Growing creative industry with numerous art galleries, museums, festivals, and events
  • Strong sense of community in a more relaxed, traditional atmosphere.

Cons

  • More rainfall and cooler temperatures than southern Portugal.
  • Gentrification has pushed up rent prices, making it difficult for both locals and expats to afford housing, even across the Douro River in Vila Nova de Gaia.

The family-friendly Foz district offers beautiful Atlantic beaches and proximity to top international schools, while the nearby Douro Valley boasts world-class wineries and stunning landscapes.

Faro: sunny, relaxed, and international

With more than 300 days of sunshine a year and a significantly lower cost of living than Lisbon and Porto, Faro attracts Americans seeking the right balance of urban convenience and beach lifestyle.

Pros

  • Large English-speaking population and established international community.
  • Warm climate that allows for a year-round outdoor lifestyle, including easy access to beautiful beaches and world-class golf courses.
  • One of Portugal’s safest major cities, with a laid-back Mediterranean vibe that appeals to retirees and families.

Cons

  • Seasonal influx of tourists in the summer can be extremely disruptive.
  • Job market primarily focused on tourism and hospitality.

From Faro, American expats can travel the entire Algarve region—from the Spanish border in the east to Sagres in the west—exploring vibrant resort towns like Portimão, Lagos, and Praia da Luz.

Coimbra: academic, traditional, and accessible

Home to the University of Coimbra, one of the oldest continuously operating universities in the world, the city combines academic life with exceptional healthcare and a strategic location in Central Portugal.

Pros

  • Vibrant student atmosphere, creating a unique blend of traditional city life and international flair.
  • World-class healthcare facilities, including the university’s renowned clinical research and medical center.
  • Central position at the heart of Portugal, with both Porto and Lisbon less than two hours away.

Cons

  • Pace of life is dictated by the academic calendar, with some areas feeling deserted during holidays.
  • Housing market is heavily geared towards students, making long-term rentals difficult to find.

Coimbra boasts a mild climate and both the beaches of the Silver Coast and the mountains of Serra da Estrela at a stone’s throw, while its historic center offers centuries-old cafés, bookstores, and traditions.

Funchal: subtropical, scenic, and sophisticated

Madeira’s capital offers a year-round spring climate, cutting-edge digital infrastructure, and dramatic ocean views, making it increasingly popular with American digital nomads and retirees.

Pros

  • Perfect climate with temperatures rarely dropping below 65°F (18°C) or rising above 80°F (27°C).
  • Special economic zone offers significant business opportunities and tax benefits for certain professions
  • Blend of European sophistication and tropical island life, with centuries-old gardens, traditional markets, and waterfront dining.

Cons

Madeira’s natural beauty offers everything from stunning beaches to volcanic pools—a treasure island for expats looking for adventure.

Braga: innovative, spiritual, and energetic

The second-largest city in Northern Portugal blends ancient religious heritage with cutting-edge technological education, all while ranking as the country’s top city for English proficiency.

Pros

  • One of Europe’s top startup hubs, with a rapidly growing entrepreneurial ecosystem.
  • Unique religious heritage, with famous Holy Week celebrations attracting thousands of tourists from Spain and beyond.
  • Strong international student community, creating a young, multilingual atmosphere.

Cons

  • Limited public transportation, with 70% of the population needing to drive daily.
  • Religious diversity is respected, but the strong religious presence may not appeal to all expats.

Braga’s technology park has become a magnet for both established companies and innovative start-ups, while the University of Minho’s engineering programs attract students and professionals from around the world.

Évora: medieval, peaceful, and authentic

Perhaps the smallest big city in Portugal, this UNESCO World Heritage Site offers a genuine slice of Portuguese life in the heart of Alentejo.

Pros

  • One of the best-preserved historic city centers in Europe, completely enclosed by a medieval wall.
  • Access to what many consider the country’s premier wine region, with miles of vineyards and olive groves.
  • Unhurried atmosphere, perfect for those seeking total immersion in Portuguese culture.

Cons

  • Intense summer heat with temperatures regularly exceeding 95°F (35°C).
  • Smaller expat community than other major cities, despite the low cost of living.

Évora offers an authentic Portuguese experience, where Roman temples sit next to Gothic cathedrals and traditional bakeries share streets with wine bars.

Tips for Americans moving to Portugal

Ready to make the move? These are some of the things to keep in mind as you prepare:

  • Visa requirements: If you plan to stay in Portugal for more than 90 days, you’ll need a visa. Popular options include the D7 visa for retirees and others with passive income, the D8 Digital Nomad visa for remote workers, and the D2 for entrepreneurs. There’s also a Golden Visa route for investors.
  • Healthcare: Portugal has an excellent public healthcare system that is available to all legal residents—you just need to register at your local health center. However, many expats choose to take out private insurance (typically 40-100 EUR per month) to have shorter waiting times and greater access to English-speaking doctors.
  • Language: English proficiency is generally very high in Portugal, but learning some Portuguese will make everyday life much easier. Local language schools offer intensive courses, and language-exchange meetings in cafés can provide opportunities for practice.
  • Daily schedule: Adjust to the Portuguese schedule—many businesses close in the middle of the day for lunch, usually between 1:00 and 2:30 p.m. Dinner is also later than you may be used to, often around 9 p.m. Nightlife doesn’t really get started until 11 p.m. or midnight.
  • Banking and finances: Open a Portuguese bank account and get a Portuguese credit card to handle daily expenses and housing payments. You will need a Portuguese tax number (NIF), which you can obtain from your local tax office (Finanças).

Download the Remitly app to manage your international finances with confidence. Our exchange rates and reliable transfers help you maintain strong financial connections while building your new life abroad.

FAQs about living in Portugal

Where do most U.S. expats live in Portugal?

Nearly 15,000 Americans now call Portugal home. About 40% live in the Lisbon metropolitan area, including popular spots like Cascais and Sintra. The Algarve region and Porto are the next most popular destinations, each hosting around 20% of the American community.

What is the best place for Americans to retire in Portugal?

The best retirement destination depends on the lifestyle you’re seeking in your golden years.

High quality of life and luxury real estate developments in Melides are drawing American celebrities like George Clooney and Sharon Stone to this emerging coastal paradise.

On the Silver Coast, the colorful canals of Aveiro—known as the Venice of Portugal—and the gentle waters of São Martinho do Porto provide more affordable living.

In the Algarve, the more established expat communities of Vale do Lobo and Quinta do Lago offer exclusive golf resorts and retirement villages. The eastern towns of Tavira and Castro Marim are quieter alternatives.

Can I live in Portugal speaking only English?

You can manage daily life in major cities and tourist areas with English alone. However, outside urban centers, even simple tasks like grocery shopping may require basic Portuguese. Check out our guide to the best language learning apps to help you get started.

What should Americans know about Portuguese work culture?

Like most Southern European countries, Portuguese work culture emphasizes work-life balance over rigid schedules. Meetings often begin with casual conversation, and lunch breaks can last up to two hours. Salaries are typically lower than comparable U.S. positions, but the work week is normally 30-40 hours.

If you’ve ever dined at an African restaurant or visited friends from West or Central Africa, you’ve likely seen fufu on the table. Fufu is a soft, stretchy dough served alongside fragrant soups and stews.Fufu is part of the cultural fabric connecting millions of people across Africa and the African diaspora. For centuries, this humble, hand-pounded dish has nourished families and carried the essence of history, heritage, and hospitality in every bite.

This Remitly guide explores where fufu comes from, how it developed, what makes it so beloved, and how it spread around the world. You’ll also learn about its regional variations, the traditions surrounding its preparation, and how modern cooks are keeping it alive in new ways.

The ancient roots of fufu

To understand fufu’s story, we have to go back thousands of years to Western and Central Africa, areas today that include Ghana, Nigeria, the Democratic Republic of the Congo, and Cameroon.

Long before written records, communities in these regions cultivated starchy root vegetables such as yams, cassava, plantains, and cocoyam. These ingredients were nutritious, energy-rich, and ideal for the tropical climates where they grew. Archaeological evidence shows that yam cultivation dates back more than 5,000 years in parts of West Africa, making it one of the oldest domesticated crops on the continent.

But roots like yams and cassava are dense and fibrous in their raw form. Early African cooks developed pounding techniques, using wooden mortars and pestles, to soften these starches after boiling. This method transformed them into smooth, dough-like textures that were easier to eat and digest. 

Over time, this pounding process became not just a cooking method but a cultural ritual. In many villages, the rhythmic sound of pestles striking mortars at dusk signaled that dinner was near.

Fufu, as it’s widely known today, likely originated in Ghana. However, preparations emerged separately in other parts of the continent, showing how different ethnic groups independently found ways to make their local ingredients both nourishing and communal.

Regional variations across Africa

Across Africa, you’ll find countless versions of fufu, each one shaped by local traditions, climate, and community. While the concept is the same—a smooth, starchy accompaniment eaten with soups or stews—the ingredients and preparation methods vary quite a bit from one region to another.

West Africa

West Africa is often considered the heartland of fufu. Here, the dish is both a daily staple and a ceremonial food, served at weddings, festivals, and family gatherings. 

Ghana

Ghanaian fufu is typically made with boiled cassava and plantains, pounded together until the mixture turns silky and stretchy. Some regions substitute yams or blend in cocoyam for a softer texture. Fufu is commonly eaten with light soup, groundnut (peanut) soup, or palm nut soup. Many families still use a large, wooden mortar and pestle, keeping the traditional preparation alive.

Nigeria

In Nigeria, the word “fufu” can refer specifically to fermented cassava dough, but the country is also home to several related dishes. Pounded yam is a favorite in the southwest, especially among Yoruba households, while amala (made from yam flour) has a darker color and earthy taste. Eba, made from garri (dried cassava granules), is common nationwide for its convenience. Each type of fufu complements regional soups such as egusi, ogbono, or vegetable soup.

Togo

In Togo, fufu holds a deeply symbolic place, and some people see it as the country’s national dish. Typically made from yams or cassava, maize sometimes replaces yams to make akume, a slightly sweeter variation. It’s traditionally served hot in communal bowls with soups like groundnut or palm nut, and eaten by hand, using the thumb to scoop and savor each bite.

Burkina Faso

Fufu is a common dish for communal gatherings in Burkina Faso. It’s made by pounding cassava, plantains, and yams into a smooth dough, then blending in millet flour for a slightly nuttier flavor and firmer texture. This addition sets Burkinabe fufu apart from other West African versions. It’s usually paired with rich vegetable, meat, or fish sauces, which can be just as important as the fufu itself.

Central Africa

Across Central Africa, fufu variations reflect agricultural diversity and deep-rooted traditions. Ingredients include cassava, plantains, millet, and sorghum, with each country shaping the dish in its own way.

Cameroon and the Republic of the Congo

In Cameroon and the Republic of the Congo—not to be confused with the Democratic Republic of the Congo—cassava is the base for many fufu-style dishes. The cassava is often fermented before being boiled and pounded, giving it a tangy flavor and springy texture. It’s served with vegetable stews, peanut-based sauces, or grilled fish. Communal preparation remains common, with neighbors taking turns pounding and stirring.

Chad

A similar dish known as boule is a national staple in Chad, made from millet or sorghum flour. Mixed with water, fermented overnight, and shaped into round loaves, it’s steamed or cooked over an open fire, and eaten with sauces made from okra, peanuts, or vegetables. In the south of the country, cassava sometimes replaces millet, while urban variations might include butter or eggs. Boule embodies daily life, farming traditions, and family gatherings.

East Africa

Although fufu didn’t originate in East Africa, similar starchy dishes exist under different names, serving the same cultural and social function of bringing people together at the table. Local ingredients like maize, sorghum, and millet thrive in the region’s drier climates, where cassava and yams don’t grow so easily.

Uganda

In Uganda, posho, also known as kwon in some regions depending on the grain used, is made from maize flour and water, stirred over heat until thick and firm. Served with bean stews, greens, or groundnut sauces, it’s inexpensive, filling, and versatile.

Kenya and Tanzania

In Kenya and Tanzania, ugali serves a similar role. Made from maize flour, it’s slightly drier than traditional fufu but eaten the same way. It’s a beloved part of the nation’s cuisine.

South Sudan

In South Sudan, asida or kisra, made from sorghum or millet flour, is paired with lamb or vegetable stews, reflecting the adaptation of staple dishes to the local environment.

Region Common base ingredients Popular names
Ghana Cassava, plantain Fufu
Nigeria Yams, cassava, plantain Pounded yam, eba, amala
Cameroon Corn flour Fufu corn
Republic of the Congo Cassava Fufu de manioc
Democratic Republic of the Congo Cassava Fufu, fufu de manioc
Togo Yams, cassava, maize Fufu, akume
Burkina Faso Cassava, plantain, yam, millet flour Fufu
Chad Millet, sorghum, cassava Boule
Uganda Maize flour Posho
Kenya and Tanzania Maize flour Ugali

The cultural heart of African communities

In African homes, fufu is rarely just a meal. Preparing it is often a communal act: one person pounds, another folds. 

Serving and eating it together are just as meaningful. It’s usually eaten with your hands, not utensils, which strengthens a sense of connection and tradition. You pinch off a small piece, shape it into a ball, and dip it into flavorful soup, echoing generations before you.

Fufu also holds an important place in ceremonies and celebrations. It’s served at weddings, festivals, and family gatherings: moments where food becomes a bridge between the living and their ancestors. Offering fufu to guests continues to symbolize warmth, generosity, and respect.

How fufu traveled the world

Fufu’s global journey began as African people were forcibly taken across the Atlantic through the slave trade, and later through voluntary migration. Through these movements, the traditions surrounding fufu traveled across oceans, continuing to sustain community bonds far from home.During the slave trade, enslaved Africans brought their food knowledge and traditions to the Caribbean and the Americas. Though they often lacked access to their native ingredients, they adapted. In places like Haiti, Jamaica, and the Dominican Republic, cassava and plantains were already cultivated, making it possible to recreate fufu-like dishes. In Cuba and Puerto Rico, fufú de plátano—mashed plantains—became a beloved local dish with obvious African roots.

As African communities migrated voluntarily in later centuries, fufu evolved again, appearing in Caribbean kitchens, South American homes, and African restaurants in cities across Europe, North America, and Asia.

A taste of home away from home

If you’ve ever lived far from home, you know how powerful food can be in keeping traditions alive. For many people across the African diaspora, fufu represents a link to family, memory, and identity. Preparing or sharing fufu abroad often brings a sense of comfort and belonging, reminding people of home even when they’re thousands of miles away.

Across global cities like London, Toronto, and Washington D.C., you’ll find African grocery stores and restaurants that help communities stay connected through food. Maybe you’ve visited one yourself, or you’ve made fufu at home using cassava flour or instant mixes. 

In recent years, globalization and social media have made fufu even more visible. Home cooks, chefs, and content creators have introduced it to international audiences, sparking curiosity and appreciation for its texture, flavor, and meaning. Yet for millions of people, it remains a comforting reminder of home, something deeply familiar in an ever-changing world

Making fufu: traditional vs. modern methods

If you’ve ever watched fufu being made in a traditional kitchen, it’s a mesmerizing sight. The process starts with boiling starchy vegetables until they’re soft. Then they’re pounded in a large wooden mortar with a heavy pestle until smooth. The rhythm is steady and powerful: lift, strike, fold, repeat.

This physical act of pounding takes strength and coordination to achieve the elastic yet firm, smooth but not sticky consistency, so it’s probably not surprising that many modern cooks, especially abroad, often use shortcuts like food processors, stand mixers, or instant fufu flours. 

These days instant fufu, made from dehydrated cassava or yam flour, can be prepared with hot water in minutes. While convenient, some say these lack the subtle flavor and texture of freshly pounded fufu.

Both methods have their place. Traditional fufu preserves cultural authenticity and ceremony, while modern techniques make it accessible worldwide. If you’d like to try making it yourself, start with cassava flour, mix it with boiling water, and stir until it becomes doughy and stretchy. Pair with a flavorful soup and enjoy as African families have for countless generations.

Fufu’s enduring legacy

From its ancient roots in West African villages to its presence on dinner tables across the globe, fufu’s story is one of resilience, adaptation, and unity. It has endured through centuries of change because it embodies more than nourishment—it’s memory, connection, and celebration.

If you’ve never tried fufu before, consider ordering it at a local African restaurant if you’re lucky enough to have one close to where you live, or give making it at home a go. It’s a wonderful way to experience African flavors and appreciate how food preserves identity across continents.

FAQs

Where is fufu originally from?

Fufu originates from West and Central Africa, particularly Ghana, Nigeria, and Cameroon. But it has spread globally through migration and can now be found around the world.

Is fufu the same across all African countries?

No. While the concept is similar, each country and ethnic group has its own version. Ingredients, texture, and names vary widely.

What is fufu made from?

Fufu is typically made from starchy foods like cassava, yams, or plantains. Some regions use corn or cocoyam. These ingredients are boiled, pounded, and shaped into smooth, elastic doughs.

How did fufu spread outside of Africa?

Fufu traveled with Africans during the transatlantic slave trade and later through modern immigration. Over time, it became part of the culinary landscape in the Caribbean, South America, and beyond.

Whether you’re planning a cross-country road trip or simply exploring a new city, renting a car can give you the freedom to travel on your own schedule. But how old do you have to be to rent one? Even if you have held a full driver’s license since the age of 16, rules in the US vary between companies and locations. 

In this Remitly guide, we’ll explain the typical age requirements to rent a car, what additional fees might apply if you’re under 25, and the restrictions you might encounter. We’ll also take a look at how car rental rules compare around the world, so that you can make plans with clarity and confidence.

What is the minimum age requirement to rent a car? 

Most states don’t set a specific minimum age to rent a car. Instead, car rental companies decide their own requirements, largely based on risk.

Why age matters for car rental

Statistics show that the younger and less experienced the driver, the more likely they are to be involved in an accident. This not only puts rental companies’ fleets at risk, but also drives up their insurance premiums. To manage the risk, many companies restrict rentals to younger drivers.

While each car rental company has its own policies, the most common minimum age for a standard car rental is 21 years old. Drivers under 25 generally pay a young driver surcharge, which is added to the daily rental fee. Young drivers may also be restricted from renting certain vehicle categories, such as luxury cars or bigger passenger vans.

There are also some state-specific rules. Michigan and New York both have laws that require car rental companies to rent to fully-licensed drivers from the age of 18. To offset the risk associated with much younger drivers, car rental companies often apply even higher young driver surcharges for 18-20 year olds.

Young driver fees and car rental age requirements at major rental companies

Policies for young drivers vary from company to company, and sometimes from state to state. The table below provides a general summary of the minimum age requirements and approximate daily surcharge for drivers under 25 at some major rental companies. These are averages and may vary by location and vehicle type, but they offer a useful reference point when estimating costs.

Prices are listed in USD and are correct at the time of writing. Rates may change.

Car rental company Minimum age Standard daily surcharge Daily surcharge New York Daily surcharge Michigan
Alamo 21 $25 $34 (18-20)

$13 (21-24)

$57 (18-20)

$20 (21-24)

AVIS 21 $27 $41 (18-20)

$28 (21-24)

$84 (18-20)

$35 (21-24)

Budget 21 $27 $84 (18-20)

$35 (21-24)

$41 (18-20)

$28 (21-24)

Enterprise 21 $25 $36.50 (18-20)

$15.75 (21-24)

$64.75 (18-20)

$30.75 (21-24)

The surcharge is typically added when you provide your date of birth during the booking process. Be aware that initial price estimates given before you enter your personal details may not include these fees.

Exceptions and waivers

There are exceptions for some young drivers. For example, state and government employees may be able to rent for official purposes as young as 18 if they present their official orders. If they are over 21, the young driver surcharge may be waived. Check with specific rental companies to confirm their policies.

Membership benefits (for example, with the American Automobile Association (AAA) or United Services Automobile Association (USAA)) and corporate or association agreements can also waive the young driver surcharge at some companies. Always check terms before booking.

Vehicle restrictions for younger renters

Most rental companies limit the types of vehicles available to drivers under the age of 25. Rental is often restricted for:

  • Luxury cars
  • Sports cars
  • Specialty or premium cars
  • Premium and full-size SUVs
  • Passenger vans
  • Pickup trucks

This still leaves a wide range of cars for younger drivers to choose from, including economy and compact cars, mid-size and full-size cars, small and standard SUVs, and smaller minivans.

Restrictions vary by company and location, and some membership or corporate programs may allow more flexibility.

International young driver car rentals

Car rental age rules vary widely around the world. Local laws set some limits, but they’re mostly set by the rental companies themselves. Like in the US, most companies restrict access for younger drivers and apply a surcharge for under-25s. Below are general guidelines for popular travel destinations:

Country Typical minimum age Average daily surcharge for under 25s
Australia 21  $15-35 AUD (about $8-20 USD)
European Union members 18-21, depending on the country and company €10-€40 (about $11-46 USD)
Canada 21

(18 in Quebec and Saskatchewan)

$25 CAD (about $18 USD)
Mexico 18, but 21 for many companies $10-$25 USD
New Zealand 18, but 21 for many companies $10-$35 NZD (about $5.50-20 USD)
United Kingdom 21 £30-£50 (about $40-65 USD), usually capped at 10 days

In some English-speaking countries, such as Canada, the UK, and Australia, US travelers can usually rent a car with a valid US driver’s license, as long as it’s a full license that meets local requirements. In Australia, New Zealand, and the UK, you typically need to have held a full license for at least one year.

International Driving Permits

In some countries, you might need an International Driving Permit (IDP) to rent a car. An IDP is a valid translation of your license, and it’s valid for one year. You can find out if you need an IDP for a country you intend to visit here.

US citizens can apply for an IDP through the AAA or the American Automobile Touring Alliance (AATA). You’ll need to submit an application form, two passport-sized photos, and a copy of your driver’s license. You’ll also need to pay a fee.

Insurance and coverage

If you’re under 25 and renting a car abroad, there may be different insurance and deposit requirements than you’d find in the US. Many international rental companies require young drivers to take out additional coverage. This typically includes:

  • Collision Damage Waiver (CDW) or Loss Damage Waiver (LDW): This covers any damage to the vehicle.
  • Theft protection: This protects against theft of the vehicle.
  • Third-party liability: This covers damage or injury to others.

Young renters may also face higher security deposits or credit card holds. In some countries, rental companies may require proof of alternate insurance coverage if you decline their insurance.

Checking the insurance and deposit terms in advance can save you from any unexpected charges and ensure you’re fully covered when you rent a car abroad.

Tips for young drivers to rent cars successfully

Here are some tips to help you save money on your car rentals and make the process smoother.

In the US:

  • Consider membership programs: If you’re a young driver and think you’ll be renting a car regularly, AAA or USAA membership could save you money on young driver fees.
  • Ask about employer or university discounts: Many large employers and universities have partnerships with major rental companies that include fee waivers or reduced rental rates.
  • Use a credit card whenever possible: Remember that to rent a car, you must have a full and valid driver’s license and a credit card. Some rental companies may accept a debit card for drivers under 25, but you’ll likely need to meet additional conditions, such as passing a credit check.
  • Double-check your quote: Online quotes typically don’t include the young driver surcharge. This is added once you input your personal details.

If you’re planning to rent a car outside the US:

  • Do your research before you go: Find out whether you’re eligible to rent a car as a young driver, and how much it is likely to cost. Rules vary by country and company.
  • Check if you need an International Driving Permit (IDP): Some countries require it, even if you have a full US license.
  • Be aware of local driving rules and customs: Confirm which side of the road they drive on, and take extra care.
  • Know your transmission type: Manual cars are more common in other countries. If your license only allows you to drive automatic cars, make sure you book automatic cars only.

Start planning your rental today

If you’re under 25, you’re considered a greater risk on the road. Car rental companies often restrict rentals for young drivers. Many won’t rent to under-21s, and almost all charge a daily young driver surcharge to offset the added risks.

As a young driver, paying a bit more just comes with the territory. But if you do your research and book in advance, you can often find lower rental rates. Also, don’t forget to check whether you’re entitled to any discounts through your employer or school. Those discounts are there to help you save.

With a little planning, renting a car doesn’t have to be complicated. Once you understand the rules and compare your options, you’ll be ready to hit the road, wherever your next adventure takes you.

FAQs

How old do you have to be to rent a car in the US?

Car rental companies set their own minimum age for car rentals. Most won’t rent to under-21s, and nearly all charge a daily young driver surcharge for under-25s. There are exceptions: Laws in New York and Michigan require car rental companies to rent to drivers from the age of 18, although surcharges tend to be higher.

Can an 18-year-old rent a car?

Most car rental companies choose not to rent to under-21s because of the risk they represent, even though there are no laws preventing it. There are exceptions, so if you shop around, you may find a company that is willing to rent to you, but the range of cars available to you may be limited, and a higher surcharge almost always applies.

Why do rental companies charge extra for young drivers?

Young drivers are considered high-risk because they are significantly more likely to be involved in accidents. Young driver surcharges help cover the increased costs of insurance and vehicle maintenance.

Are there ways to avoid young driver fees?

Some memberships (like AAA and USAA) and corporate agreements can reduce or eliminate young driver surcharges.  It’s worth checking with your employer, university, or membership organization before booking.

What documents do young renters need?

To rent a car in the US, you need a full driver’s license and a major credit card in your name. Some companies accept debit cards but may require additional identification or a credit check.  If you’re renting overseas, you might also need an International Driving Permit (IDP) along with your US license.

Fufu, a staple food in Togo, is a dish that’s deeply woven into the fabric of the nation. It’s more than just sustenance—it’s a symbol of unity and tradition.

Our team at Remitly created this guide as part of our series that celebrates the traditional foods of our global customers.

Ingredients and Preparation

In Togo, fufu is often made from yams, but cassava is also widely used. The process usually involves boiling the chosen starchy vegetable until it becomes soft and then pounding it until a smooth, stretchy, dough-like consistency is achieved.

This is typically done using a large wooden mortar and pestle, often with two people working in tandem: one pounding and the other turning and moistening the fufu.

A Simple Yam Fufu Recipe

Fufu is a dish that’s easy to prepare with just a few ingredients. Here’s a basic recipe you can try at home.

Ingredients:

  • 4 large yams
  • Water for boiling
  • Salt to taste

Instructions:

  1. Peel the yams and cut them into chunks.
  2. Place the yam chunks in a large pot, add enough water to cover them, and bring it to a boil.
  3. Cook until the yams are soft and easily pierced with a fork—this usually takes about 30 minutes.
  4. Drain the water and transfer the cooked yams to a mortar.
  5. Using a pestle, pound the yams until they form a smooth, stretchy dough. Add salt to taste during this process.
  6. Once you achieve the desired consistency, your fufu is ready to serve.

Remember, fufu is best enjoyed fresh and hot with your favorite soup or stew.

Variations of Fufu Across Togo

In Togo, variations in fufu preparation reflect the diversity within the country. In some regions, cornmeal replaces yams or cassava as the main ingredient—giving birth to akume—a variant loved for its slightly sweet flavor.

Other areas prefer plantain-based fufu which has a distinct tanginess that pairs well with spicy dishes. There are also numerous versions of this dish all over West Africa.

Serving and Eating Etiquette

Eating fufu is an experience steeped in tradition. It’s typically served hot alongside soup or stew in communal bowls promoting shared meals—an important aspect of Togolese culture.

Using your right hand, you tear a small piece of fufu, shape it into a ball, make an indentation with your thumb, and scoop up the soup or stew. This method of eating enhances the communal dining experience and fosters a sense of unity.

Popular Pairings

Fufu pairs well with various dishes due to its neutral flavor. In Togo, it’s often served with groundnut soup—a rich concoction made from peanuts, meat or fish, tomatoes, onions and spices.

Another popular pairing is palm nut soup—a hearty stew made from palm fruits that adds a unique depth to the taste experience when eaten with fufu.

The Origin of Fufu

Fufu, with its various names and forms, has deep roots in the culinary history of West Africa. Its origins can be traced back several centuries.

The word “fufu” is believed to have originated from the Twi language of the Akan ethnic group in Ghana, where it means “mash” or “mix.”

However, while Ghana can claim the name’s origins, the concept of pounding starchy foods into a dough-like consistency is a tradition shared by many West African cultures, even before the borders of present-day nations were established.

Historically, fufu’s beginnings are linked to the cultivation of starchy crops in West Africa, particularly yams. The yam holds deep cultural significance in regions of Nigeria and Ghana, and its cultivation can be traced back over 11,000 years.

As communities learned to farm yams and later cassava, which was introduced to Africa from South America in the 16th century, they also developed methods to process and store these crops. Pounding them into a smooth, stretchy consistency was not only a means of consumption but also a preservation method.

As West African communities traded, migrated, and interacted over time, variations of fufu spread throughout the region, with each community adapting it based on available ingredients and local preferences.

Togolese Cuisine: A Melting Pot of Flavors

Togo’s cuisine reflects its rich cultural diversity and history. It’s characterized by bold flavors, fresh ingredients, and an array of dishes that cater to different palates.

Staple Foods

Aside from fufu, other staple foods in Togo include maize, millet, sorghum, beans, rice, and cassava—all often used as bases for various dishes.

Popular Dishes

One popular dish is Djenkoume—a tomato-based cornmeal dumpling dish often served with meat or fish sauce. Another well-known meal is Akpan—a fermented corn or millet dough served with okra soup.

Grilled meat skewers known as brochettes are also favored street food items in Togo—often enjoyed with spicy sauces on the side.

Seafood Delights

Given its coastal location, seafood plays a significant role in Togolese cuisine. Fish, shrimp, and other seafood are often used in soups, stews, and grilled dishes.

Spices and Flavors

Togolese food is known for its robust flavors. Spices like ginger, garlic, nutmeg, and chili peppers are commonly used to add depth to dishes.

Palm oil—a richly flavored oil extracted from palm fruits—is also a key ingredient in many Togolese recipes.

Sweet Treats

For those with a sweet tooth, Togo offers treats like Akassa—a fermented corn pudding—and Klako—an airy cake made from fermented cassava.

Visit the homepage, download our app, or check out our Help Center to get started.

If you’re new to sailing, all the specialist words can feel like learning a second language. Terms like bow, stern, aft, and especially port and starboard, can leave you scratching your head. But mastering the basic terminology isn’t just about sounding like a seasoned sailor. It’s a matter of safety.

At Remitly, we know how important clear communication is. In this guide, we’ll break down exactly what these terms mean and how to remember port and starboard. Once we’re done, you’ll not only understand port and starboard, but you’ll be able to use them with confidence every time you sail.

What do port and starboard mean?

You may already know that port and starboard refer to the left and right sides of a ship. But this idea can be misleading. After all, left and right change if you turn around and face the other way. Port and starboard, on the other hand, are fixed maritime navigation terms that never change, no matter which way you’re facing.

The port side of the vessel is the left side when you’re facing forward, toward the bow, or front of the ship. Starboard means the right side of the vessel when facing forward.

These terms are relative to the vessel, not to the person saying them. So even if you turn around and face the stern, or the back of the boat, port is still the ship’s left-hand side, and starboard is still the right. If you’re facing the stern, port will be on your right, and starboard will be on your left.

This is essential for safe communication at sea. On a busy deck or during a manoeuvre, using left or right can be confusing, as crewmembers may be facing different directions. Saying “turn to port” or “secure the starboard line” lets everyone know immediately what side of the vessel you’re talking about. These precise and logical directions help to keep operations coordinated and everybody safe.

The history behind port and starboard

Sailing is rooted in ancient tradition, and the terms of port and starboard are no different. The term starboard comes from the Old English word steorbord, meaning “steering side.”

In ancient ships, the steering oar was mounted on the right-hand side near the stern. That’s because most sailors, then and now, were right-handed. 

The steering oar would get in the way when ships tried to dock, and so they would tend to dock with the opposite side against the port. Originally, this side was called larboard, which came from the term “lade board,” meaning the loading side. Even today, ships, trucks, and cargo planes use documents called “bills of lading” in reference to this tradition.

But, as you might have noticed, starboard and larboard sound pretty similar. Imagine trying to tell the difference between one and the other during a howling wind or on a large ship during manoeuvres, and you’ll instantly see the problem.

So where did “port” come from?

Britain leads the way

At least as early as 1543, the High Court of Admiralty Examinations was using the term “port” to refer to the left side of the ship. In 1844, the British Admiralty made it official, and since Britain was the world’s foremost maritime power, the word soon spread around the world. These days, the same terms are used for planes and even spaceships, and all because most Old English sailors were right-handed.

Easy ways to remember port and starboard

For beginners, it might feel tricky to remember port and starboard when left and right seem so much more natural. However, there are a few memory tricks that can help you.

Handy words and phrases

One popular trick is to remember that port wine is red. By international law, boats carry a red navigation light on their port side and a green one on the starboard side, so remembering that port wine is red can help you remember that the port side is the left side of the vessel. 

You could also memorize the phrase, “There is no red port left in the bottle.” This combines the word ‘left’ with the color red and the word “left” to help you remember which side of the boat is which.

Another method is the four-letter rule. The words “port” and “left” each have four letters, so you can use this to remember that port always means left when facing forward on the vessel. Starboard and right, on the other hand, both have more than four letters.

Stick with the visuals

If you’re more of a visual learner, imagine yourself standing on the boat and steering. If you’re facing the pointy end of the boat, port will be on your left side, and starboard on your right.

Other people find it helpful to picture docking at the harbor. Boats dock on the port side.

Or think about the last time you got onto a plane. You’ve probably never gotten onto a plane from the starboard side, only the port side. That’s the left side if you’re facing the direction the plane flies in. When you board the plane, regardless of whether you use a jetway or staircase, the nose of the plane is always to your left.

Whichever trick makes sense to you, remember that practice makes perfect. Practice using port and starboard instead of left and right in conversation, and it’ll soon become as natural to you as night and day.

Port and starboard navigation lights

We mentioned earlier how navigation lights are an important part of boating. These maritime navigation terms become especially important when operating a vessel at night or in low light. The colored lights on a ship aren’t decorative. Instead, they’re an internationally standardized safety system to help sailors identify a boat’s location, direction of travel, and right-of-way.

Lights are the law

International maritime law says that every vessel must display a red light on the port side and a green light on the starboard side. Because starboard and port never change relative to a boat’s bow, the color of light you see can tell you what direction a boat is going in.

If you see a green light, you’re looking at the vessel’s starboard side. If you see red, you’re looking at its port side. If you see both together, it usually means the vessel is heading straight toward you, so it’s a good idea to get out of the way.

A similar rule applies when returning to a port from open water. You’re supposed to keep the red channel markers on your right/ starboard side, and the green markers on your left/ port side. This helps to avoid collisions, especially in busy waterways. Boating terminology uses the term “red right returning” to describe this rule. In other words, you need to keep the red marker on your right when returning to port.

These colored lights are also helpful when approaching a port at night. Sometimes, the channel into the port isn’t obvious. It will be between the green and red lights, but if you can only see one of the lights, like in heavy fog, you can still work out where the channel is. If you see a green light, you know that the channel is to the right of the light, while for a red light, the channel is to the left.

These rules show why it’s important to keep your boat’s navigation lights in good working order, especially if you intend to sail at night. Make sure your sidelights are clean and unobstructed, and stay aware of the lights of other vessels so that you can anticipate their movements. This information is one of the most important nautical directions to know.

Practical applications for boaters

Knowing how to use port and starboard in real-world boating situations is absolutely essential for safety. These historic terms are constantly used from docking to distress calls to make sure that everyone understands instructions instantly. Especially on big ships where you have multiple people performing tasks at the same time, these terms help avoid misunderstandings.

The same is true in radio communications and emergency calls. Nautical directions like “man overboard, port side” or “vessel approaching on our starboard side” can tell emergency responders where to look for a quick response.

These terms may also be used in weather reporting and anchoring instructions. For example, “drop anchor of the starboard bow.”

Using this boating terminology isn’t about acting like a professional. It’s designed to make communication clear and straightforward for everyone.

Master maritime navigation with confidence

Understanding these historic maritime terms is key to boating safely. If you’re going sailing, it’s a good idea to memorize them and get comfortable with using them so you can respond quickly in a crisis. Practicing them even in your daily life can help you to remember them so that if you ever need them, they’ll be on the tip of your tongue.

Remember: if you’re facing the bow, port is left, and starboard is right. These terms don’t change, so if you’re facing in a different direction, the names for the sides of the boat remain the same.

Get that locked in, and you’ll be one important step closer to safe boating.

FAQs

What happens if I confuse port and starboard?

Mixing up port and starboard can lead to serious miscommunication. That’s especially true during docking, manoeuvres, navigation, and emergencies. The use of these nautical directions helps everyone to act in sync to avoid accidents.

Do these terms apply to all types of boats?

Yes. Port and starboard are universal boating terminology used in every kind of watercraft. Whether you’re on a paddleboard or a cargo ship, these terms help to avoid misunderstanding.

How do port and starboard relate to bow and stern?

The bow is the front of the boat, and the stern is the back. When you’re facing the bow, the port side is on your left, and the starboard side is on your right. These terms never change, so if you turn around to face the stern of the boat, port will now be on your right. But it’s still the left side of the boat.

Are there different terms for the front and back of a boat?

Yes. The front of the boat is called the bow, and the back is the stern. Along with port and starboard, they form the four key nautical directions used in navigation.

What if I’m facing backwards on the boat?

Port and starboard refer to the same physical sides of the vessel, no matter which way you happen to be facing. They’re relative to the boat, not to the observer. So if you’re facing backward on the boat, port will be on your right, and starboard on your left.

Ever wanted to write a check but wondered what all those numbers at the bottom actually mean? Even in today’s digital banking world, paper checks are still commonly used for important payments such as rent, bills, or direct deposits.

Knowing what the account number on a check means helps you use them correctly and avoid costly mistakes. That’s why we’ve created this Remitly guide to clearly explain what an account number is, where to find it on a check, and why it matters.

What is the account number on a check?

An account number is a unique set of digits that identifies your individual bank account, whether it’s checking, savings, or a different type. You can think of it as your account’s address within the bank’s system.

These numbers tell the bank exactly where to take funds from when you make a payment and where to deposit money when it comes in. It links all your financial transactions directly to your specific account, making sure your money ends up in the right place.

Where is the account number on a check?

To find your account number on a check, it helps to know what all the different numbers at the bottom mean. Each set of digits serves a different purpose—here’s how to tell them apart:

The routine number

At the bottom left of a check, the first set of nine digits is the routing number. It identifies the financial institution that holds your account, making sure your money is routed accurately. You can think of it as your bank’s postal code within the financial system.

Routing numbers are used for many transactions, such as processing checks, setting up direct deposits, or sending wire transfers. Everyone who banks at the same financial institution shares the same routing number.

The account number

If you’ve been asking yourself, “What is the account number on a check?” Look for the middle set of numbers, right after the routing number. In the US, account numbers typically range between 8 and 12 digits, though some banks use as few as 5 to as many as 17.

Each bank creates its account numbers differently, often for security and organizational purposes. Your account number is unique to you or your business, and remains the same on all your checks, making it easy to spot and recognize. 

The check number

The last set of numbers at the bottom right is the check number. It matches the number in the top-right corner of your check and helps you keep track of each payment.

Check numbers make it simple to stay organized and monitor your spending. Each number is unique within your checkbook, so you can quickly identify individual transactions at a glance.

Other ways to find your account number

Even if you don’t have a physical check to hand, there are several easy ways to find your account number.

Online banking portal or mobile app

You can easily find your account number by logging into your bank’s online portal or mobile app. Check sections like “Account Summary” or “Account Details,” where your account number is usually displayed for quick reference. 

This method is safe and convenient, letting you view your account anytime without waiting for mail or visiting a branch. Just make sure you log in using a secure network to protect your private details.

Bank statements

Your account number appears on every monthly bank statement, whether paper or digital. It’s usually near the account summary or in the header or footer of the statement.

Even past statements can serve as a reliable reference if you need your account number. This method provides a permanent record you can return to whenever you need it.

Calling your bank

You can also call your bank’s customer service to get your account number. After verifying your identity with personal information like your Social Security number or date of birth, they can provide the information.

This option is ideal if you don’t have online access or a physical check. Always use the official phone number listed on your bank’s website or statements to ensure safety.

Visiting a branch in person

If you prefer face-to-face help, visiting a bank branch is a solid option. Bring a valid ID and the staff will verify your identity before providing the information.

This method gives you immediate access and the chance to ask any other questions about your account while you’re there.

Bank correspondence and welcome letters

When you open a new bank account, your account number is usually included in welcome letters, deposit confirmations, or other official correspondence from the bank.

Keeping these documents in a secure place makes it easy to reference your account number anytime, even if you don’t use checks or online banking regularly. This is a handy option for anyone who prefers having a physical record on hand.

Why is your account number important?

Now that you know where to find the account number on a check, let’s take a close look at why the numbers matter and how to use them.

Setting up direct deposits

To get your paycheck directly into your bank account, employers need both your routing number and account number. This way, your salary arrives safely and on time without dealing with paper checks. Direct deposits are convenient, reduce the risk of lost or stolen checks, and let you access your money immediately on payday.

Making automatic payments

Your account number is also needed to set up automatic payments for bills, subscriptions, loan repayments, and other recurring expenses. Automatic payments make it easier to stay on top of due dates and prevent late fees. They simplify your monthly routine and help keep your credit in good standing by ensuring payments are made on time.

Setting up alerts and notifications

Your account number lets your bank send instant alerts for deposits, withdrawals, low balances, or unusual activity. You can also customize alerts to focus on transactions that matter most to you. These notifications help you spot errors or suspicious transactions quickly. Staying informed in real-time gives you greater control over your finances.

Simplifying account management

Your account number makes it easier to view and manage multiple accounts in one place. You can monitor balances, track spending, and plan your budgets without switching accounts. This helps you see the full picture of your finances without hassle.

Linking financial services

Many apps and payment platforms need your account number to connect securely to your bank. Linking your accounts allows you to transfer money, pay bills, and manage your finances seamlessly across different services. It saves time and reduces the risk of errors in online transactions.

Verifying transactions

Your account number is key for double-checking deposits, withdrawals, and transfers. It helps ensure all transactions match your record and are correctly processed. Using it to verify activity makes resolving discrepancies faster and simpler.

Requesting a refund or chargeback

Your account number is essential if you ever need to request a refund or file a chargeback. When a payment is disputed, your bank uses your account number to locate the correct account and process the reversal securely. Keeping accurate records and knowing your account number helps ensure refunds or chargebacks are processed smoothly.

Security

Your account number is sensitive information, and keeping it private is key to protecting your money. Even though banks have strong security measures, never share your account number publicly or with unverified sources. Being careful with your account number helps reduce the risk of fraud and gives you peace of mind.

What to do if you lose or suspect misuse of your account number

If your account details are lost, stolen, or you notice suspicious transactions, act quickly to prevent potential fraud:

  • Contact your bank immediately: Report the issue so your bank can freeze or monitor your account to stop further unauthorized activity.
  • Change your online banking details: Update your login passwords, security questions, and PINs right away. Use strong unique passwords and enable two-factor authentication for extra protection.
  • Review your recent transactions: Flag any payments or withdrawals you don’t recognize. Keep a record of disputed transactions to make follow-ups easier with your bank.
  • Request a new account number: In serious cases, your bank can close the compromised account and issue a new one. Update any automatic payments or deposits linked to your old account to avoid disruptions.

Find and use your account number easily

Your account number connects all your transactions to your specific account and is usually the middle set of numbers at the bottom of a check, between the routing and check numbers. Knowing this number makes your transactions accurate, secure, and stress-free.

Finding and using your account number is simple. You can locate it on a physical check, in your online banking portal or app, bank statements, or by contacting your bank directly. These are safe and easy ways to access it when needed.

When you understand your account number and how it works, you can manage your money confidently and handle transactions without mistakes or stress.

FAQs

Is the account number the same as the check number?

No. Your account number identifies your specific bank account, but the check number tracks a single check from your checkbook.

Can two people have the same account number?

No. Every account number is unique, even for customers at the same bank. This uniqueness makes sure your money always goes to the right place without confusion.

Is it safe to give out my account number?

It’s generally safe to share your account number with trusted sources, such as your employer or utility company. But never share it with anyone you don’t know or can’t verify. Always double-check that the request is legitimate to avoid unauthorized access.

Can I change my account number if needed?

Yes. If there’s ever a security issue or suspected fraud, your bank can close the compromised account and give you a new one. Be sure to update automatic payments, deposits, and any linked services.

Does the account number ever expire?

No. Your account number stays the same as long as your account is active. Even if you get a new checkbook or debit card, your account number usually doesn’t change unless you specifically request it.

Where else might I need my account number besides checks?

You’ll need your account number for things like electronic transfers, linking your bank to apps or payment services, and setting up automatic payments. It’s also important when verifying your identity with your bank or resolving any transaction issues.

From K-pop and K-dramas to gaming, did you know that the world’s growing love for Korean culture has inspired more people to start typing in Korean? And many seek out an authentic experience that helps them connect with the language. With a Korean keyboard, you can connect more deeply with the language behind your favorite shows and music.

Unlike the standard QWERTY keyboards, Korean keyboards have unique layouts that can feel confusing for beginners. Many learners struggle with typing Korean characters, navigating layouts, or finding the right keyboard. 

That’s why we’ve created this guide at Remitly to help you understand Korean keyboards effortlessly. In it, we cover the different types, key features, setup tips, and our top recommendations for every need.

What makes Korean keyboards different?

Korean keyboards are specifically designed to support Hangul, the Korean writing system. Unlike the English alphabet, Hangul is a phonetic system built from individual consonants and vowels that form syllable blocks. 

Each block represents a single syllable. When you type, an Input Method Editor (IME)—a software tool that converts keystrokes into Korean characters—automatically combines these characters into the correct syllables for accurate writing.

There are two main Korean keyboard layouts:

  • 2-set: The most common and beginner-friendly, with a simple arrangement of consonants and vowels that makes everyday typing easy.
  • 3-set: Though less common, the 3-set layout includes extra characters and shortcuts that some advanced users or professionals prefer.

What are the types of Korean keyboards?

To type in Korean comfortably, it helps to understand the types of keyboards available:

Physical Korean keyboards

Many enthusiasts prefer mechanical keyboards for their improved typing accuracy and solid construction. Many brands also offer pre-built Korean keyboards, so you don’t need to replace keycaps manually. This makes them a convenient choice for frequent typists.

Virtual Korean keyboards

If you don’t need a separate physical keyboard, virtual Korean keyboards are a great software-based alternative. Most devices include built-in Korean input options on Windows, Mac, and mobile platforms. Third-party Korean apps also offer advanced features for learners and professionals.

Hybrid solutions

If you want the best of both worlds, hybrid solutions let you combine both layouts effectively. They make it easier to switch between Korean and English keyboards without a separate device. 

One option is to use English keyboards with Korean stickers or overlays, which allow you to see both character sets while maintaining your familiar layout.

Another approach is programmable keyboards that can be customized to support Korean input methods, allowing you to assign Hangul characters to specific keys. These keyboards are great for bilingual users who want flexibility without investing in a separate keyboard.

Essential features to look for

When choosing a Hangul keyboard, be sure to check out the following features:

Build quality

A durable keyboard is key for frequent Korean typing, especially since forming Hangul syllables often involves pressing several keys in sequence. Look for models built with sturdy plastics, metal frames, or reinforced keycaps that resist wear and fading.

Compatibility

Not every Korean keyboard works across all devices. Before buying, make sure it’s compatible with Windows, macOS, Android, and iOS. Some keyboards require special drivers or software to enable full Hangul input. Checking compatibility early on helps avoid setup issues later.

Switch types

The type of switch plays a big role in how your keyboard feels and sounds. Mechanical switches give satisfying tactile feedback, while membrane switches are softer, quieter, and usually more affordable. Some mechanical keyboards even let you swap out switches to personalize the typing feel key by key.

Backlighting

Backlighting isn’t just stylish—it’s practical, too. Illuminated keys help you see Hangul characters clearly in low-light settings or when studying at night. Many keyboards offer customizable RGB lighting, so you can highlight Korean characters or favorite keys for better visibility and comfort.

Software support

Many Korean keyboards come with companion software that lets you customize your setup—and this software support can enhance your experience in powerful ways. You can remap keys, create shortcuts or macros, and switch between different layouts based on your needs. 

Several advanced programs even let you save multiple profiles. For example, you may optimize one for typing and another for gaming. Be sure to confirm that the software works with your operating system to avoid missing out on key features.

Setting up your Korean keyboard

How to set up a Korean keyboard on Windows

Add Korean as a language on Windows by following these steps:

  1. Open Settings, click Time and Language, and then Language and Region
  2. Click “add a language” under the preferred languages section
  3. Search for Korean and select it, then click Next, and Install

Windows will download and add the Korean language pack, which includes the keyboard layout.

To enable the Korean keyboard input:

  • Once installed, you’ll see a language icon on your taskbar, usually near the clock
  • Click the icon and select Korean to switch your keyboard input
  • You’re now ready to type in Hangul

If you want to configure keyboard shortcuts, Windows allows you to switch between languages using:

  • Press and hold Windows + Spacebar to cycle through installed languages
  • Left Alt + Shift to switch between input languages

Customize these settings by following these steps:

  • Select Start > Settings > Time & Language > Typing
  • Select advanced keyboard settings
  • Click language bar options
  • Go to the Advanced Key Settings tab 
  • Click change the key sequence, select keyboard combinations to switch between languages, and click OK.

After installation, you might encounter a few common issues. Here’s how to fix them:

  • Korean characters not showing clearly: Ensure you’ve installed the Korean language pack and select the correct keyboard input mode (Hangul).
  • Shortcut keys not working: Check your shortcut settings under “Advanced keyboard settings.” Sometimes, custom shortcuts conflict with default ones.
  • Typing produces strange characters: Make sure your application supports Korean input. Some programs may need a restart after installation.
  • Accidentally switch back to English: Keep an eye on the taskbar language icon and switch back to Korean when needed.

How to set up a Korean keyboard on a Mac

Typing in Korean on a Mac is simple once you’ve added the right input sources.

To add Korean input sources, follow the steps below:

  1. Choose Apple menu > System Settings (or System Preferences, depending on your version of macOS).
  2. Go to Keyboard > Text input > Edit
  3. Click the + button in the dialog box that appears and search for Korean
  4. Select your preferred layout, usually 2-set Korean, and click add
  5. Enable “Show input menu in the menu bar” so you can easily switch between languages from the menu bar.

After adding the input source, switch languages using the following shortcuts:

  • Control + Spacebar to switch between the last two used input sources
  • Customize shortcuts in system settings, keyboards, shortcuts, and then input sources

To optimize the Korean typing experience on macOS:

Note: Menu names and shortcuts may vary by OS version. If you don’t see an option, search settings for “keyboard” or “input sources.”

How to set up a Korean keyboard on mobile

Installing Korean keyboards on iOS and Android is quick and easy. To install on iOS:

  1. Open Settings
  2. Go to General, Keyboard, then Keyboards
  3. Select Add new keyboard
  4. Scroll down and choose Korean
  5. Once added, the Korean keyboard will appear in your list of available input languages.

Install a Korean keyboard on Android devices with the following steps:

  • Open Settings
  • Click on System
  • Select Language and Input
  • Choose on-screen keyboard and manage keyboards
  • Select your default keyboard app (such as Gboard)
  • Add Korean as an input language
  • Turn on your preferred Korean keyboard layout and tap Done to finish the setup.

Here are some recommended Korean keyboard apps and their key features:

  • Gboard (iOS and Android): Offers predictive Korean typing, emoji suggestions, and swipe typing for faster input.
  • Swiftkey (iOS and Android): Adapts to your typing style, predicts Korean words accurately, and allows seamless switching between multiple languages.
  • Korean keyboard – Hangul (Android): Simple and beginner-friendly, designed specifically for smooth Hangul typing on mobile devices.

Using these apps can improve your typing speed, reduce errors, and provide smart features like auto-correct and predictive text tailored for Korean.

Top Korean keyboard recommendations

Now that you’ve learned how to configure your Korean keyboard, here’s how to find the one that fits you best:

Budget-friendly options

If you’re just starting out or want to stay on budget, there are plenty of Korean keyboards under $50 that work well for everyday use. Brands like Logitech, Rapoo, and Keychron offer some of the best Korean keyboards for beginners. You can also find entry-level mechanical keyboards with solid switches or comfortable designs. They’re ideal for students or casual users who want a good typing feel without breaking the bank.

Premium choices

If you type in Korean often or want something more advanced, consider investing in premium keyboards. These keyboards are built for comfort and performance—with durable frames, customizable lighting, and hot, swappable switches that let you fine-tune how each key feels.

For gamers, brands like Corsair, Razer, and ABKO offer Korean keyboard layouts with anti-ghosting, programmable macros, and per-key RGB lighting. These features are great for both fast typing and immersive gaming experiences.

Software solutions

If you already have a keyboard, you can still type in Korean using software-based options. Windows, macOS, Android, and iOS all include free Korean typing tools that let you switch between languages in seconds.

If you want more advanced features, premium Korean typing apps offer smart suggestions, autocorrect, and customizable layouts. These tools help improve speed and accuracy, making them useful for both beginners and experienced users.

Start typing Korean with confidence

A proper Korean keyboard makes typing in Hangul simple and natural. It helps you form syllables correctly, avoid mistakes, and type faster, whether you’re learning, working, or chatting in Korean. For professionals, it ensures a typing experience that matches native standards.

With the right setup, you’ll type more comfortably and accurately. Explore different keyboard types, layouts, and features to find what best fits your needs and budget. Once you’re set up, typing in Korean feels effortless and enjoyable.

FAQs

Do I need a physical keyboard to type in Korean?

No. Most computers and mobile devices let you add a Korean input method through system settings. However, a physical keyboard with Hangul characters can make typing easier and more comfortable—especially for frequent use.

What’s the difference between 2-set and 3-set Korean keyboard layouts?

The 2-set layout is the standard and most widely used—with consonants on the left and vowels on the right. The 3-set layout adds extra keys for faster typing and fewer keystrokes, which advanced typists often prefer. Most beginners start with the 2-set layout because it is simpler and more supported on all devices.

Can I use Korean keyboard stickers on my existing keyboard?

Yes. You can apply Korean keyboard stickers or overlays to your current keyboard. They display Hangul characters alongside English letters, making it easier to learn key placement without buying a new device.

How do I switch between Korean and English typing quickly?

  • Windows: Press Alt + Shift or Windows + Spacebar to switch input languages
  • Mac: Press Control + Spacebar or Control + Option + Spacebar

You can also customize these shortcuts in your keyboard settings for even faster access.

Are Korean keyboards compatible with gaming?

Absolutely. Most Korean keyboards work perfectly for gaming. High-end models often include anti-ghosting, customizable macros, and RGB lighting, just like English gaming keyboards. You can play games in both Korean and English without any performance issues.

What’s the best Korean keyboard for beginners?

For beginners, a budget-friendly 2-set Korean keyboard or a standard keyboard with Korean keycaps is ideal. These options are simple to use, widely compatible, and affordable. You can also start with virtual Korean keyboards on Windows, Mac, or mobile devices. They’re convenient and perfect for learning without investing in a physical keyboard.

Today, most payments happen with a click of a button. It’s easy to assume paper checks are now outdated, things of the past. But the truth is, they’re not extinct just yet, and you might find yourself needing to write one when you least expect it. Knowing how to write a check remains an important skill, even in a digital world.

Checks were once king when it came to making payments. Today, even in the age of digital mobile wallets and instant transfers, there are still situations where a check may be your most reliable option. Remitly recognizes how rapidly the world of payments is evolving and wants to keep you informed—on everything from checks to digital transfers. 

In this guide, we’ll break down how to write a check, walk you through the key security steps, and provide additional tips to help you feel confident. 

Understanding the parts of a check before you fill it out

To get a checkbook of your own, you can reach out to your bank or use their online platforms to request checks be mailed to you. Checks in the US have a standard layout regardless of which bank you use, with only slight variations, like whether the memo line says “Memo” or “For.”

Before you start writing out your first check, it helps to know what each section of a check is for. Every line, number, and box has a purpose. Once you understand the layout, it’ll be easier to avoid mistakes.

The key sections of a check

Your name (pre-printed)                                                                                             872

Address (optional)

                                                                                       Date ______________                                             

Pay to the order of ________________[Name of recipient]_______________   $ [Amount]

________________[Amount written in words]__________________________ DOLLARS 

BANK NAME (pre-printed)

Memo _____________                                       ____________[Your signature]________MP

             |:123456789 |:             123456789||l 1234


Here’s what each element on a check means:

  • Your information: Your name is usually pre-printed in the upper left-hand corner. You can also have your address printed, but this is optional at many banks. This identifies you as the account holder.
  • Check number: The check number is pre-printed in the upper right-hand corner. The number is different on every check.
  • Date line: Found on the upper right of the check, below the check number, this is where you write the current date. In the US, the correct format is month, day, year.
  • “Pay to the Order of” line: This line is where you write the name of the person or business that will receive the money.
  • Amount Box ($): The small box at the end of the “Pay to the Order of” line is where you write the amount you wish the person to receive in numerical form.
  • Amount line (Dollars): Write the payment amount in words on the longer line beneath the payee’s name. This written amount is the official and legally binding one, preventing any confusion about the total. 
  • Memo or For line: A short line in the bottom left corner is where you can note what the payment is for. For example, “June rent” or “Christmas gift.”
  • Signature line: The bottom right line is for your signature. A check without your signature isn’t valid and cannot be cashed by the recipient.
  • Routing and account numbers: At the very bottom of the check, you’ll see numbers that refer to your account number and your bank’s routing number. This helps identify which account the funds are coming from.

Most checks come as a booklet (checkbook) and include a check log for you to record details of every check you write. Every check is officially numbered. You can note the check number, recipient, amount, and date in your log. 

Keeping this information can be invaluable in case a check goes missing or needs to be stopped. If something goes wrong, having those details allows the bank to easily locate and cancel the payment.

How to write a check in 6 simple steps

Now that you’re more familiar with a check’s layout, let’s go step-by-step through writing out a check.

There are just six simple steps to filling out a check correctly.

Step 1: Write the date

In the upper right corner, write the date. In the US, dates are written with the month first, followed by the day and the year.

You can use the numerical form or spell the date out:

  • 11/17/2025
  • November 17, 2025

The date shows when you authorized and endorsed the check.

While you can post-date a check (write a future date), banks often process checks as soon as they’re deposited. So, if you’re trying to delay payment, post-dating isn’t always possible. It’s best to speak with the recipient or wait until you have the funds in your account.

Step 2: Name the recipient

On the line that says “Pay to the Order of,” write the full, correct name of the person or business you’re paying. Accuracy does matter here. Banks will verify the name on the check, so using the wrong name can delay the deposit. In some cases, the check may be rejected altogether.

If you’re paying a business, you may want to ask them exactly who the check should be made out to. 

For example:

  •  “Sunny Cleaners, LLC” vs. “Sunny Cleaners”. 

If you’re unsure, double-check the name or put the part of the name that you know, but avoid leaving this line blank. 

Leaving the recipient line blank is extremely dangerous; if a check without a recipient gets lost or simply falls into the wrong hands, anyone could fill in their own name and cash it. 

It’s also advised not to write “CASH” as the payee. Writing “CASH” makes the check payable to anyone who holds it. People sometimes do this when they want to withdraw money for themselves or give cash to someone without specifying a payee. However, this is risky. If you lose the check and haven’t stopped the payment, anyone can cash it. For security, it’s best to write the name of the person or business you want to pay.

Step 3: Fill in the amount in numbers

In the small “amount” box, write the amount of the check using numbers. For example, $200.00 or $200.10. It’s best to fill the whole box so that no one can add extra numbers. 

It’s also important to add “.00” to ensure there’s no doubt about the exact amount.

Step 4: Write out the amount in words

On the line below the recipient’s name (ending with the word “Dollars”), you’ll now write the amount in words. This line helps verify the correct amount. If there’s any discrepancy between the amount written in words and the numerical amount, the written words usually take precedence. 

When writing an amount with cents, it’s essential to write the change as a fraction. The fraction is always written “X/100.” 

Examples for writing cents on a check:

  • $150.75, write “One hundred fifty and 75/100.”
  • $50.00, write “Fifty and 00/100.”
  • $210.10, write “Two hundred ten and 10/100.”

To make sure your bank withdraws the correct amount from your account, you’ll need to clearly indicate the number of cents—even if it’s zero.

Step 5: Add a memo (optional, but a good idea)

While this step isn’t required, the memo is a great tool for keeping track of what each check payment is for.

Write something short and clear, such as:

By adding a memo, there’s no doubt what the check is for. You can easily record this in your checkbook log. You can also take a picture of the check as an extra measure for your records.

Step 6: Sign the check

Finally, sign your name on the bottom right line. This authorizes the bank to release the funds from your account. If the bank has your signature on file, it’s best to make sure your signature matches the one you initially provided. A new signature that looks different could raise a red flag.

Remember: the check will be invalid if there’s no signature on the bottom right line.

Most importantly, avoid signing a blank check with the intention of filling the check later. Anyone can fill in a signed blank check and cash or deposit it, so it’s best to take precautions.

Pro tips for check writing: ensuring your check is secure

Checks are still a safe form of payment when handled correctly. Since they contain personal information, such as your name and banking details, it’s best to handle them with care.

Here are a few simple ways to keep your check secure:

  • Use a pen with permanent blue or black ink. 
  • Sign the check only after it has been completely filled out.
  • Keep your checkbook in a safe place.
  • Record every check in your log, taking note of the check number, date, payee, amount, and purpose.
  • Void checks that are no longer valid and record them in your log, make a copy, and, if possible, shred them after some time has passed. Simply write “VOID” in large letters across the check.
  • Mail your check directly at the post office.

New sources have reported stories of checks in the mail being stolen and tampered with. For extra precaution, it’s best to mail your check in a securely sealed envelope, either directly at the post office, through your mail carrier, or through your workplace. 

It’s best to avoid placing a check in your personal mailbox for pickup. If possible, hand the check directly to the payee to ensure it reaches them safely.

Going beyond basics: understanding how checks are processed

Knowing what happens after you hand over your check helps you stay in control of your finances. This is especially true if there are any issues after the check leaves your possession.

From paper to processing

When a recipient deposits your check, their bank sends the payment information digitally to your bank. Funds are then withdrawn from your account and transferred electronically to the recipient through the Federal Reserve’s check clearing system. This process usually takes one to three business days, depending on the bank. 

Today, you can deposit checks in person, via your bank’s mobile app, or at an ATM. If the recipient calls to tell you they deposited the check, don’t be surprised if your account balance doesn’t reflect the change for another day or two. 

If the funds still haven’t been withdrawn after seven business days, it might be best to reach out to the recipient or your bank to ensure there was no issue with the check.

What happens if your funds are low?

If the recipient does not deposit the check immediately and you no longer have the funds to cover the check, it may “bounce.” That means the bank returns the check unpaid. In some cases, a bounced check may also incur fees for you, the recipient, or both, depending on the institution.

This is an important factor to consider if you post-date a check. Post-dating does not guarantee delayed processing. Many banks deposit checks immediately, which can cause your check to bounce if the funds aren’t there. You might ask the recipient to wait until the date listed on the check before cashing or depositing it. 

Tracking your balance will help you avoid a bounced check. In some cases, the check may go through, and you’ll end up with an overdraft. If your bank doesn’t offer overdraft protection, you may have to pay overdraft fees. 

You can check with your bank to understand overdraft fees and protection, which should be listed on your bank’s website.

Checks still matter

Paper checks aren’t outdated. Digital payments may be more practical at times, but you can think of a check as your old, reliable buddy. When power outages happen or your phone stops working, you can still keep up-to-date on payments by pulling out your checkbook.

Knowing how to write a check is a useful skill to have in your back pocket. Even as digital banking continues to grow, checks remain a trusted and reliable method for transferring money. And with this guide, you can easily and efficiently write out a check whenever you need to.

Do you need more resources on making payments and managing finances? Check out our blog for more!

FAQs

Can I use a future date on a check?

You can post-date a check; however, most banks process the check immediately once it is deposited, regardless of the post-date. 

What does it mean to void a check?

If you make a mistake while writing a check or no longer need to finish filling out the check, writing “VOID” across the check in capital letters ensures the check is no longer valid and cannot be cashed or deposited.

Is it safe to send a check in the mail?

Yes, it is generally safe. If you’d like to take additional precautions, the safest way to mail a check is to take it directly to your local post office. You can also hand it directly to your mail carrier instead of leaving it for pickup in your mailbox.