English (US) – Page 242

Best Places to Retire in Mexico: Coastal, Colonial, and Budget-Friendly Picks

Planning your retirement? Explore the best places to retire in Mexico with our guide to coastal, colonial, and budget-friendly destinations.

English (US)

Key Highlights

  • Discover the best places to retire in Mexico, from vibrant coastal destinations to cities with stunning colonial architecture.
  • Learn about the affordable cost of living, which allows for a high quality of life on a reasonable budget.
  • Explore Mexico’s accessible health care system, including public and private options for retirees.
  • Find out which locations boast a large and welcoming expat community, making it easy to connect with others.
  • Understand the straightforward visa and residency process for making your retirement dream a reality.

Introduction

Are you dreaming of a retirement filled with warm weather, rich culture, and a more affordable lifestyle? Mexico might be the perfect place for you. From the bustling energy of Mexico City to the historic charm of a colonial city, the country offers a diverse range of options for every preference. With a lower cost of living and a welcoming atmosphere, Mexico has become a top destination for retirees seeking a vibrant and fulfilling next chapter. This guide will explore the best places to make your retirement home.

Exploring Retirement in Mexico: Coastal, Colonial, and Budget-Friendly Choices

Choosing where to retire is a major decision, and Mexico presents an array of appealing choices. The country is celebrated for its natural beauty, from stunning beaches to lush rainforests, offering an exceptional quality of life. Whether you are drawn to the energy of large Mexican cities or the tranquility of a small town, there is a perfect spot for you.

Many retirees find that the lower cost of living allows their savings to go much further without sacrificing comfort or amenities. In the following sections, we will examine why Mexico is so popular, the different lifestyles you can enjoy, and what to consider before making your move to one of the best places for retirement.

Why Mexico Appeals to Retirees from the United States

Thousands of retirees from the United States have discovered that Mexico offers an incredible upgrade in their quality of life. One of the biggest draws is the significantly lower cost of living. Your Social Security and retirement savings can stretch much further, allowing for a comfortable lifestyle that might be out of reach back home. This financial freedom opens up opportunities for travel, hobbies, and new experiences.

Beyond the financial benefits, many are attracted to the slower pace of life. Mexico encourages a more relaxed and present way of living, a welcome change from the constant hustle. The culture is warm and community-oriented, with friendly locals who are often hospitable and ready to help. This welcoming environment makes it easier to feel at home.

The proximity to the United States is another key advantage. With numerous direct flights, visiting family and friends is simple and convenient, which is an important consideration for many retirees. This combination of affordability, lifestyle, and accessibility makes Mexico a top choice for a happy and fulfilling retirement.

Popular Retirement Lifestyles: Beach, Colonial Towns, and Affordable Living

What does your ideal retirement look like? In Mexico, you can choose from several distinct lifestyles, each with its own unique charm. Whether you dream of waking up to the sound of ocean waves or strolling through historic streets, there is a setting that fits your vision.

For those who love the sea, Mexico’s extensive coastline is a paradise. You could settle in a vibrant beach town on the Pacific Coast or the Riviera Maya, where a relaxed lifestyle is the norm. These areas offer everything from water sports to beachfront dining, all under the warm Mexican sun. If history and culture are more your style, consider one of Mexico’s stunning colonial towns. These cities are known for their beautiful colonial architecture, art galleries, and lively cultural scenes.

Finally, affordable living is a lifestyle in itself. The lower cost of living across the country allows for a comfortable retirement without financial stress. You can choose from various popular lifestyles:

  • Beach Life: Enjoying a relaxed lifestyle in a bustling coastal city or a quiet beach town.
  • Colonial Charm: Living amidst stunning colonial architecture and a rich cultural heritage.
  • Budget-Friendly: Taking advantage of a lower cost of living to maximize your retirement funds.

Key Considerations Before Choosing Your Ideal Mexican Retirement Destination

Before packing your bags, it’s important to think about the practical aspects of retiring in Mexico. Choosing the right location involves more than just picking a beautiful spot; it requires careful consideration of your personal needs and priorities to ensure a high quality of life.

First, think about your financial situation and the cost of living in different regions. While Mexico is generally affordable, prices can vary significantly between a major tourist hub and a smaller inland town. You should also research medical care. Look into the availability and quality of hospitals and clinics in your potential new home and understand your options for health insurance. While many areas have excellent facilities, it’s wise to confirm they meet your standards.

Finally, consider safety and legal requirements. Research the crime rates of the areas you’re interested in and understand the process for obtaining permanent residency. Preparing for these key aspects will help you make an informed decision.

  • Cost of Living: How does it align with your budget and retirement income?
  • Medical Care: Are there high-quality hospitals and healthcare services nearby?
  • Safety: What are the local crime rates and safety precautions?
  • Residency: What are the requirements for a permanent residency visa?

Beginner’s Guide: How to Start Planning Your Retirement in Mexico

Planning your retirement in Mexico can feel like a big undertaking, but breaking it down into manageable steps makes the process much smoother. The first phase is all about research and preparation. You’ll want to explore the best places for you, understand the financial requirements, and gather the necessary paperwork.

This initial planning will lay the foundation for a successful move. From researching different Mexican cities to understanding how your Social Security income fits into visa applications, getting a clear picture of what’s needed is essential. The following sections will guide you through the documents you’ll need, how to research potential locations, and the legal steps involved in securing your permanent resident visa.

Essential Documents and Resources Needed

When you start planning your move, one of the first steps is to gather all the essential documents. Having your paperwork in order will make the process for permanent residency much smoother. This includes not just official identification but also financial records that prove your economic solvency.

You will need to show proof of a steady income from sources like a pension or Social Security, or a significant balance in a bank account. It’s also a good idea to start looking into health insurance options, as this is a crucial part of living abroad. Make sure you have digital and physical copies of everything to be prepared for any request from officials.

Here is a list of documents and resources you will likely need:

  • A valid passport and copies.
  • Passport-sized photos with a white background.
  • Proof of economic solvency, such as bank statements showing monthly income or a minimum balance.
  • Proof of relationship (marriage or birth certificates) if applying with a dependent.
  • Information on private health insurance plans.

Researching Mexican Cities and Regions for Retirement

With so many wonderful Mexican cities to choose from, how do you find the one that’s right for you? The key is to research popular areas while keeping your personal preferences in mind. Think about what kind of environment you want to live in. Are you looking for a bustling city, a quiet beach town, or a culturally rich colonial center?

Start by making a list of your top priorities. Consider factors like climate, access to amenities, and the size of the expat community. Online forums and expat groups can be valuable resources for getting firsthand accounts of the quality of life in different locations. It’s an excellent idea to visit your top choices as a tourist before making a final decision. Spending time in a place will give you a real feel for the local lifestyle.

When researching, focus on these key factors:

  • Cost of Living: Compare rent, food, and utility costs in different cities.
  • Lifestyle: Does the city’s atmosphere match your desired pace of life?
  • Amenities: Check for access to healthcare, shopping, and international airports.
  • Community: Look for areas with established expat communities if that is important to you.

Understanding Residency, Visa, and Legal Requirements

Navigating the visa and residency process is a critical step in your retirement journey. Fortunately, Mexico’s legal requirements are relatively straightforward. Most retirees begin the process at a Mexican consulate in their home country, not after they arrive in Mexico. You cannot apply for residency while in Mexico on a tourist visa.

The most common paths are the Temporary Resident Visa and the Permanent Resident Visa. A temporary visa is valid for one year and can be renewed for up to three more years. A permanent resident visa is ideal for those certain about retiring in Mexico, as it does not expire. Both require proving economic solvency, either through a minimum monthly income or a specified amount in savings or investments.

It’s crucial to check the most current financial requirements with your nearest Mexican consulate, as these amounts can change. Starting this process early ensures you have ample time to gather your documents and meet all the qualifications without feeling rushed. Consulting with an immigration lawyer can also help simplify the process.

Step-by-Step Guide to Retiring in Mexico

Ready to turn your dream of retiring in Mexico into a reality? Following a clear, step-by-step guide can make the entire process feel less daunting. By tackling one task at a time, from defining your priorities to connecting with your new community, you can ensure a smooth transition to your new life.

This guide will walk you through the essential stages of planning your move. We will cover everything from figuring out your budget and monthly income needs for permanent residency to finding housing in one of the best places to live. Let’s begin with the very first step: identifying what truly matters to you in retirement.

Step 1: Identifying Your Retirement Priorities

The first and most important step in your retirement journey is to define what you want your new life to look like. Your personal priorities will guide every other decision you make, from choosing a city to setting a budget. A high quality of life means different things to different people, so it’s essential to know what it means to you.

Do you envision an active social life with a large expat community, or do you prefer a quieter, more immersive cultural experience? Is being close to the beach a must-have, or would you prefer the climate of a high-altitude colonial city? Think about your health care needs, your budget, and how you plan to use your Social Security or other retirement income.

Creating a list of your non-negotiables and nice-to-haves will help you narrow down your options. Consider the following:

  • Lifestyle: Do you prefer a bustling city, a relaxed beach town, or a historic village?
  • Budget: What is your target cost of living?
  • Health: How close do you need to be to specific medical facilities?
  • Community: Is a strong expat social network important to you?

Step 2: Exploring Cost of Living in Different Areas

Once you know your priorities, it’s time to look at the numbers. The cost of living is one of Mexico’s biggest attractions, but it varies widely across different Mexican cities. While the country offers a much lower cost of living overall compared to the U.S., popular tourist destinations are generally more expensive than smaller, inland towns.

Researching specific areas will give you a realistic idea of what to expect. Look at average rental prices, utility costs, grocery bills, and entertainment expenses. For example, living in a major city like Mexico City or a popular beach town like Playa del Carmen will have a different price tag than residing in a more affordable city like Mérida.

To give you a clearer picture, here is a comparison of estimated monthly costs in a few popular retirement destinations. These figures, which do not include rent, can help you see how your budget might fit with different locations. Many find they can live comfortably on $1,500 to $3,000 a month, depending on the city and their lifestyle.

City Average Monthly Expenses (Without Rent) Rent for One-Bedroom Apartment (City Center)
Mérida ~$649 USD ~$343 USD
Puerto Vallarta ~$699 USD ~$940 USD
San Miguel de Allende ~$456 USD ~$1,620 USD

Step 3: Applying for a Mexican Temporary or Permanent Resident Visa

After you’ve chosen a location and confirmed it fits your budget, the next step is to secure your residency. This process begins at a Mexican consulate in your home country. It is crucial to remember that you cannot convert a tourist permit to a resident visa while in Mexico; the application must be initiated before you move.

You will typically apply for either a Temporary Resident Visa or a Permanent Resident Visa. For retirees, the permanent option is often the most direct path if you meet the financial requirements. To qualify, you must provide proof of economic solvency. This is usually demonstrated through bank statements showing a minimum monthly pension or income (around $4,300-$4,500 USD) or a significant investment or savings balance (around $180,000 USD).

The exact financial thresholds can vary by consulate and are subject to change, so always verify the current requirements with the consulate where you plan to apply. Once your visa is approved, you will receive a stamp in your passport, and you must travel to Mexico to complete the residency process at an immigration office.

Step 4: Securing Healthcare Options for Retirees

Access to quality, affordable medical care is a top priority for retirees, and Mexico offers excellent options. The country has both public healthcare and private healthcare systems, giving you choices based on your needs and budget. Many expats are surprised by the high standard of medical services available, often at a fraction of the cost in the U.S.

As a legal resident, you can enroll in the public healthcare system, known as IMSS (Instituto Mexicano del Seguro Social), for a low annual fee. This system provides comprehensive coverage for most medical needs. However, some retirees prefer the private system for its shorter wait times and English-speaking doctors. Many doctors in private practice received training in the U.S. or Europe.

For those opting for private care, purchasing a private health insurance policy is essential. You can choose from international plans that offer coverage worldwide or local Mexican plans that are often more affordable. Researching hospitals, clinics, and insurance providers in your chosen area will ensure you have the medical support you need for peace of mind.

Step 5: Finding Housing—Renting vs. Buying

Finding the right place to live is an exciting part of your retirement adventure. In Mexico, you have the option to rent or buy, and each comes with its own set of considerations. Many expats choose to rent for the first year or two. This gives you the flexibility to explore a neighborhood or even a different city before making a long-term commitment.

Renting allows you to get a feel for the local real estate market and lifestyle. Whether you prefer an apartment in the city center or a house in a quiet beach town, you will find options at a much lower cost than in the U.S. When you are ready to buy, it’s important to understand the laws for foreign property ownership, especially in coastal and border areas where restrictions apply. Working with a reputable real estate agent and lawyer is highly recommended.

Here are some points to consider when deciding between renting and buying:

  • Flexibility: Renting offers the freedom to move if your needs change.
  • Investment: Buying can be a good long-term investment, but it involves a more complex legal process.
  • Location: Certain areas, known as “restricted zones,” have special rules for foreign buyers.
  • Initial Costs: Renting requires a smaller upfront financial commitment.

Step 6: Joining Expat Communities and Building Connections

Moving to a new country is about more than just logistics; it’s about building a new life. One of the best ways to enhance your quality of life is by connecting with others. Mexico is home to large, vibrant expat community networks in many popular retirement areas, making it easy to meet people who share your experience.

Joining these communities can provide an instant social network and a valuable support system. You can find groups on social media platforms, join local clubs, or attend community events. These connections can help you navigate the challenges of living abroad, from practical tips about where to shop to sharing stories over coffee.

While expat groups are a great starting point, don’t forget to immerse yourself in the local culture and build relationships with your Mexican neighbors. Learning some basic Spanish and participating in local festivities will enrich your experience immeasurably.

  • Join online forums and Facebook groups for expats in your city.
  • Attend local community events and festivals.
  • Take a Spanish class or join a hobby group.
  • Support local businesses and get to know the owners.

Top Coastal Destinations for Retirement in Mexico

If your retirement dream includes sunshine, sand, and the sound of waves, Mexico’s coastal destinations are calling your name. With miles of beautiful beaches along the Pacific Coast and the Caribbean Sea, the country offers some of the best places for a seaside retirement. These towns combine stunning natural beauty with modern amenities.

From the vibrant energy of Puerto Vallarta to the relaxed vibe of Playa del Carmen, each coastal town has its own personality. In the next sections, we’ll take a closer look at a few of the top choices for retirees seeking a life by the sea, highlighting what makes each one a unique and attractive option.

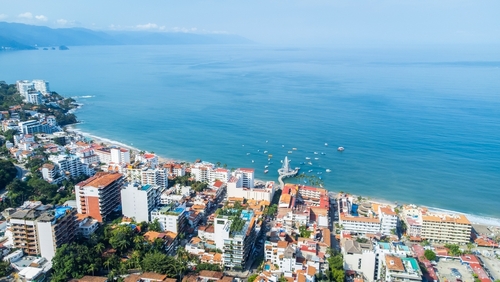
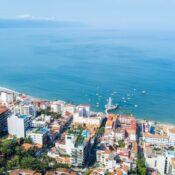
Puerto Vallarta: Vibrant Beach Living and Expat Community

Puerto Vallarta is one of the most popular and beloved retirement spots in Mexico, and for good reason. Nestled on the Pacific Coast, this vibrant beach town offers a perfect blend of natural beauty and a bustling, friendly atmosphere. With the Sierra Madre mountains as a backdrop to its beautiful beaches, the scenery is breathtaking.

What truly sets Puerto Vallarta apart is its large and welcoming expat community. With around 15,000 foreigners living there year-round, it’s easy to find social groups and activities, making the transition to a new country much smoother. The city is famously friendly and inclusive, welcoming people from all walks of life.

Beyond its social scene, Puerto Vallarta provides all the comforts you need for a comfortable retirement. It boasts excellent healthcare facilities, a great selection of restaurants and shops, and an international airport for easy travel to and from the U.S. and Canada. It’s a place where you can enjoy both a modern vibe and an authentic Mexican lifestyle.

Playa del Carmen: Relaxed Lifestyle on the Riviera Maya

For those who dream of a Caribbean paradise, Playa del Carmen on the Riviera Maya is a top contender. Once a small fishing village, it has grown into a chic and cosmopolitan destination known for its pristine white-sand beaches and turquoise waters. It’s the ideal place for anyone seeking a relaxed lifestyle with a touch of international flair.

The warm weather is a constant, perfect for enjoying the outdoors year-round. The heart of the city is Quinta Avenida (Fifth Avenue), a pedestrian-only street lined with shops, cafes, and restaurants from around the world. This walkable layout gives the city a friendly, accessible feel, despite its growth. It attracts a diverse mix of residents, creating a truly international atmosphere.

Playa del Carmen is a fantastic base for exploring the region’s natural wonders, including ancient ruins and stunning cenotes. With modern amenities and a thriving expat scene, it offers a high quality of life for retirees who want to spend their days enjoying the sun and sea in a laid-back environment.

Mazatlán: Affordable Coastal Charm

If you’re looking for affordable living by the sea, Mazatlán should be on your list. Located on the Pacific Ocean, this resort city offers all the natural beauty of a coastal destination but with a significantly lower cost of living compared to other popular beach towns. This makes it an excellent choice for retirees on a budget who don’t want to sacrifice a beautiful setting.

Mazatlán boasts a unique blend of a modern tourist zone and a beautifully restored historic center, known as Centro Histórico. Here, you can wander cobblestone streets, admire colorful colonial buildings, and enjoy the lively plaza. The city has miles of beaches, perfect for long walks, and a vibrant cultural scene with plenty of activities.

With an established expat community of around 10,000 people, it’s easy to connect with fellow retirees. The combination of affordable living, stunning coastal views, and rich history makes Mazatlán a hidden gem for those seeking a charming and budget-friendly retirement on the Pacific.

Best Colonial Cities to Retire in Mexico

If you are captivated by history, art, and culture, retiring in one of Mexico’s colonial cities might be your perfect match. These cities are renowned for their stunning colonial architecture, cobblestone streets, and vibrant cultural scenes. Many are even designated as a UNESCO World Heritage Site, preserving their unique historical character for all to enjoy.

Living in a colonial city offers a different kind of charm than the coastal towns. It’s a life filled with art galleries, concerts, and beautiful plazas. Let’s explore some of the best places for retirees who appreciate history and a rich cultural atmosphere, from the artistic hub of San Miguel de Allende to the safe and modern Querétaro.

San Miguel de Allende: Rich History and Artistic Culture

San Miguel de Allende is a world-renowned destination that has been attracting artists, writers, and retirees for decades. This magical city, a UNESCO World Heritage Site, is celebrated for its exceptionally preserved colonial architecture and vibrant arts scene. The iconic pink sandstone cathedral and colorful buildings create a picturesque setting that feels like stepping back in time.

The city is a haven for creatives, with numerous art galleries, workshops, and cultural festivals throughout the year. Its large and well-established expat community, estimated at around 10,000 people, means English is widely spoken, making it easy for newcomers to settle in. The mild, high-altitude climate provides warm days and cool nights year-round, perfect for exploring the charming cobblestone streets.

While it has a higher cost of living than some other Mexican cities, San Miguel de Allende offers a serene and sophisticated lifestyle. For those who value art, culture, and a strong sense of community, it remains one of the most desirable retirement destinations in the world.

Mérida: Safety, Warm Climate, and Affordable Living

Mérida consistently ranks as one of the safest cities in Mexico, making it a top choice for retirees who prioritize security. Located on the Yucatán Peninsula, this vibrant city combines a rich Mayan and colonial heritage with a remarkably low crime rate. You can enjoy a high quality of life here with peace of mind.

The city is known for its beautiful historic center, filled with impressive architecture, bustling markets, and lively plazas. The warm climate is perfect for those looking to escape cold winters, though summers can be quite hot. A key attraction of Mérida is its affordable living. The cost of housing, food, and entertainment is significantly lower than in many other large Mexican cities, allowing your retirement funds to go further.

With a growing expat community of around 10,000 to 15,000, you’ll find a welcoming network of fellow retirees. Mérida offers a perfect balance of safety, culture, and affordability, making it an ideal destination for a comfortable and engaging retirement.

Querétaro: Modern Amenities in a Colonial Setting

Querétaro offers a unique and appealing blend of old and new. This colonial city boasts a stunning, pedestrian-friendly city center that is a UNESCO World Heritage site, filled with beautiful plazas, historic churches, and charming streets. At the same time, it is a thriving, modern hub with a strong economy and excellent infrastructure.

This combination provides a high quality of life for retirees. You can enjoy the historical charm of the colonial city while benefiting from modern amenities like excellent healthcare, great shopping, and a reliable transportation network. Querétaro has managed to maintain its safety and character despite its significant economic growth, making it one of Mexico’s safest and most livable cities.

The mild climate and family-friendly atmosphere add to its appeal. Located just a few hours from Mexico City, it offers easy access to the capital without the hustle and bustle. For retirees seeking a sophisticated urban lifestyle in a safe and beautiful historic setting, Querétaro is an outstanding choice.

Budget-Friendly Mexican Retirement Destinations

One of the most compelling reasons to retire in Mexico is the opportunity for affordable living. If stretching your retirement budget without sacrificing your quality of life is your main goal, you’re in luck. The country is full of destinations where a low cost of living allows for a comfortable and fulfilling lifestyle.

From tranquil seaside towns to charming lakeside communities, there are many best places that are perfect for retirees on a budget. In the following sections, we will highlight some top spots where you can enjoy all that Mexico has to offer without breaking the bank.

La Paz: Low Cost of Living by the Sea

If you dream of retiring by the sea but find popular coastal spots too expensive, La Paz is the answer. Located in Baja California Sur, this tranquil city offers a much lower cost of living than its famous neighbor, Cabo San Lucas. La Paz provides a more authentic and relaxed atmosphere, making it perfect for retirees seeking peace and natural beauty on a budget.

The city is situated on the Sea of Cortez, which the famed oceanographer Jacques Cousteau once called “the world’s aquarium.” This makes it a paradise for nature lovers, with opportunities for whale watching, snorkeling with sea lions, and kayaking in crystal-clear waters. The Malecón, or waterfront promenade, is the heart of the city, perfect for evening strolls and watching stunning sunsets.

Unlike the bustling tourist hubs, La Paz has a laid-back vibe that appeals to those looking to escape the crowds. Its combination of affordability, breathtaking marine life, and a tranquil pace of life makes it an ideal destination for a budget-friendly retirement on the Pacific Coast.

Ajijic & Lake Chapala: Affordable Lakeside Living

The area around Lake Chapala, Mexico’s largest lake, is home to one of the biggest expat communities in the world. The charming village of Ajijic, nestled on its shores, is particularly popular with American and Canadian retirees. This region is renowned for its affordable living and has been a haven for expats for decades.

One of the area’s main draws is its near-perfect warm climate. The high altitude and lakeside location create temperate weather year-round, with low humidity. This makes it comfortable for outdoor activities and enjoying the beautiful scenery. The cost of living is very reasonable, with affordable housing, dining, and healthcare readily available.

The well-established expat community, estimated at around 20,000 in the greater Lake Chapala area, provides a robust social network with countless clubs, activities, and volunteer opportunities. For retirees seeking an affordable, sociable, and comfortable lifestyle in a beautiful setting, Ajijic and Lake Chapala are hard to beat.

Hidden Gems: Underexplored Towns for Thrifty Retirees

Beyond the well-known retirement hotspots, Mexico is full of hidden gems that offer an even lower cost of living and a more authentic experience. These underexplored towns provide a chance to immerse yourself in Mexican culture while enjoying a high quality of life on a thrifty budget. If you’re adventurous and looking to get off the beaten path, these places are for you.

In a small town, you can enjoy a slower pace of life, form close connections with your neighbors, and shop at bustling local markets for fresh, inexpensive produce. While they may have fewer expat-focused amenities, they make up for it with charm and character. Exploring these lesser-known areas can lead you to your perfect, affordable retirement paradise.

Consider looking into places like:

  • Campeche: A beautiful walled colonial city on the Gulf coast known for its safety and relaxed lifestyle.
  • Oaxaca: A cultural and culinary capital with a rich indigenous heritage and low living costs, though speaking Spanish is helpful here.
  • Pátzcuaro: A charming town in Michoacán known for its stunning lake and vibrant Day of the Dead celebrations.

Healthcare and Wellbeing for Retirees in Mexico

One of the most important considerations for any retiree is access to quality health care. You’ll be happy to know that Mexico offers excellent and affordable medical services. The country’s healthcare system is a major draw for expats, with both public and private options available to meet your needs.

From enrolling in the public healthcare system to purchasing private health insurance, you have several choices to ensure your wellbeing. The following sections will provide an overview of the public system (IMSS), private insurance options, and how to access medical care and senior services throughout the country.

Public Healthcare Systems and IMSS

Mexico’s public healthcare system offers an affordable way for legal residents to access medical care. The primary system for residents is the Instituto Mexicano del Seguro Social (IMSS). As a retiree with a resident visa, you can voluntarily enroll in IMSS by paying a modest annual fee, which is based on your age.

IMSS provides comprehensive healthcare services, including doctor’s visits, hospitalizations, surgeries, and prescription medications. It operates a network of clinics and hospitals throughout the country. While it is an excellent and affordable option, it’s important to be aware that wait times can be long for certain procedures, and facilities may not always have the same level of comfort as private hospitals.

For many retirees, IMSS is a fantastic way to ensure they have coverage for major medical events, contributing to a better quality of life without the high cost of U.S. healthcare. It’s a viable option that provides peace of mind, knowing that essential healthcare services are within reach.

Private Health Insurance Options

For retirees who prefer more flexibility and convenience, the private healthcare system in Mexico is an excellent choice. Many expats opt for private health insurance to gain access to a network of modern, private hospitals and English-speaking doctors. This route often means shorter wait times for appointments and procedures.

You have several private insurance options. You can purchase an international health insurance plan, which offers comprehensive coverage in Mexico and other countries. This is a great choice if you plan to travel frequently. Alternatively, you can buy a local Mexican private insurance policy. These plans are typically more affordable but will only provide coverage within Mexico.

The cost of private medical care in Mexico is significantly lower than in the United States. A visit to a specialist might cost between $30 and $60, a fraction of the U.S. price. This affordability, combined with high-quality facilities, makes private healthcare a very attractive option for many retirees.

Access to Medical Care and Senior Services

Accessing medical care in Mexico is generally straightforward, especially in cities with large expat populations. Major cities and tourist destinations have high-quality hospitals and clinics that offer a wide range of healthcare services, from routine check-ups to specialized treatments. Many pharmacies also have a doctor on-site for minor consultations.

Beyond standard medical care, it’s worth looking into senior services available in your chosen area. While Mexico is still developing its senior-specific infrastructure, many communities offer resources that can enhance your quality of life. This includes things like accessible public transportation, social clubs, and volunteer organizations.

When evaluating a potential retirement spot, consider your long-term needs.

  • Hospitals and Clinics: Are there well-regarded medical facilities nearby?
  • Pharmacies: Prescription medications are often available over-the-counter at a much lower cost.
  • Accessibility: Check if the town has good public transportation and is easy to navigate.
  • Community Support: Look for local groups that offer activities and services for seniors.

Conclusion

Retiring in Mexico offers a unique blend of vibrant culture, stunning landscapes, and affordability that draws many American retirees. From the sun-soaked beaches of Puerto Vallarta to the charming streets of San Miguel de Allende, there’s something for everyone. It’s essential to consider your priorities, such as lifestyle, cost of living, and healthcare access when selecting your ideal destination. By doing your research and planning carefully, you can ensure a smooth transition into this beautiful country. Embrace the opportunity to build a fulfilling retirement in Mexico, where each day brings new adventures and a richer quality of life. If you’re ready to take the next step, start your retirement journey today!

Which Italian Cities Are Ideal for Retirement Compared to Those in Mexico?

When considering retirement, many seek the charm of Italian culture. Among the best cities italy offers, Florence and Bologna stand out with their rich history and vibrant lifestyles. In contrast, Mexico provides warm weather and affordability. Ultimately, choosing between these options depends on personal preferences for culture and climate.

Frequently Asked Questions

Which cities in Mexico have the largest American expat retiree communities?

Some of the largest American expat retiree communities are found in towns known for their welcoming atmosphere. The Lake Chapala area, particularly Ajijic, has one of the biggest concentrations of retirees from the United States. Other popular hubs with a significant expat community include San Miguel de Allende and Puerto Vallarta.

How much does it cost to live comfortably in Mexico’s retirement hotspots?

The cost of living varies, but many retirees live comfortably on a monthly income of $1,500 to $3,000. In many of the best places, this budget covers rent, food, utilities, and entertainment. More affordable Mexican cities offer a lower cost, while popular coastal spots may require a slightly larger budget.

What legal and visa steps should I take before retiring in Mexico?

Before retiring, you must apply for a temporary or permanent resident visa at a Mexican consulate in your home country. This involves proving economic solvency. Once approved, you will complete the residency process in Mexico. It is not possible to change a tourist visa to a resident visa within Mexico.

Are there safe and affordable places to retire in Mexico on a budget?

Yes, Mexico has many safe and affordable places for retirees on a budget. Cities like Mérida are known for being among the safest places with a low cost of living. Other options for affordable living include La Paz and the Lake Chapala area, which have low crime rates and a welcoming community.

The power of nature is not just in its sweet smells and beauty, but in the meaning that flowers and plants hold. This is why many countries have chosen a national flower to represent their identity—one that embodies cultural values, historical moments, and national heritage.

Remitly is all about connection, whether through sending remittances to help loved ones or sharing resources that celebrate our unique and shared history. So we’ve put together this guide to highlight official (and not so official) national flowers around the world, their legends, and why these symbols hold so much significance.

What makes a flower “national”?

There are two flowers that represent pride: the Indian plum and the amaryllis. People take pride in their homes, their countries, and everything that grows there. 

Flowers have been cultivated for centuries and have become symbols of countries long before they even officially adopted them.

For example, the frenzy for tulips in the 1600s in the Netherlands means we now closely associate the flower with the Dutch. However, it’s never been recognized as the official national bloom. That title went to another flower (more on that later).

Official vs. traditional symbols

Countries choose their national flowers in different ways. Some are legally designated through acts of parliament or presidential decrees, while others become traditional emblems, accepted after centuries of use and cultural significance.

Take the cherry blossom, you’ll most likely think of Japan, but it’s never been formally legislated as the national flower—it’s simply universally embraced.

So, a flower may become a national flower because of:

  • Cultural values
  • Abundance
  • Historical weight and symbolism
  • Resilience in a difficult climate

Let’s take a look at some official and unofficial national symbols that represent history, unity, strength, and pride. 

Blossoms of the Americas: pride and diversity

From north to south, the terrain in the Americas is diverse and abundant with some of the most beautiful plant life in the world

The blossoms found throughout North, South, and Central America are true symbols of pride and endurance.

United States: rose

In 1986, in the White House Rose Garden, President Reagan declared the rose the nation’s national flower.

For almost 40 years now, the rose has been a symbol of love, devotion, and resilience. It’s not just the country that holds a national flower either. Along with the rose, each US state has its own flower, such as the California poppy and the Texas bluebonnet.

Mexico: dahlia

Cultivated by the Aztecs for food and medicine, the dahlia is native to Mexico and was named as the country’s national flower in 1963.

The dahlia’s symbol of creativity and cultural pride, represents not just Mexican history but its people as well. The intricate petals that form the colorful blooms have gone on to become a favorite throughout many European gardens as well.

Argentina: ceibo 

The ceibo was declared the national flower in December 1942. The flower is seen as a symbol of honor, bravery, and spirit.

Used to decorate parks and dye fabrics, this multi-purpose red bloom grows alongside rivers, lakes, and swamps. Argentina’s choice for national flower is not only for its beauty and symbols but for the legends and stories it represents for the native people of the land.

Canada: the unofficial, but voted for, bunchberry

You may have thought the maple leaf was the official national flower (it’s even on their flag), but unfortunately, as the maple leaf is part of the maple tree, it doesn’t count. 

The truth is, Canada has no legally designated flower. While some flowers are closely linked with the country and provinces, such as the trillium in Ontario, the wild rose in Alberta, or even the maple leaf, the country has never crowned them with the title of national flower.

In 2017, however, after 150 years without a flower to officially call their own, the people took a vote, naming the bunchberry the unofficial national flower to represent all the beauty Canada has to offer.

Asia in bloom: symbols of grace and tradition

Delicate flowers hold strong symbols for many countries across Asia. While these flowers remain unofficial national flowers, they have strong representations, making them national treasures.

China: the unofficial peony

In 2019, a poll was conducted, and the peony overwhelmingly won the people’s vote, with 79% supporting it as the national flower. However, the government has still not officially confirmed this, leaving the peony as the preferred national symbol but not the official national flower.

The peony has over 4,000 years of history in China and continues to symbolize prosperity, good fortune, and honor—many attributes that strongly tie to Chinese history.

A close second and highly recognized flower is the plum blossom.

Japan: the unofficial cherry blossom 

Japan and cherry blossoms go hand in hand. The annual hanami festival celebrates the tree’s fleeting bloom, reminding people of the world’s beauty and its delicate cycle of life. 

The Samurai often compared their short lives to cherry blossoms—the pink blooms bursting from the trees’ branches each year have come to symbolize renewal and joy, as people from all over the world gather to see their beauty.

India: the unofficial lotus

In 2019, India’s minister clarified that there is no official national flower. However, the lotus flower, also known as a water lily, remains the country’s favorite and beloved bloom.

A sacred flower among Hindus and other groups in India, the lotus symbolizes purity, rebirth, and strength, reflecting religious beliefs and the nation’s rich history.

Europe’s petals of history and heritage

Kings and queens in Europe went to great lengths to construct some of the world’s most ornate and beautiful gardens, planting flowers native to the land and from afar.

And while many European countries have particular flowers closely associated with them, you’ll be surprised to find out they aren’t always the official national symbol.

France: iris

You might’ve thought lavender was definitely the national flower of France, a country so often associated with lavender fields. Though lavender is definitely loved, it’s not the official national flower.

While you can even see the iris in France’s emblem, the fleur-de-lis, there has been a long-standing confusion about its connection because ‘lis’ means lily. 

Many historians, however, side with the idea that it’s a nod to the iris, which is lucky considering that it’s the national flower—as declared by Louis VII, who loved it dearly.

Netherlands: daisy

If you’re surprised it’s not the tulip, you’re not the only one. Tulips are so heavily associated with the Netherlands that people travel to the country each year to see the fields upon fields of colorful tulips at their peak bloom.

But the crown here goes to the daisy, thanks to a lot of Dutch men and their lawn mowers. This wasn’t a mere declaration, either—53,000 votes were cast and the daisy was the overwhelming winner among the Dutch people. 

The country may be known for its tulips, but the daisy has captured the people’s hearts.

Scotland: thistle

Since King Alexander III, the thistle has been the national emblem. Found across the low and highlands, the flower has a long history, with legends stating it saved the Scots from invasion centuries ago.

The thistle symbolizes strength, resilience, and protection, all of which encapsulate Scotland and its history.

Found on coins and embroidered on fabrics, the thistle is deeply ingrained in Scotland’s cultural identity and is one of the oldest recorded national flowers.

Africa and the Middle East: legends in the sand

Sand and sun can sometimes produce some of the most stunning vegetation. Africa and the Middle East have some truly incredible landscapes, and while the desert can be a tough place for flowers to thrive, it’s not impossible. 

Some of the most beautiful and strongest flowers come from unlikely places.

South Africa: King Protea

The name certainly doesn’t do this incredible flower justice. The King Protea was officially declared the national flower of South Africa in 1976 and has become an emblem found on birth certificates, passports, and even national sports teams.

A symbol of strength and beauty, it’s a testament to South Africa’s long history and the perseverance of its people.

United Arab Emirates (UAE): tribulus omanense

Said to be a symbol of resilience and strength, it also represents the region’s unique landscape.

The tribulus omanense is a small yellow flowering plant that thrives in desert climates, creating beauty and standing strong against the odds. This small but tough flower also prevents soil erosion, allowing for more biodiversity in the region.

The UAE considers the delicate and vibrant flower an embodiment of its people and the land, which is why it has been known as the national flower since 1973.

Ghana: impala lily

If you’ve never seen an impala lily, you’ll be struck by its vibrancy. The colors marking the edge of the flower’s petals are a thing of beauty and one of the many reasons Ghana declared it the official national flower.

While this delicate flowering plant looks and smells sweet, it can also reach great heights, measuring up to 16 feet tall.

An emblem now found around the country, and even on stamps, the tiny flower symbolizes resilience in a rugged terrain

Oceania’s natural treasures

Australia: Golden Wattle 

With over 1300 Acacia species in the world, and 960 of them located in Australia, it’s no wonder the Golden Wattle was declared the country’s national flower.

If you find yourself Down Under in September, you’ll enjoy seeing a sea of golden yellow fluffy flowers basking in the warm sun as spring begins. 

The Golden Wattle is often said to symbolize unity and the nation’s spirit, which is hard to argue with when you see this yellow beauty with your own eyes.

The stories behind the symbol

Many flowers that eventually became treasured national symbols are linked to the legends behind them. These stories reveal the flowers’ beauty and strength, and whether they’re true or myth—they’re deeply rooted in many countries’ histories.

Scotland’s thistle defeats the Norse

There are a number of legends that tell just how the thistle came to be Scotland’s treasured emblem, many of them coming from the time of Alexander III.

One particular legend dates back to 1263, when the king of Norway was determined to conquer the Scots. When Norse invaders crept into the night to surprise sleeping Clansmen, they walked barefoot to move more quietly. 

Unfortunately, they couldn’t see in the darkness, stepping on thistles that caused them to cry out in pain and make their presence known—saving the Scots from invasion.

Argentina’s ceibo tells a story of courage and strength

On another continent, Anahi, a Guarani woman, is still remembered today for her act of resistance. Condemned to be burned, the legend claims she sang as flames engulfed her, and from her ashes, the ceibo tree grew.

The flowering tree reminds the people of Argentina of the courage, resilience, and strength of the Guarani people.

A world united by flowers: celebrating our natural heritage

The beauty in flowers is not just how they look, but what they represent. National flowers aren’t chosen at random. They embody resilience, hope, tradition, and much more. 

These symbols, official or not, have united people under shared stories that stretch across centuries. When it comes to flowers, even the most delicate can thrive against all odds. 

Want to learn more about culture? Check out our other guides in Lifestyle & Culture for more resources.

How Do National Flowers Relate to the Natural Landscapes Found in Places Like Lava Beds National Monument?

National flowers often reflect the unique ecosystems of their regions, embodying the flora and scenery that define a landscape. In places like Lava Beds National Monument, these flowers thrive in the rugged terrain shaped by volcanic activity. Visitors can truly appreciate nature’s artistry when they explore the wonders of lava beds.

FAQ

How are national flowers officially chosen?

Flowers are officially chosen in different ways—some are declared by a president or parliament, and others are voted for by the people.

Can a country have more than one national flower?

Most countries have only one official national flower, though they may have more than one flower associated with them.

For example, the Netherlands’ national flower is the daisy, but tulips are so heavily associated with the country that many people believe it’s the national flower.

Do all countries have national flowers?

No, not every country has an official national flower. However, they often have a flower closely associated with them, such as the cherry blossoms in Japan.

Key Highlights

Are you ready to explore a world beneath the surface? The Oregon Caves National Monument offers an unforgettable adventure. Here’s a quick look at what makes this destination so special before you plan your visit.

  • Explore the rare “Marble Halls of Oregon,” a unique cave system formed entirely within marble rock.
  • Take a guided cave tour to witness stunning formations deep within the Siskiyou Mountains.
  • Hike scenic trails above ground, including one leading to Oregon’s widest Douglas fir tree.
  • Discover the area’s rich history at the National Historic Landmark, the Oregon Caves Chateau.
  • Book your tickets in advance online or visit the Illinois Valley Visitor Center, as tours often sell out.

Discovering Oregon Caves National Monument

Nestled in the lush, wooded slopes of the Siskiyou Mountains in Southern Oregon, the Oregon Caves National Monument and Preserve is a treasure managed by the National Park Service. This protected area, located 20 miles east of Cave Junction, offers a cool escape into a subterranean world of natural wonder. Have you ever wondered what lies beneath a dense forest? Here, you can find out.

Your adventure begins at the visitor center, the gateway to this unique park. The monument is celebrated for its incredible marble caves, but the beauty doesn’t stop there. The surrounding region provides a stunning landscape of wild and scenic rivers and unique geological features. Below, we’ll look at what makes these caves so distinct and uncover the history behind their preservation.

What Makes the Marble Halls Unique

What truly sets the Oregon Caves apart is their unique geology. While most caves form in limestone, these are one of only three cave systems managed by the National Park Service that are carved from marble rock. This gives them the nickname “the Marble Halls of Oregon.” The cave system’s parent rock began as limestone about 190 million years ago before undergoing intense heat and pressure, which transformed it into the marble you see today.

This marble block was eventually uplifted to its current elevation, where slightly acidic groundwater seeped into cracks. Over millions of years, this water dissolved the marble, creating the winding passages that total about 15,000 feet. This process makes the cave a geological masterpiece and a fascinating subject for scientific study.

The result is a labyrinth of passages filled with stunning formations like stalactites and stalagmites. The cave’s incredible natural architecture and the historic Oregon Caves Chateau earned the site its status as a National Historic Landmark. Its distinct marble composition makes it a must-see for anyone interested in natural wonders.

Brief History & Designation as a National Monument

The story of the cave’s modern discovery begins in 1874 with a local hunter named Elijah Davidson. While on a hunting trip, his dog chased a bear into a dark opening in the hillside. Following his dog, Davidson stumbled upon the entrance to the magnificent cave system. Can you imagine making such an incredible discovery by accident?

Despite early attempts by private investors to turn the cave into a tourist attraction near Cave Junction, these efforts failed due to the site’s remote location. Recognizing its significance, the United States government stepped in. With the passage of the Antiquities Act, President William Howard Taft declared the site the Oregon Caves National Monument in 1909.

Later, the construction of highways and the rise of automobile tourism brought more visitors to the area. Structures like the Oregon Caves Chateau, now on the National Register of Historic Places, were built to accommodate them. In 1933, management was transferred to the National Park Service, which continues to protect this natural and historical treasure for all to enjoy.

Navigating to Oregon Caves National Monument

Getting to the Oregon Caves National Monument is part of the adventure, taking you through the beautiful Rogue River – Siskiyou National Forest. The monument is located in Southern Oregon, about 20 miles east of the town of Cave Junction. From Grants Pass, the drive is approximately 55 miles southwest. The journey involves scenic, winding roads that climb into the mountains.

The primary route is Oregon Route 46, which connects from U.S. Route 199. Be prepared for a slow and winding drive, especially on the last stretch of the road leading to the monument. Now, let’s explore the specific routes from nearby cities and what you need to know about accessing the park.

Getting There from Major Cities

If you’re traveling from major cities, your journey will likely take you through Grant’s Pass, a key hub in Southern Oregon. From Portland, the drive is about 300 miles south, while San Francisco is roughly 450 miles to the north. Once you reach Grant’s Pass, you will take U.S. Route 199 southwest toward the coast.

This scenic highway follows the Rogue River for a time before you reach the turnoff for the monument. About 29 miles from Grant’s Pass, you will arrive in the small city of Cave Junction. This is the last stop for gas and comprehensive services before you head up to the caves.

From Cave Junction, you will turn onto Oregon Route 46, also known as the Caves Highway. This final 20-mile stretch takes you deep into the mountains. The road is paved but narrow and winding, so it’s best to drive cautiously and allow plenty of time.

Directions & Access Routes

For clear directions, your destination is 19000 Caves Highway, Cave Junction, OR 97523. The main access route is Oregon Route 46. It is important to note that RVs and trailers over 46 feet long are not recommended on this road due to its sharp turns and narrow lanes. Are you planning to buy cave tour tickets on-site?

You must first stop at the Illinois Valley Visitor Center, located at 201 Caves Highway in Cave Junction, to purchase same-day tickets. Do not drive all the way up to the monument expecting to buy tickets there, as they are not sold at the cave entrance. This visitor center is your best source for local information about the caves and the surrounding scenic rivers system.

Once you complete the beautiful drive up Route 46, you will arrive at the monument’s parking lot. Parking can be limited, especially during peak season, so arriving early is a good idea. From the parking lot, a short walk will take you to the main visitor area, the Chateau, and the cave entrance.

Entrance Information, Hours & Seasonal Closures

Planning your visit to the Oregon Caves National Monument requires checking the operational schedule, as hours and tour availability are seasonal. Cave tours are the main attraction, and the National Park Service adjusts the schedule based on weather conditions and staffing. Remember that the inside of the cave maintains a constant cave temperature of about 44°F (7°C) year-round.

It is crucial to verify the current status before you travel, especially during the spring and fall shoulder seasons when schedules can change. Ready to find out the best time to go and what to watch out for? The following sections will provide details on opening times, seasonal patterns, and potential closures.

Opening Times and Best Seasons to Visit

The best seasons to visit Oregon Caves are from late spring to early fall, when you can enjoy comfortable summer temperatures above ground. Cave tours typically run from late March through the end of November, but this schedule can vary. The monument itself is open year-round, but winter snow can sometimes block road access.

Summer is the most popular time to visit, offering the most predictable weather and a full schedule of tours. Spring and fall are also excellent times, with fewer crowds and beautiful forest scenery. However, be prepared for rain and cooler weather during these seasons.

Cave tours are generally available from Thursday through Monday and are closed on Tuesdays and Wednesdays. It’s always a good practice to check the official National Park Service website for the most up-to-date opening times before your trip. Here is a general guide to the seasonal operations:

Season Operational Status Notes
Spring (Late March – May) Tours typically begin. Schedule may be limited; check for weather-related changes.
Summer (June – August) Peak season; full tour schedule. Roads are clear; expect larger crowds.
Fall (September – End of November) Tours continue; schedule may shorten. Beautiful fall colors; check for early-season snow.
Winter (December – Early March) Tours are closed. The road may be closed due to snow.

Closures, Special Notices & Government Shutdowns

Beyond the regular seasonal closures in winter, unexpected events can affect access to Oregon Caves National Monument. Wildfires in the surrounding national forest, heavy snowfall, or road damage can lead to temporary closures. Always check the official park website or call the visitor center for the latest alerts before you leave home.

Like other national parks and monuments, Oregon Caves can be affected by government shutdowns. During a shutdown, facilities and services, including the visitor center, restrooms, and all guided cave tours, are typically suspended. The NPS.gov website is the most reliable source for information during these events.

Special notices may also be posted for various reasons, such as wildlife activity or trail maintenance. For example, to protect bats from a devastating disease called White-Nose Syndrome, visitors are prohibited from bringing any clothing or gear that has been inside another cave or mine. Following these guidelines helps preserve the delicate cave ecosystem for future generations.

Booking & Taking a Cave Tour

The only way to experience the underground marble halls is by taking a guided tour. The National Park Service offers several options, with the 90-minute Discovery Cave Tour being the most popular. This tour takes you through the heart of the cave, showcasing its most impressive features. For a more adventurous experience, off-trail caving tours are sometimes available by reservation.

All tours are led by knowledgeable park rangers who share insights into the cave’s geology, history, and ecology. Due to high demand, booking your cave tour in advance is strongly recommended. Let’s look at how you can reserve your spot and what you should expect on the day of your tour.

How to Reserve Guided Cave Tours

The most reliable way to reserve a cave tour is by booking in advance online. Tickets for the Discovery Cave Tour and other guided tour options are available through the Recreation.gov website. Booking ahead ensures you get the time slot you want, as tours often sell out, especially during the busy summer months.

A limited number of same-day tickets are sold on a first-come, first-served basis at the Illinois Valley Visitor Center in Cave Junction. These tickets can sell out quickly, with some visitors arriving as early as 6 a.m. to secure a spot. Remember that tours are typically only available Thursday through Monday.

To prepare for booking your tour, keep these points in mind:

  • Visit Recreation.gov to see tour availability and make a reservation.
  • Book several weeks or even months in advance for summer visits.
  • If you plan to buy same-day tickets, go to the Illinois Valley Visitor Center, not the monument itself.
  • Check the official NPS.gov website for the current tour schedule and any special tour offerings before booking.

What to Expect on the Tour

The basic tour of the cave, the Discovery Tour, is a moderately strenuous 90-minute walk. Are you prepared for the physical demands? The path includes over 500 steep and uneven stairs, and there are several areas with very low ceilings—as low as 45 inches. To ensure safety, children must be at least 42 inches tall and able to climb a set of test stairs on their own to participate.

The cave temperature is a constant 44°F (7°C), so dressing in layers with a warm jacket is essential. The trail surface can be wet and slippery, so sturdy, closed-toe walking shoes are required for good traction. Personal flashlights are not permitted, as the tour is lit and rangers carry their own lights.

Here are a few key things to know before your tour of the cave:

  • The tour involves a total climb of 230 feet. It is not recommended for those with heart, lung, or mobility issues.
  • Backpacks, large purses, tripods, and food or drink are not allowed. Lockers are available for storage.
  • To protect the cave’s ecosystem, do not touch the cave walls or formations.
  • Cameras are welcome, but be mindful of your surroundings while taking pictures.

Hiking Trails & Outdoor Adventures

The adventure at Oregon Caves National Monument extends well beyond its underground passages. Above ground, a network of hiking trails offers a chance to explore the diverse forests and subalpine meadows of the Siskiyou Mountains. These trails range from easy, short walks to more challenging treks, providing outdoor adventures for every skill level.

Whether you want to see the famous Big Tree, follow the path of a creek, or enjoy panoramic views, there is a trail for you. The area is part of a region known for its incredible biodiversity and connection to the Rogue River and other scenic rivers. Below, you will find information on the most popular trails and tips for a great day of hiking.

Popular Trails Near the Monument

Several popular trails start right from the main visitor area, offering a variety of experiences. The most famous is the Big Tree Trail, a 3.3-mile loop that gains 1,100 feet in elevation. This challenging but rewarding hike leads you to what is thought to be the widest Douglas fir tree in Oregon, estimated to be 600-800 years old.

For a shorter, less strenuous option, the Old Growth Trail is a 0.8-mile path that connects the Chateau to the main parking lot, winding through a beautiful stand of old-growth forest. Another choice is the Cliff Nature Trail, a one-mile loop that passes over marble outcrops and offers excellent views. The trail surface on many paths can be uneven, so watch your step.

Here are some of the key trails to explore:

  • Big Tree Trail: A 3.3-mile loop to see the monument’s famous giant Douglas fir.
  • No Name Trail: A 1.3-mile hike that follows Cave Creek and leads to waterfalls.
  • Cliff Nature Trail: A 1-mile scenic loop with views over marble outcrops.
  • Old Growth Trail: An easy 0.8-mile walk through an old-growth forest.
  • Mt. Elijah Trail: A longer, more strenuous hike offering panoramic views of the surrounding wilderness.
  • Cave Creek Trail: Connects to the nearby Cave Creek Campground.

Tips for Exploring Above Ground

Exploring the wooded slopes of the Siskiyou Mountains requires some preparation. The weather can change quickly at this elevation, so it’s wise to bring layers. Even on a warm day, a light jacket or warm clothing can be useful, especially at higher elevations or in the shade of the dense forest.

Good walking shoes with sturdy soles are a must for navigating the trails. Many paths have uneven surfaces, rocks, and roots, so proper footwear will keep you safe and comfortable. During the spring and fall, trails can be muddy, while snowy winters may require snowshoes for some of the higher-elevation routes into the surrounding wilderness areas.

Here are a few more tips for your above-ground adventure:

  • Bring plenty of water and snacks, as services are limited at the monument.
  • Carry a trail map, which you can get from the visitor center.
  • Be aware of wildlife; store food properly and never feed the animals.
  • Always check trail conditions before you start your hike, especially after rain or snow.

How Do the Unique Features of Oregon Caves Compare to the Natural Wonders of Kobuk Valley National Park?

Oregon Caves offer a stunning underground experience with their intricate limestone formations and unique ecosystems. In contrast, Kobuk Valley National Park showcases vast sand dunes and the surreal sight of shifting landscapes. Both locations invite nature lovers to explore the beauty of kobuk valley park and Oregon’s hidden gems.

Frequently Asked Questions

What wildlife can I spot at Oregon Caves National Monument?

The diverse habitats of the Siskiyou Mountains support a variety of wildlife. While exploring, you might see black-tailed deer, Townsend’s chipmunks, and Steller’s jays. Less common but present in the area are black bears and cougars. Inside the cave system, look for bats and unique insects adapted to the dark environment.

What is Oregon Caves National Monument known for?

Oregon Caves National Monument is famous for its “Marble Halls,” a rare cave system formed in marble rock rather than the more common limestone. Managed by the National Park Service, its unique geology, stunning cave formations, and the historic Chateau have made it a one-of-a-kind destination in Southern Oregon.

What should I bring when visiting Oregon Caves National Monument?

For your visit, be sure to bring warm clothing, like a jacket or sweatshirt, as the cave is always 44°F. Sturdy, good walking shoes are essential for both the cave tour and hiking trails. Also, pack water and snacks. Remember that personal flashlights are not allowed on the cave tour.

Key Highlights

Welcome to your guide for Calaveras Big Trees State Park! Here’s what you can look forward to.

  • Explore two magnificent giant sequoia groves: the easily accessible North Grove and the more remote South Grove.
  • Hike miles of scenic hiking trails suitable for all skill levels, from gentle loops to strenuous canyon treks.
  • Discover historic big trees, including the “Discovery Tree” and the massive Agassiz Tree.
  • Enjoy year-round recreation, from summer swimming in the Stanislaus River to winter snowshoeing.
  • Visit the modern visitors center and museum to learn about the park’s history and ecology.

Discovering Calaveras Big Trees State Park

Have you ever wanted to walk among giants? At Calaveras Big Trees State Park in Calaveras County, you can do just that. This park was established in 1931 to protect the magnificent sequoia groves first noted by Augustus T. Dowd in 1852. It’s a place where history and nature intertwine, offering jaw-dropping views and serene trails.

From the moment you pass the park entrance, you are transported to another world. The park features the winding Stanislaus River, lush forests, and, of course, the famous big trees. Whether you take a stroll on the Calaveras Big Trees North Grove Trail or venture deeper into the wilderness, you’ll find an unforgettable experience. Let’s look closer at where this amazing park is and what it offers.

Where Is Calaveras Big Trees State Park Located?

You’ll find Calaveras Big Trees State Park nestled in the western slopes of the Sierra Nevada mountains. Specifically, it’s located four miles northeast of the town of Arnold on Highway 4 in Calaveras County. This area is part of California’s historic Gold Country, blending rich human history with breathtaking natural beauty.

The park’s location makes it an accessible yet wonderfully wild destination. It’s about a 35-minute drive from Angels Camp, making it a perfect day trip or weekend getaway if you’re exploring the region. The address is 1170 California 4, Arnold, CA 95223.

Being situated in the Sierra Nevada means you get to experience a diverse range of elevations and ecosystems all within one state park. The towering trees, river canyons, and volcanic formations create a unique landscape that has captivated visitors for generations. Are you ready to explore it for yourself?

Park Overview and Key Features

Calaveras Big Trees State Park became a major tourist attraction shortly after its giant trees were documented and is considered California’s longest continuously operated tourist facility. The park is centered around two main groves of giant sequoias, but it offers so much more for every type of visitor.

Your first stop should be the fantastic visitors center. Here, you can get trail maps, learn about the park’s history in the museum, and find unique souvenirs in the gift shop. It’s the perfect starting point to plan your day. From there, you can explore numerous designated trails that wind through the forest and along the river.

The park is designed to give you an immersive experience in the Sierra Nevada wilderness. With everything from easy, family-friendly walks to challenging hikes, camping, and picnic spots, it’s a destination that invites you to stay and explore.

The Giant Sequoias of Calaveras

The main draw of the park is, without a doubt, the awe-inspiring giant sequoia trees. These massive beings are some of the largest living things on Earth, and Calaveras offers you a chance to see them up close. The park protects two main groves: the North Grove, which contains the famous “Discovery Tree,” and the more remote South Grove.

Seeing these large giant sequoias is an experience you won’t forget. You can wander through the groves on well-maintained paths, hike the Grove Overlook Trail for a different perspective, or venture into the South Grove for a more rugged adventure to find the park’s largest trees. Let’s explore the unique history of these groves and some of the most famous trees you can visit.

History and Significance of the Sequoia Groves

The history of this park is as rich as the soil its trees grow in. The North Grove gained fame after Augustus T. Dowd documented the “Discovery Tree” in 1852, sparking a wave of tourism in the Mother Lode region. To preserve these natural wonders, the area officially became a state park in 1931.

One of the most famous trees was the Pioneer Cabin Tree, which was tunneled through for visitors to pass under. Sadly, this iconic tree fell during a winter storm in 2017, but its memory remains a key part of the park’s story. The oldest known giant sequoia lived for 3,200 years, a testament to the longevity of these incredible species.

Today, the South Grove Natural Preserve protects nearly 1,000 mature sequoias in a more pristine, wild state. This area offers a glimpse into what the Sierra Nevada forests looked like for millennia, standing as a vital sanctuary for these ancient giants.

Notable Trees and Must-See Sights

When you visit, you’ll want to make sure you see some of the park’s most famous residents. The North Grove Trail is home to many of these, making it an easy and rewarding hike for everyone. Walking this trail, you’ll encounter a timeline of the forest written in wood and bark.

The “Discovery Tree,” now known as the Big Stump, is a must-see. It’s the remnant of the first giant sequoia that brought international attention to the area. Seeing the sheer size of the stump helps you comprehend the scale of these magnificent trees.

For a more adventurous journey, the South Grove Trail leads to even bigger giants. Here are a few you shouldn’t miss:

  • Agassiz Tree: The largest tree in the entire park, located in the South Grove.
  • Palace Hotel Tree: A hollowed-out tree in the South Grove that you can walk inside.
  • Father of the Forest: A massive fallen tree in the North Grove that showcases the incredible size of these giants even after they’ve toppled.

Popular Hiking Trails in the Park

Ready to stretch your legs? Calaveras Big Trees State Park offers a variety of hiking trails for every fitness level. Whether you want a gentle stroll among the giants or a challenging trek into the wilderness, there’s a path waiting for you.

The most popular options are the North Grove Trail and the South Grove Loop. For a different perspective, you can climb the Grove Overlook Trail. The Bradley Grove Trail offers a quieter experience through a younger sequoia grove. Each trail provides a unique way to connect with the park’s stunning scenery. Let’s take a closer look at what you can expect on the two main grove trails.

Exploring the North Grove Trail

The North Grove Trail is the perfect introduction to the park’s giants. This gentle, 1.7-mile loop is mostly flat and even stroller-friendly when dry, making it ideal for families and visitors of all abilities. It winds through the historic North Grove, where you’ll see about 100 majestic sequoias.

Along the trail, you’ll find interpretive signs and opportunities to learn through environmental educational programs. The park often offers free guided hikes filled with fascinating information about the area’s flora and fauna. This trail is also where you’ll find the famous Big Stump and the fallen Pioneer Cabin Tree.

Conveniently located near the visitors center and the North Grove Campground, this trail is easy to access. In the winter, it transforms into a winter wonderland, perfect for snowshoeing or cross-country skiing. It’s a beautiful and educational experience no matter the season.

Adventures on the South Grove Trail

If you’re seeking a more rugged and solitary experience, the South Grove Trail is for you. This trail system offers a true wilderness adventure with significantly fewer visitors than the North Grove. The main South Grove Loop is about 5 miles long, including a spur trail to see the park’s largest tree, the Agassiz Tree.

The journey begins nine miles past the park entrance, along dirt roads that lead to the trailhead. The hike itself is more challenging, with an elevation gain of about 200 feet, so be sure to wear good hiking shoes and bring plenty of water. You’ll cross Beaver Creek and enter a pristine forest that is home to nearly 1,000 mature sequoias.

Unlike the more developed North Grove, the South Grove allows you to go off-trail and get up close to the trees. The peace and quiet here are incredible, offering a profound connection to the ancient forest.

Recreational Activities for Visitors

While the giant trees are the main event, Calaveras Big Trees is a major tourist attraction with plenty of other cool outdoor adventures. The park offers a wide range of recreational activities that let you enjoy its diverse landscapes in different ways.

From mountain biking on fire roads to relaxing at scenic picnic sites, there’s something for everyone. You can also fish, swim, or simply enjoy the beautiful scenery. For a full list of options, be sure to grab a park activity guide at the visitors center. Read on to discover more about the wildlife and seasonal fun waiting for you.

Wildlife Viewing and Birdwatching Opportunities

The park is a haven for more than just big trees. Its varied environments provide a rich habitat for a wide array of animals, making wildlife viewing a rewarding activity. Keep your eyes peeled as you explore the trails and you might just spot some of the local residents.

For avid birdwatchers, the Lava Bluffs Trail is an excellent choice, known for its diverse bird population, especially during the spring wildflower season. The park’s conservation efforts help protect these habitats, ensuring that wildlife continues to thrive. A park activity guide can provide more specific information on what to look for during your visit.

What might you see during your visit?

  • Steller’s jays and other songbirds
  • Squirrels and chipmunks
  • Mule deer
  • Occasionally, black bears (remember to be bear aware!)

Picnicking, Swimming Holes, and Seasonal Events

Looking for a way to relax and cool off? The park has beautiful picnic areas, many located along the scenic Stanislaus River. Pack a lunch and enjoy a meal surrounded by nature. After eating, you can head down to the river, where you’ll find perfect family-friendly swimming holes with calm water.

The park is a year-round destination with fun seasonal events and features. In the winter, the Warming Hut near the North Grove offers a cozy fire with hot chocolate and cider, serving as the starting point for guided snowshoe tours.

Don’t forget to stop by the gift shop for a souvenir to remember your trip. Here are some activities to enjoy:

  • Picnicking at tables under the trees.
  • Swimming and playing on the sandy beach along the Stanislaus River.
  • Building a snowman or having a snowball fight in the winter.
  • Joining a guided tour or program.

Practical Information for Your Visit

Planning a trip is always easier with a little preparation. Before you head out, it’s helpful to know the practical details about visiting Calaveras Big Trees State Park. From park fees to what to do when you arrive, a bit of information can make your visit smooth and enjoyable.

When you arrive at the park entrance, you’ll find a large parking lot near the visitors center. This is your hub for information on permits, trail conditions, and daily activities. Let’s cover the specifics of fees, camping, and pet policies to ensure you’re fully prepared for your adventure.

Park Fees, Permits, and Entry Details

Understanding the entry details before you go can save you time. The park is open daily from sunrise to sunset, while the Visitor Center operates from 10:00 am to 4:00 pm year-round. Upon arrival at the park entrance, you will find a day-use fee is required for entry.

The main parking lot is conveniently located near the North Grove and the visitors center, providing easy access to the most popular attractions. Special permits are generally not required for day hiking, but they may be needed for certain activities or group events. Always check with the park for the most current information.

Here are the standard park fees for day use:

Vehicle Type Fee
Vehicle (up to 9 passengers) $10

This fee provides access to all open areas of the park for the entire day.

Camping Facilities and Pet Policies

Want to spend a night under the stars? Calaveras Big Trees State Park has some of the most beautiful campgrounds in the county, with a total of 129 campsites available. The North Grove Campground is open from March through November, while the Oak Hollow Campground is available when the South Grove opens for the season. Year-round cabin rentals are also an option.

When it comes to pet policies, dogs are welcome in developed areas of the park. This includes campgrounds, picnic sites, and on paved or dirt fire roads, as long as they are on a leash.

However, it’s important to know that dogs are not allowed on any of the designated hiking trails, such as the North and South Grove trails. This means you won’t be able to see the giant sequoias with your furry friend. Service dogs are permitted everywhere.

How Do the Historical Aspects of Pecos National Historical Park Compare to the Natural Wonders of Calaveras Big Trees State Park?

Pecos National Historical Park boasts rich pecos park history, showcasing ancient Puebloan ruins and the Spanish Colonial mission. In contrast, Calaveras Big Trees State Park captures the awe of nature with its towering giant sequoias. While one narrates human stories, the other celebrates the magnificent artistry of the natural world.

Frequently Asked Questions

When Is the best time to Visit Calaveras Big Trees State Park?

The park is open year-round, so the best time of year depends on what you want to experience! Spring brings blooming dogwoods, summer is perfect for swimming, and fall offers beautiful colors with fewer visitors. Winter provides unique seasonal events like snowshoeing among the silent, snow-dusted giants.

What are the main attractions at Calaveras Big Trees State Park?

The primary attractions at Big Trees State Park are the magnificent giant sequoias. You can see many notable trees along the accessible North Grove Trail or the more rugged South Grove Trail. The modern visitors center and museum are also key highlights, offering great information and history.

Where is Calaveras Big Trees State Park located?

This state park is located in Calaveras County, nestled in the Sierra Nevada mountains of California. It’s situated on Highway 4, just northeast of the town of Arnold. This places it right in the heart of the historic Gold Country, making it a scenic and accessible destination.

What is the largest tree in Calaveras state park?

The largest tree in Calaveras Big Trees State Park is the Agassiz Tree. To see this massive giant sequoia, you’ll need to hike the trail into the South Grove. It stands as the king among the park’s many large trees and is well worth the trek.

Key Highlights

Welcome to your guide for Blue Springs State Park! This beautiful destination in Orange City offers a perfect blend of relaxation and adventure. Before you plan your trip, here are a few key highlights to know:

  • The park is a famous designated refuge for manatees, especially during the cool manatee season.
  • A scenic boardwalk runs along the spring run, offering amazing views of wildlife.
  • Enjoy various water activities like swimming, tubing, and paddling in the 72-degree water.
  • Explore lush trails, have a picnic, and learn about local history at the Thursby House.
  • This state park offers camping facilities and cabins for overnight stays.

Discovering Blue Springs State Park

Nestled in the heart of Central Florida, Blue Spring State Park is a jewel among Florida’s state parks. Located in Orange City, this destination is renowned for its crystal-clear spring and the gentle giants that call it home, making it a must-visit for nature lovers and families alike.

Each year, the park draws visitors from all over to witness its stunning natural beauty and incredible wildlife. Whether you are looking for a peaceful retreat or an active day outdoors, Blue Spring State Park provides an unforgettable experience with the iconic Florida manatee at its center.

History and Natural Formation of the Springs

Long before it became a popular park, the Blue Springs area was inhabited by the Timucua people. Its documented history began in 1774 when famed naturalist William Bartram recorded its beauty. Later, in the mid-1800s, Louis Thursby and his family settled here, building the historic Thursby House, which still stands today as a window into the past.

The centerpiece of the park is the spring itself, a first-magnitude spring that pumps out an impressive 70 million gallons of water daily. This powerful water flow emerges from the spring boil, creating a habitat that supports a wide variety of life, from aquatic plants to numerous species of Florida fish.

Over time, conservation efforts have been crucial. An episode of “The Underwater World of Jacques Cousteau” highlighted the spring’s ecological significance, leading to its current status as a protected sanctuary. This ensures the spring remains a vital resource for both wildlife and future generations to enjoy.

Park Location and Getting There

Finding your way to Blue Spring State Park is simple. The park is conveniently located at 2100 W. French Ave. in Orange City, Florida. This central location makes it an easy day trip from several major hubs. Are you traveling from Orlando? The park is just 41 miles north. If you’re coming from Daytona Beach, it’s a short 38-mile drive southwest.

This accessibility makes the state park a popular year-round destination for both locals and tourists. Its proximity to major cities allows you to easily escape into nature without a long and complicated journey.

When planning your visit, keep in mind the park’s popularity, especially during peak seasons. Arriving early is always a good idea to ensure entry, as the park often reaches capacity and closes its gates to new visitors.

Experiencing the Springs: Main Attractions

Blue Spring State Park is filled with attractions that showcase its incredible natural beauty. From the powerful spring boil to the gentle manatees that gather in its waters, there is always something amazing to see. The park’s main features are designed to give you an up-close look at this unique ecosystem.

One of the best ways to experience it all is by taking a stroll on the park’s iconic boardwalk, which offers breathtaking views of the spring and its inhabitants. In the sections below, we’ll explore the top attractions that make a visit to this park so memorable.

Manatee Viewing Opportunities

Blue Spring is a designated manatee refuge, making it one of the best places in Florida to see these gentle creatures. During the winter, the spring run becomes a vital winter home for hundreds of Florida manatees. They flock to the constant 72-degree water as a safe haven from the colder temperatures of the St. Johns River.

The best spot for viewing is from the park’s extensive boardwalk, which provides a bird’s-eye view without disturbing the animals. During the peak of manatee season, from mid-November to March, you can see dozens, sometimes hundreds, of manatees resting and playing in the clear water. It’s an awe-inspiring sight that highlights the importance of this protected area.

To make the most of your viewing experience, remember these tips:

  • The colder the weather, the more manatees you are likely to see in the spring.
  • Bring binoculars for a closer look at manatees farther from the boardwalk.
  • Visit on a weekday to avoid the largest crowds.

The Iconic Boardwalk and Scenic Views

A walk along the scenic boardwalk at Blue Spring State Park is a highlight for many visitors. This well-maintained path stretches for over a mile, winding through a lush hammock and offering spectacular views of the spring run from its source to the St. Johns River.

One of the best features of the boardwalk is its accessibility. It is designed to accommodate wheelchairs, strollers, and walkers, ensuring that everyone can enjoy the park’s natural wonders. As you stroll, you get a perfect vantage point to observe the clear water, aquatic plants, and the diverse wildlife that call this area home.

From the boardwalk, you can often spot:

  • Manatees resting in the warm water during winter.
  • Large gar and other Florida fish swimming below.
  • Turtles, anhingas, and even the occasional alligator.

The boardwalk also connects to other park trails, such as the Pine Island Trail, allowing you to extend your exploration.

Activities for Every Interest

Beyond its beautiful scenery, Blue Spring State Park is a playground for outdoor enthusiasts. The park offers a wide array of activities centered around its refreshing spring water, ensuring there is something for everyone to enjoy. Whether you prefer a relaxing float or an active paddle, the opportunities for fun are endless.

From swimming and tubing in the clear run to exploring the St. Johns River by kayak, the park’s water activities are a perfect way to cool off and connect with nature. Let’s look at some of the most popular ways you can dive into the fun at Blue Springs.

Swimming, Snorkeling, and Tubing in Crystal Waters

There is nothing quite like a dip in the cool, 72-degree spring water on a hot Florida day. The swimming area at Blue Spring is a popular spot for locals and visitors to cool off. Swimming is permitted from April 1 through November 14, but the spring run is closed during manatee season to protect the gentle giants.

For those who want to see what lies beneath the surface, snorkeling is a fantastic option. You can bring your own gear or join a guided tour to explore the vibrant underwater world. If you’re looking for a more relaxed experience, tubing is a must-do. You can rent a tube and enjoy a leisurely float down the spring run, which lasts for about an eighth of a mile.

Before you jump in, here are a few things to know:

  • The water depth varies, so be prepared to tread water in deeper sections.
  • Disposable items, food, and coolers are not allowed in the water.
  • Certified divers can also explore the spring, but capacity is limited.

Kayaking, Canoeing, and Paddleboarding Adventures

Exploring the tranquil waters of Blue Springs State Park offers exhilarating opportunities for kayakers, canoeists, and paddleboard enthusiasts. The spring run, teeming with aquatic plants and wildlife, creates an ideal environment to glide along while appreciating the natural beauty. As you navigate through these scenic waters, you might even spot Florida manatees, especially during the winter months. With various launch points and easy access, paddling adventures here ensure a memorable experience amidst the park’s enchanting landscape. Enjoy a peaceful day on the water!

Exploring Wildlife and Nature

Blue Spring State Park is a sanctuary for an incredible diversity of native wildlife. While the Florida manatees are the stars of the show, the park’s various habitats support a wide range of other fascinating creatures. From the scrublands to the riverbanks, every corner of the park is teeming with life.

The delicate balance of this ecosystem, including its aquatic plants and animal populations, is carefully managed. Efforts by organizations like the Florida Fish and Wildlife Conservation Commission help ensure that these species continue to thrive. Read on to discover more about the amazing animals you might encounter during your visit.

Florida Manatees and Seasonal Sightings

The main wildlife attraction at the park is undoubtedly the Florida manatee. Blue Spring is a designated manatee refuge, providing a critical winter home for these gentle marine mammals. When the St. Johns River gets too cold, hundreds of manatees seek shelter in the spring’s consistently warm waters.

This annual migration creates an unforgettable spectacle for visitors. The peak of manatee season, running from mid-November through March, is the best time for sightings. The clear water from the spring boil allows for exceptional viewing opportunities, as you can watch the manatees rest, nurse their young, and interact with one another.

Seeing these magnificent creatures in their natural habitat is a powerful reminder of why conservation efforts are so important. The park’s protection ensures that this safe haven will be available for manatees for years to come.

Birdwatching and Other Native Wildlife

Beyond the manatees, Blue Spring State Park is a paradise for wildlife enthusiasts. The park’s diverse ecosystems provide a home for a wide variety of native wildlife. As you explore, keep your eyes peeled for large gar and other Florida fish in the spring run, along with turtles, anhingas, and even alligators basking on the riverbanks.

Birdwatching is another popular activity here. The park is home to the endemic Florida scrub-jay, whose distinct calls can often be heard in the scrub habitat. Remember, it is illegal to feed these birds as it can cause them harm. Hiking through the park’s trails might also lead to sightings of deer or other local animals.

The health of these animal populations is closely tied to the park’s environment, from its aquatic plants to its scrubby flatwoods. The Florida Fish and Wildlife Conservation Commission works to protect these habitats, ensuring a thriving ecosystem for all its inhabitants.

Visiting Essentials: Reservations, Hours, and Fees

A little planning can make your trip to Blue Spring State Park smooth and enjoyable. Because of its popularity, it’s important to be aware of park hours and potential closures. The park often reaches capacity early in the day, especially on weekends and during peak season, so arriving early is highly recommended.

You should also check the latest information on entrance fees before you go. While some activities are included with admission, others, like camping or boat tours, require separate reservations and fees. The park has a camp store for supplies and souvenirs.

Camping, Picnicking, and Park Facilities

For an immersive experience, consider staying overnight at the park. Blue Spring State Park offers excellent park facilities, including a campground with 51 campsites suitable for tents and RVs. Each site comes with a picnic table, water, electricity, and an outdoor grill. Cabins are also available for those who prefer more comfort.

Picnicking is a popular activity, with numerous picnic tables and grills scattered throughout the park. For larger groups, covered pavilions are available on a first-come, first-served basis. A playground located in the lower day-use area provides a great spot for kids to burn off some energy.

Here’s a quick look at the overnight accommodations:

Facility Details
Campsites 51 sites with water, electricity, picnic table, and grill. Accommodates RVs up to 40 feet.
Cabins 6 two-bedroom cabins with A/C, kitchen, bathroom, and screened porch. Accommodates up to 6 people.

Reservations for both campsites and cabins are highly recommended and can be made up to 11 months in advance.

Which Park Offers a Better Experience for Nature Lovers: Blue Springs State Park or Big Trees State Park?

For nature lovers seeking tranquility, both parks offer unique experiences. At Blue Springs State Park, you can enjoy stunning springs and vibrant wildlife. Meanwhile, if towering giants fascinate you, visit Big Trees State Park where you can discover california’s big trees amidst serene hiking trails and lush forest scenery.

Frequently Asked Questions

When is the best time to see manatees at Blue Springs?

The best time to see the Florida manatee at Blue Spring State Park is during manatee season, which runs from mid-November through March. During these colder months, hundreds of manatees gather in the 72-degree spring run, using it as a warm winter home, making for incredible viewing opportunities.

Are there alligators in Blue Springs State Park?

Yes, alligators are part of the native wildlife at Blue Spring State Park. As with any natural Florida environment, you may spot them in or near the water. It is important to always be aware of your surroundings and keep a safe distance from all wildlife, including alligators.

Is swimming allowed at Blue Springs State Park?

Yes, swimming is allowed in the refreshing spring water of Blue Springs. The swimming area is open annually from April 1 to November 14. However, all water activities, including swimming, are prohibited during manatee season (mid-November to March) to provide a safe refuge for the manatees.

Key Highlights

Welcome to Pecos National Historical Park, a place where layers of history come alive! This guide will walk you through its most fascinating aspects.

  • Explore the impressive ruins of Pecos Pueblo, once a powerful trading center home to over 2,000 people.
  • Discover the remains of a 17th-century Spanish mission church, showcasing the complex interactions between Pueblo people and colonists.
  • Step back into the Old West with the ranching history of the Forked Lightning Ranch.
  • Learn about the Civil War’s impact on New Mexico at the Glorieta Pass Battlefield.
  • Walk along portions of the historic Santa Fe Trail, a vital 19th-century trade route.

The Historical Legacy of Pecos National Historical Park

Pecos National Historical Park is far more than just a beautiful landscape; it’s a true cultural crossroads. For centuries, this area in New Mexico was a hub of trade, conflict, and cultural exchange. The history of the park spans from the powerful Ancestral Pueblo people to the arrival of Spanish colonists, the establishment of a famous ranch, and even a pivotal Civil War battle. It’s a place that tells a multi-layered story of the American Southwest.

As you explore the park, you’ll witness the deep history of New Mexico firsthand. The grounds preserve the story of the Pecos Pueblo and its interactions with both Plains cultures and Spanish authorities. Let’s look closer at the ancient people who first shaped this land and the European influence that followed.

Ancient Pecos Pueblo and Its People

Long before Spanish explorers arrived, the Pecos Valley was home to a thriving community. The Pecos Pueblo, also known as Cicuye, grew into a formidable village by the 15th century. This impressive five-story complex housed more than 2,000 people, making it one of the largest communities in the region. The Ancestral Pueblo people here created a rich culture, complete with intricate crafts and inventive architecture.

Positioned strategically between the farming communities of the Rio Grande Valley and the buffalo-hunting tribes of the Great Plains, Pecos Pueblo became a major trading hub. The Pecos people skillfully acted as intermediaries, facilitating the exchange of goods and ideas at this cultural crossroads. Their society was built on a strong foundation of religious practices, evidenced by the remains of over 20 underground ceremonial rooms, or kivas.

Despite their power, a combination of disease, raids, and the encroachment of settlers led to the pueblo’s decline. In 1838, the last remaining Pecos Indians left their ancestral home and moved to Jemez Pueblo, where their descendants live today.

Spanish Mission Influence and Ruins

The arrival of Spanish colonists in the 16th century forever changed the landscape and lives of the people at Pecos. In the early 1600s, Franciscan friars established the Mission Nuestra Señora de los Ángeles de Porciúncula de los Pecos. This grand mission church was built near the pueblo as the Spanish sought to convert the indigenous peoples to Christianity.

However, tensions grew between the Spanish authorities and the Pueblo people. In 1680, in a unified uprising known as the Pueblo Revolt, the Spanish were driven out of New Mexico, and the original mission church at the Pecos site was destroyed. It was a powerful statement of resistance against colonial rule.

When the Spanish returned in 1692, the relationship was different. The Pecos people and the Spanish found a way to coexist, and a new, smaller church was built in 1717. The ruins of this second church, along with the foundations of the first, stand today as silent reminders of this turbulent period of Spanish influence.

Forked Lightning Ranch: A Glimpse into Ranching History

The history of Pecos National Historical Park doesn’t end with the ancient pueblo and Spanish mission. The park also preserves a significant chapter of 20th-century ranching history at the Forked Lightning Ranch. This property adds another fascinating layer to the park’s story, showcasing the transition of the Old West into the modern era.

Originally established by rodeo promoter Tex Austin and later owned by oilman Buddy Fogelson and his wife, actress Greer Garson, the ranch represents a different kind of life in the Pecos Valley. Now, you can explore this piece of cowboy culture and learn about the individuals who shaped it.

The Story of Tex Austin’s Ranch Era

In the 1920s, the famous rodeo producer Tex Austin saw potential in the beautiful land along the upper Pecos River. He purchased a property that included Kozlowski’s Stage Stop, a historic stop on the Santa Fe Trail, and established the Forked Lightning Ranch. Initially, it was a working cattle ranch, continuing the long tradition of livestock in the region.

Soon, however, Austin converted it into a dude ranch, marketing it to wealthy Easterners seeking an authentic Western experience. He commissioned the renowned architect John Gaw Meem to design the main ranch house in the Pueblo Revival style, blending modern luxury with traditional Southwestern aesthetics. This era brought a new kind of visitor to the Pecos Valley.

Unfortunately, Austin’s ambitious venture was heavily mortgaged, and the ranch closed in 1933. Though his ownership was brief, Tex Austin left a lasting mark on the ranching history of the area, a legacy that is now preserved within Pecos National Historical Park.

Architectural Highlights and Guided Tour Options

The Forked Lightning Ranch House is a masterpiece of Pueblo Revival architecture, designed to harmonize with the surrounding landscape. Its style reflects a deep appreciation for the region’s cultural heritage, and exploring its features offers a unique glimpse into the 1920s dude ranch craze. Are you interested in what makes it so special?

Some of the key architectural highlights include:

  • Classic Pueblo Revival style by architect John Gaw Meem.
  • Thick, adobe-style walls and flat roofs.
  • Projecting wooden ceiling beams known as vigas.
  • Beautifully crafted details that blend rustic and elegant elements.

The National Park Service offers guided tours of the ranch house, allowing you to step inside and learn about its history, architecture, and famous residents like Greer Garson. These tours provide fascinating insights into a different era of the Pecos Valley. Be sure to check the park’s official website or inquire at the visitor center for tour schedules and availability.

Exploring Key Sites and Attractions at the Park

Now that you have a sense of the rich history, what are the must-see attractions at Pecos National Historical Park? The park is divided into several units, each protecting a unique piece of the story. From ancient ruins to a Civil War battlefield, there are many historical sites to discover. Your journey begins at the visitor center, where you can get oriented and plan your day.

The main unit of the park offers a well-marked trail that guides you through the most prominent ruins. Beyond that, other key sites reveal the area’s importance in trade and conflict, offering a comprehensive look at the forces that shaped this region.

Old Santa Fe Trail and Its Significance

Running directly through the park are visible ruts from the historic Santa Fe Trail, one of the most important overland routes of the 19th century. From about 1821 to 1880, this trail was a bustling highway of commerce, connecting Missouri with Santa Fe and facilitating the westward expansion of the United States. Can you imagine the wagon trains that once passed this way?

Long after the Pecos Pueblo was abandoned, travelers on the trail would have seen the magnificent ruins, wondering about the civilization that once thrived there. The trail passed by Kozlowski’s Trading Post, which later became part of the Forked Lightning Ranch. This spot served as a vital stop for weary travelers and their animals.

Today, walking along these preserved sections of the trail offers a tangible connection to the past. It’s a chance to stand in the footsteps of traders, soldiers, and settlers who journeyed through this landscape, linking the American Southwest to the rest of the nation.

Glorieta Pass Battlefield and Civil War Stories

Pecos National Historical Park also preserves a key Civil War battlefield. In March 1862, the Battle of Glorieta Pass was fought here, a crucial engagement that has been called the “Gettysburg of the West.” The battle pitted Confederate forces, who aimed to seize Fort Union and control the Southwest, against Union militias from the New Mexico and Colorado Territories.

The three-day battle ended in a strategic Union victory, halting the Confederate advance in this part of northern New Mexico. The fight secured the region for the Union and dashed Confederate hopes of capturing valuable resources and a pathway to California.

While some parts of the original battlefield have been impacted by modern highway construction, the National Park Service protects two key sections. Access to the Glorieta Pass Battlefield is often provided through ranger-led tours, offering visitors a chance to learn about the Civil War’s surprising and significant role in this remote corner of the country.

Visitor Experience and Practical Tips

Planning your visit to Pecos National Historical Park is simple, but a few practical tips can help you make the most of your day. Start your adventure at the main visitor center, where you can find maps, exhibits, and friendly park rangers ready to answer your questions. The center also features a short film that provides an excellent overview of the park’s history.

From restrooms to trail guides, the visitor center is your main hub for facilities. Before you head out to explore the trails and ruins, it’s a good idea to get oriented and learn about any special programs or closures. The following sections will give you more detailed information on getting to the park and what to expect upon arrival.

Getting to the Park: Directions and Travel Insights

Getting to Pecos National Historical Park is straightforward, as it’s conveniently located just a short drive from Santa Fe. The main unit of the park is situated about 25 miles southeast of the city. Having your own vehicle is the most practical way to visit, as there is currently no public transportation that goes directly to the park.

From Santa Fe, you will travel southeast on Interstate 25. The drive is scenic, taking you through the rolling hills at the southern tip of the Rocky Mountains. Clear signage will direct you to the park entrance.

Upon arrival, you’ll find ample parking at the main visitor center. Below are the basic directions to help you find your way.

Starting Point Directions
Santa Fe, NM Take I-25 North toward Las Vegas. Take Exit 299 for NM-50 toward Pecos. Turn left on NM-50, then turn right onto NM-63 S. The park entrance will be on your right.
Las Vegas, NM Take I-25 South toward Santa Fe. Take Exit 307 for NM-63 toward Pecos/Villanueva. Turn right onto NM-63 N. The park entrance will be on your left.

Facilities, Operating Hours, and Entry Fees

One of the best things about visiting Pecos National Historical Park is that there are no entry fees, making it an accessible destination for everyone! You can explore the main ruins and trails free of charge. However, it’s always a good practice to check the park’s official website before your visit for the most current information.

The park’s operating hours can vary by season, so confirming them ahead of time is essential. The main visitor center is your primary resource for everything you need. Key facilities available to you include:

  • A visitor center with exhibits and a park store
  • Public restrooms
  • A 1.25-mile self-guided trail through the pueblo and mission ruins
  • Picnic areas for a relaxing lunch

For the most accurate and up-to-date details, always consult the official National Park Service (NPS) website. Look for the .gov website to ensure you are getting information from the official government organization and not from a site that might ask for sensitive information. This is the best way to confirm operating hours and any potential alerts or closures.

How Do the Historical Aspects of Pecos National Historical Park Compare to the Natural Attractions of East Coast National Parks?

Pecos National Historical Park offers a rich tapestry of cultural history, showcasing ancient pueblos and Spanish missions. In contrast, East Coast national parks like Acadia and Everglades boast stunning natural landscapes and diverse ecosystems. To truly appreciate these differences, one might choose to explore national parks from acadia everglades.

Frequently Asked Questions

What are the main attractions to see at Pecos National Historical Park?

The main attractions at Pecos National Historical Park include the extensive ruins of the Pecos Pueblo and its Spanish mission church. You can also see preserved sections of the Santa Fe Trail and learn about Civil War history at the Glorieta Pass Battlefield. Start your visit at the visitor center to get oriented.

What hiking trails are available in Pecos National Historical Park?

The primary hiking trail is a 1.25-mile loop that takes you through the Ancestral Pueblo and mission ruins, offering views of Glorieta Mesa. The park also offers ranger-led hikes on the Glorieta Pass Battle Loop, providing incredible views of the Sangre de Cristo Mountains.

What are the operating hours and entry fees for Pecos National Historical Park?

There is no entry fee to visit Pecos National Historical Park. Operating hours for the visitor center and gates can change seasonally. It is highly recommended that you check the park’s official websites on the National Park Service page for the most current hours before you plan your trip.

Key Highlights

Welcome to your essential guide for Itasca State Park! This beautiful destination in northern Minnesota offers an unforgettable experience for every visitor.

  • Walk across the iconic headwaters of the Mississippi River, where the mighty river begins its long journey.
  • Explore Minnesota’s oldest state park, spanning over 32,000 acres of pristine forests and more than 100 lakes.
  • Discover rich history and interactive exhibits at the Jacob V. Brower Visitor Center and Mary Gibbs Mississippi Headwaters Center.
  • Enjoy year-round outdoor activities, from summer canoeing on Lake Itasca to winter cross-country skiing.
  • Stay in historic lodging like the Douglas Lodge or camp under the stars at well-equipped campgrounds.

Overview of Itasca State Park

Established in 1891, Itasca State Park is Minnesota’s oldest state park and a treasure of the Upper Midwest. Nestled in northern Minnesota, this park protects the pristine source of the Mississippi River. Its vast 32,000 acres are a sanctuary of natural beauty, featuring towering pines, sparkling lakes, and diverse wildlife. Are you looking for a place to connect with nature and history?

This park is more than just a landmark; it’s a year-round destination for adventure and relaxation. With over 100 lakes and miles of trails, Itasca offers endless opportunities for outdoor enthusiasts. From exploring its past to enjoying its present-day recreational offerings, there is something for everyone in this remarkable state park.

A Brief History of the Park

For thousands of years, this area was home to Native American communities who lived off the rich land. Archaeological sites, like the Itasca Bison Kill Site and burial mounds at the Itasca Indian Cemetery, offer a glimpse into this deep history. In 1832, Anishinaabe guide Ozawindib led explorer Henry Schoolcraft to the river’s source at Lake Itasca, a pivotal moment in the region’s recorded history.

By the late 19th century, logging threatened the area’s magnificent pine forests. A historian and land surveyor named Jacob V. Brower fought tirelessly to protect this unique landscape for future generations. His determined efforts led the Minnesota Legislature to establish Itasca as the oldest state park in 1891, preserving its natural wonders.

Today, the park continues to be a center for both recreation and education. The University of Minnesota operates the Itasca Biological Station and Labs, one of the nation’s oldest inland field training centers. This facility allows students and researchers to study the park’s undisturbed ecosystems, carrying on a legacy of conservation and discovery.

Significance of the Mississippi River Headwaters

The headwaters of the Mississippi River are undeniably the star attraction of Itasca State Park. This is the very spot where the Mighty Mississippi begins its 2,348-mile journey to the Gulf of Mexico. It’s a powerful experience to stand at the birthplace of the Mississippi River, a waterway that has shaped the history and culture of North America.

What makes the Mississippi headwaters so special? Here, the river is just a small, shallow stream flowing out of Lake Itasca. You can easily walk across a line of rocks that mark the official beginning of the river. It’s a symbolic and memorable activity for visitors of all ages, connecting you directly to the force of one of the world’s greatest rivers.

This state park carefully preserves the area, allowing you to experience the Mississippi headwaters in a serene and natural setting. The surrounding landscape, with its tall pines and clear water, remains much as it has for centuries, offering a peaceful moment of reflection on the river’s humble origins.

How to Get to Itasca State Park

Getting to Itasca State Park is a scenic journey into the heart of northern Minnesota. Located about 21 miles north of Park Rapids and 25 miles from Bagley, the park is easily accessible by car. Whether you are coming from a nearby town or a major city, the drive itself is part of the adventure, showcasing the beautiful countryside.

Once you arrive, the Jacob V. Brower Visitor Center is your primary hub for information, maps, and park passes. The routes leading to the park are well-marked, guiding you from major highways directly to the park entrance. Are you ready to find the best way to get there? The following sections will provide you with detailed driving directions and transportation information.

Best Driving Routes and Directions

Finding your way to Itasca State Park is straightforward with these driving routes. If you’re traveling from the Minneapolis-St. Paul area, your best bet is to head northwest on I-94. Take US-10 West toward Detroit Lakes, then follow MN-34 West to MN-200 West, which will lead you right to the park. The entire drive takes approximately three and a half to four hours.

For visitors coming from Duluth, the journey is about three hours long. You’ll take US-2 West through Grand Rapids until you reach MN-46 North. Continue on MN-46 until it intersects with MN-200, then turn west to enter the park. This route offers lovely views of northern Minnesota.

If you are coming from Fargo, North Dakota, the drive is around two hours. Take US-10 East to Detroit Lakes, then switch to MN-34 East. From there, transition onto MN-200 West, which takes you directly to the entrance near Lake Itasca. These are some of the best places to start your trip from, ensuring a smooth arrival.

Nearest Airports and Transportation Options

If you plan on flying, the closest airport is Bemidji Regional Airport (BJI), located about 45 minutes from the park. It offers convenient connections through Delta, making it a great option for travelers coming from farther away. Another choice is Duluth International Airport (DLH), which is about a two-and-a-half-hour drive and provides more flight options. Fargo’s Hector International Airport (FAR) is also about two and a half hours away.

Public transportation options directly to the park are limited. Jefferson Lines provides bus service to nearby towns like Bemidji and Park Rapids. From there, you would need to arrange for a taxi or shuttle service for the remainder of the journey. Some local tour companies may offer transportation from Lake Bemidji during peak season.

Renting a car is the most flexible and recommended mode of transportation. Having your own vehicle allows you to travel from the airport at your own pace and gives you the freedom to explore the park and the beautiful surrounding area without restrictions. Car rentals are available at all nearby airports.

Camping and Lodging Options

When it comes to staying overnight, Itasca State Park offers a wonderful variety of options to fit any preference. You can immerse yourself in history by staying at the magnificent Douglas Lodge or rent one of the cozy cabins scattered throughout the park. For those who prefer sleeping under the stars, the park provides excellent camping opportunities.

Whether you’re looking for modern comforts or a rustic wilderness experience, you’ll find it here. The Bear Paw Campground is a popular choice for families, while backcountry sites offer solitude for adventurous campers. Let’s explore the different campgrounds, cabins, and lodges available for your stay.

Campgrounds and Site Types

Itasca State Park has two main campgrounds that cater to different camping styles. The Bear Paw Campground offers 79 sites, including some with full hookups and pull-through access, making it great for RVs. Each campsite comes with a picnic table and fire ring, and the campground provides modern amenities like showers and restrooms.

The Pine Ridge Campground is even larger, with 155 sites, including 65 with electric hookups. It’s conveniently located near the Mississippi Headwaters and is a family favorite due to its playground and easy access to the swimming beach. For a more rugged experience, the park also has backpack and cart-in sites for those wanting to venture further off the beaten path.

  • Bear Paw Campground: Offers sites with full hookups and proximity to bike trails.
  • Pine Ridge Campground: Features electric hookups and is close to major attractions.
  • Backpack & Cart-In Sites: Provides a more primitive camping experience with fire rings and pit toilets.
  • Group Camps: Accommodates large groups at Elk Lake Group Camp and Lake Ozawindib Group Center.

No matter which campsite you choose, you’ll be surrounded by the park’s natural beauty. Many sites are situated near the scenic Wilderness Drive, offering a peaceful setting for your outdoor adventure.

Cabins, Lodges, and Alternative Stays

If camping isn’t your style, Itasca State Park provides charming and comfortable lodging options. The historic Douglas Lodge, built in 1905, is a centerpiece of the park. It offers beautiful guest rooms with stunning views of Lake Itasca and features a full-service restaurant known for its delicious wild rice soup.

For a more private retreat, you can rent one of the many cabins available throughout the park. These range from simple, one-room units to larger family cabins with multiple bedrooms and kitchen facilities. The Pine Ridge cabins and Douglas Lodge cabins are popular choices, providing a cozy base for exploring the park.

  • Douglas Lodge: Historic 1905 lodge with guest rooms and an on-site restaurant.
  • Cabins: Various sizes available, from one-room units to multi-bedroom family cabins.
  • Clubhouse: A large building overlooking the lake that can accommodate up to 21 guests.
  • Mississippi Headwaters Hostel: Offers budget-friendly accommodations with shared rooms and a full kitchen.

These alternative stays allow you to enjoy the rustic beauty of Itasca without sacrificing comfort. Whether you choose a historic lodge or a secluded cabin, you’ll have a memorable stay.

Must-See Attractions in Itasca State Park

Itasca State Park is filled with iconic landmarks and breathtaking sights that you won’t want to miss. The top attraction is, of course, the headwaters of the Mississippi River, where you can walk across the beginning of the legendary waterway. But the wonders of the park don’t stop there.

From historic structures to natural marvels, there is so much to see. You can climb the Aiton Heights Fire Tower for panoramic views, relax in the serene Preacher’s Grove, or step back in time at the historic Douglas Lodge. Are you ready to discover these incredible places?

The Headwaters of the Mississippi River

A visit to Itasca State Park isn’t complete without seeing the Mississippi River headwaters. This is the exact spot where the river emerges from Lake Itasca, beginning its long journey south. The water here is so shallow that you can easily walk across a stretch of rocks, a cherished tradition for visitors. It’s a truly unique experience to stand at the birthplace of the Mississippi River.

To enhance your visit, stop by the Mary Gibbs Mississippi Headwaters Center. This modern facility features interactive exhibits that tell the story of the river and the park’s history. It also has a café and a gift shop, making it a perfect starting point for your exploration of the headwaters area.

The area is thoughtfully preserved to maintain its natural charm. A log bridge crosses the stream, offering a picturesque view for those who prefer to stay dry. Whether you choose to wade through the shallow water or admire it from the shore, this attraction provides a powerful connection to one of America’s greatest natural wonders.

Historic Douglas Lodge and Other Landmarks

Beyond the headwaters, Itasca is home to several historic landmarks that tell the story of the park’s past. The magnificent Douglas Lodge, constructed in 1905, is the oldest surviving building in the park and a prime example of rustic architecture. Its log construction and grand stone fireplace create a warm, inviting atmosphere for guests.

For an unbeatable view, make the climb up the historic Aiton Heights Fire Tower. This 100-foot tower offers a breathtaking 360-degree panorama of the park’s forests and lakes. The hike to the tower is a rewarding adventure in itself, leading you through beautiful woodlands.

  • Douglas Lodge: A historic 1905 lodge offering rooms, cabins, and a full-service restaurant.
  • Aiton Heights Fire Tower: A 100-foot tower with stunning panoramic views of the park.
  • Preacher’s Grove: A tranquil stand of ancient, towering red pines, perfect for quiet reflection.
  • Old Timer’s Cabin: A small, charming cabin built by the Civilian Conservation Corps (CCC), often called the “Honeymooner’s Cabin.”

Another must-see is Preacher’s Grove, a serene stand of old-growth red pines. Walking among these giants, some over 200 years old, is a humbling experience that connects you to the timeless beauty of the forest.

Outdoor Activities for Every Visitor

Itasca State Park is an outdoor playground with activities for every season and skill level. With miles of hiking trails and paved biking trails, exploring the park on foot or by bike is a fantastic way to see the scenery. The calm waters of Lake Itasca and the gentle current of the Mississippi River are perfect for canoeing and kayaking.

Whether you’re looking for an active adventure or a peaceful day in nature, you’ll find plenty to do. From fishing in the clear lakes to simply enjoying a scenic drive, the park invites you to get outside and explore. Let’s look closer at the trails and water activities available.

Hiking and Biking Trails Overview

With 49 miles of hiking trails, Itasca State Park is a paradise for walkers and hikers. The trails wind through diverse landscapes, from old-growth pine forests to wetlands and lakeshores. A favorite is the Dr. Roberts Trail, an accessible loop that showcases the park’s natural beauty. For a more challenging hike, the trail to the Aiton Heights Fire Tower rewards you with incredible views.

Biking is another fantastic way to see the park. A 16-mile paved trail system offers a smooth and scenic bike ride. A popular six-mile section connects Douglas Lodge to the Mississippi Headwaters, taking you past beautiful Lake Itasca. The 10-mile Wilderness Drive is also a great loop for cyclists who want to immerse themselves in the park’s forests.

Whether you prefer a leisurely stroll or an challenging trek, you’ll find a trail that suits your style. Here are a few popular options:

Trail Name Length (miles) Highlights
Dr. Roberts Trail 3.3 (loop) Old-growth forests, wetlands, shores of Lake Itasca
Aiton Heights Fire Tower Trail 1.5 (round trip) Steep climb to a historic fire tower with panoramic views
Headwaters Loop 1.5 (loop) Flat, accessible trail around the Mississippi Headwaters
Wilderness Drive 10 (loop) Paved path perfect for biking through forests and past lakes

Water Activities: Canoeing, Swimming, and Fishing

With over 100 lakes and the start of the Mississippi River, Itasca State Park has plenty of water for everyone to enjoy. Canoeing and kayaking are popular activities, with Lake Itasca and the quieter Elk Lake being top spots. Paddling along the shoreline provides a peaceful way to observe wildlife and enjoy the serene beauty of the north woods.

On warm summer days, you can cool off with a swim at the park’s designated swimming beach. The beach area is family-friendly and located near the Pine Ridge Campground, making it a convenient spot to relax and play. Fishing is another favorite pastime, with anglers casting their lines for a variety of species.

  • Canoeing & Kayaking: Explore the calm waters of Lake Itasca, Elk Lake, or the beginning of the Mississippi River.
  • Swimming: A designated swimming beach offers a safe and fun place to cool off.
  • Fishing: Cast for northern pike, walleye, bass, and panfish in the park’s numerous lakes.
  • Boat Rentals: Don’t have your own gear? You can rent canoes, kayaks, paddleboards, and fishing boats at the park.

Whether you’re an experienced angler hoping to catch a trophy northern pike or a family looking for a fun day on the water, Itasca’s lakes and rivers offer endless opportunities for adventure.

Wildlife, Nature, and Scenic Highlights

Itasca State Park is a sanctuary for an incredible array of flora and fauna. The park’s diverse habitats support common wildlife sightings and fantastic birdwatching opportunities. As you explore, you’ll be surrounded by majestic old-growth forests of red pine and white pine, so significant that the area was named a National Natural Landmark.

The natural beauty here is truly remarkable, from the ancient trees to the sparkling lakes and the animals that call this place home. Are you ready to discover the wild side of Itasca? Let’s take a look at the wildlife and scenic features you can expect to see.

Common Wildlife Sightings and Birdwatching

The park is teeming with wildlife, making every hike or paddle an opportunity for a special encounter. White-tailed deer are frequently seen grazing in open meadows, while beavers are busy building dams along the waterways. If you’re quiet and patient, you might even spot a black bear, porcupine, or a reclusive timber wolf.

Birdwatching is exceptional in Itasca State Park, which is home to over 200 bird species. The haunting call of the Common Loon echoes across the lakes, and bald eagles can often be seen soaring overhead. The park’s location at the intersection of three major biomes creates a rich environment for a wide variety of birds.

  • Mammals: Look for white-tailed deer, beavers, porcupines, black bears, and timber wolves.
  • Birds: Spot bald eagles, loons, woodpeckers, warblers, and ospreys.
  • Best Viewing Times: Early morning and late afternoon are typically the best times to see active wildlife.
  • Bring Binoculars: Enhance your birdwatching and wildlife viewing experience.

As a protected area, Itasca is a vital steward of these natural resources. Its pristine habitats, bordering the Chippewa National Forest, ensure that this incredible diversity of wildlife will thrive for years to come.

Forests, Lakes, and Notable Natural Features

The natural beauty of Itasca State Park is defined by its magnificent forests and pristine lakes. The park is most famous for its stands of old-growth red and white pines, some of which are over 200 years old. Walking beneath these towering giants, with sunlight filtering down to the fern-covered forest floor, is an awe-inspiring experience.

This stunning landscape, with its unique combination of pine forests and clear lakes, earned the Itasca Natural Area the designation of a National Natural Landmark in 1965. The park protects a rare ecosystem that showcases Minnesota’s wild heritage.

  • Old-Growth Forests: Home to virgin red and white pines, some over two centuries old.
  • Numerous Lakes: The park contains over 100 lakes, with Lake Itasca being the largest and most famous.
  • Preacher’s Grove: A serene and accessible stand of ancient pines that is a must-see.
  • Knob and Kettle Terrain: The landscape was shaped by glaciers, leaving behind rolling hills (knobs) and water-filled depressions (kettles).

From the shores of Lake Itasca to the quiet depths of the woods, every corner of this state park reveals another layer of its remarkable natural beauty. It’s a place where you can truly immerse yourself in the tranquility of the wilderness.

Guided Tours, Events, and Special Programs

Want to deepen your connection to Itasca State Park? The park offers a fantastic lineup of guided tours, special events, and educational programs throughout the year. Participating in ranger-led activities or seasonal park events is a great way to learn more about the area’s history, wildlife, and natural wonders.

From guided nature walks that reveal the secrets of the forest to lively festivals that celebrate the local culture, there’s always something happening at Itasca. Let’s explore some of the exciting programs and events that can make your visit even more memorable.

Ranger-Led Activities and Nature Walks

One of the best ways to experience Itasca State Park is by joining one of the many ranger-led activities. Knowledgeable park naturalists lead guided tours that provide fascinating insights into the park’s ecology and history. These programs are designed for all ages and are a wonderful way to discover hidden gems you might otherwise miss.

You can join a guided hike through the old-growth forests, a canoe tour on Lake Itasca, or a talk about the park’s famous wildlife. The Mary Gibbs Center often serves as a hub for these activities, featuring outdoor exhibits and programs that bring the park’s stories to life.

  • Guided Hikes: Explore trails with a naturalist to learn about local flora and fauna.
  • Canoe Tours: Paddle on Lake Itasca while a ranger shares stories about the lake’s history and ecology.
  • Naturalist Talks: Attend presentations on topics like wildlife, geology, and cultural history.
  • Junior Ranger Program: A fun, engaging program for kids to learn about the park and earn a badge.

These ranger-led activities are a perfect way to enhance your visit, offering a deeper understanding and appreciation for this incredible state park. Be sure to check the park’s schedule for current offerings.

Seasonal Festivals and Park Events

Throughout the year, Itasca State Park hosts a variety of seasonal festivals and special events that draw visitors from all over. These park events celebrate the unique character of northern Minnesota and offer fun for the whole family. One of the most popular is the Headwaters 100 Bike Ride, a scenic ride held every fall that showcases the stunning autumn colors.

In the summer, you might find the Itasca Family Music Festival, a lively gathering with live music, food, and activities set against the beautiful backdrop of the park. During the winter, special events often center around snowshoeing or cross-country skiing, encouraging visitors to embrace the snowy season.

  • Headwaters 100 Bike Ride: An annual fall event with routes for all skill levels.
  • Itasca Family Music Festival: A summer celebration with live music and family-friendly fun.
  • Winter Festivals: Events focused on cross-country skiing, snowshoeing, and other winter activities.
  • Educational Workshops: Learn about everything from birdwatching to outdoor survival skills.

These events are a great way to experience the park’s community spirit. You might even get to sample local favorites like wild rice soup at the Douglas Lodge Restaurant during your visit.

Planning Your Visit: Tips and Recommendations

A little planning goes a long way in making your trip to Itasca State Park a success. To have the best experience, it’s wise to think about the best times to visit, what to pack, and how to make reservations for lodging or camping. Understanding the park’s safety guidelines and regulations will also ensure a smooth and enjoyable trip for everyone.

Are you ready to finalize your plans? The following tips will help you prepare for an unforgettable adventure, covering everything from booking your stay to packing the right gear and staying safe in the park.

Best Times to Visit and What to Pack

Itasca State Park is a year-round destination, but the best times to visit depend on what you want to do. Summer offers warm weather perfect for swimming, boating, and hiking, but it’s also the busiest season. For beautiful colors and fewer crowds, visit in the fall. Winter transforms the park into a snowy paradise for skiing and snowshoeing, while spring brings blooming wildflowers and active wildlife.

When packing, always prepare for changing weather. Layered clothing is a smart choice any time of year. Essentials include comfortable hiking shoes, insect repellent (especially in summer), sunscreen, and a reusable water bottle.

  • Summer: Pack swimwear, light clothing, and bug spray.
  • Fall: Bring layers, a warm jacket, and your camera for the foliage.
  • Winter: Pack insulated boots, warm layers, hats, gloves, and snow gear.
  • General: Always have a park map, first-aid kit, and flashlight.

Having the right gear will make your explorations of the park and the surrounding area much more comfortable and enjoyable. Check the forecast before you go to fine-tune your packing list.

Safety, Regulations, and Reservations

To ensure a safe and pleasant visit for everyone, it’s important to follow park regulations. Pets must be on a leash at all times, and you are responsible for cleaning up after them. The park follows Leave No Trace principles, so be sure to pack out everything you bring in. Fires are only allowed in designated fire rings.

Making reservations in advance is highly recommended, especially during the peak summer and fall seasons. Campsites, cabins, and lodge rooms can be booked up to a year in advance through the Minnesota Department of Natural Resources reservation website. Popular spots fill up quickly, so plan ahead!

  • Safety: Stay on marked trails, carry a map, and let someone know your plans. Be aware of wildlife and observe from a distance.
  • Regulations: Keep pets on a leash, use designated fire rings, and pack out all trash.
  • Reservations: Book campsites and lodging well in advance online or by phone.
  • Parking: Use designated parking lots to avoid damaging natural vegetation.

By following these simple rules, you help protect the park’s natural resources and ensure a great experience for all visitors.

Conclusion

Itasca State Park, with its rich history and stunning natural beauty, offers a unique experience for every visitor. From exploring the iconic headwaters of the Mississippi River to enjoying diverse outdoor activities like hiking, canoeing, and birdwatching, there’s something for everyone to enjoy. Whether you’re camping under the stars or staying in one of the cozy lodges, the park’s scenic landscapes and wildlife promise to leave a lasting impression. As you plan your visit, remember to pack wisely and check safety regulations to make the most of your adventure. If you’re ready to discover the wonders of Itasca State Park, book your trip today and create unforgettable memories in this beautiful destination!

Is It Possible to Combine a Trip to Itasca State Park with a Visit to the Biggest Water Park in the USA?

Combining a trip to Itasca State Park with a visit to the biggest water park in the USA is a thrilling idea! Enjoy the serene beauty of natural landscapes and outdoor activities before diving into fun-filled water attractions. It’s the perfect way to discover the largest water park experience while surrounded by nature.

Frequently Asked Questions

How do I reserve a campsite or lodging at Itasca State Park?

Making reservations is easy! You can book your spot for camping at Bear Paw Campground or lodging at Douglas Lodge online through the Minnesota DNR’s reservation system. It’s best to make reservations well in advance, especially for popular weekends, as sites fill up quickly.

Is Itasca State Park suitable for family trips with children?

Absolutely! Itasca State Park is perfect for children of all ages. With family-friendly activities like easy hiking trails, a fun bike ride on paved paths, playgrounds, and engaging outdoor exhibits, there’s plenty to keep everyone entertained. The park also has numerous picnic tables for a perfect family lunch.

Key Highlights

  • Explore two unique park districts: the Tucson Mountain District (West) and the Rincon Mountain District (East), each offering a different Sonoran Desert experience.
  • Witness the nation’s largest cacti, the iconic Saguaro cactus, especially dense in the western part of the park.
  • Drive scenic routes like the Bajada Loop Drive and Cactus Forest Drive for breathtaking desert views from your car.
  • Hike trails for all skill levels, from the easy Desert Ecology Trail to more strenuous climbs at higher elevations.
  • Visit the Red Hills Visitor Center or Rincon Mountain Visitor Center to get maps and expert advice from park rangers.
  • Discover ancient petroglyphs at Signal Hill, offering a glimpse into the region’s rich history.

Introduction

Welcome to your guide to Saguaro National Park! Nestled in southern Arizona, this incredible national park protects the king of the Sonoran Desert: the giant saguaro cactus. This park is a place of dramatic beauty, from cactus-studded landscapes to rugged mountain peaks. In this guide, we’ll cover everything you need to know, from the best things to do and see to practical tips for planning your trip. Get ready to explore the wonders of Saguaro National Park.

Discovering Saguaro National Park: An Overview

Saguaro National Park is a treasured landscape in the United States, established to protect its namesake, the magnificent saguaro cactus. This giant cactus is a symbol of the American West and grows exclusively in the Sonoran Desert. The park is uniquely split into two separate districts on either side of the city of Tucson.

Each district offers a different perspective of this desert environment. You will find dense cactus forests, rolling foothills, and rugged mountains, all preserving a vital piece of this unique ecosystem. Prepare to learn about the park’s distinct areas and what makes them special.

The Unique Landscape of the Sonoran Desert

The Sonoran Desert is a place of surprising life and beauty. The landscape in Saguaro National Park includes two main bioclimates: the lower desert scrub and the higher desert grassland. This variety creates a rich tapestry of plant and animal life, from the valley floors to the mountain uplands. The park’s impressive cactus forest is a direct result of this unique environment.

When you visit, you might wonder what kind of wildlife lives here. You can expect to see a variety of creatures adapted to the desert. Keep an eye out for roadrunners, hummingbirds, and white-winged doves. You should also be aware of animals like Gila monsters, rattlesnakes, and scorpions, so it’s wise to always watch where you step.

To fully appreciate the desert landscape, take a walk on one of the interpretive trails. The Desert Ecology Trail and the Desert Discovery Trail are both excellent, short walks that offer signs with information about the plants and animals around you. For a stunning view, the Valley View Overlook trail provides a fantastic perspective of the cactus-filled terrain.

Iconic Saguaro Cactus and What Makes It Special

The saguaro cactus, or Carnegiea gigantea, is the star of Saguaro National Park. These giants of the desert can grow over 40 feet tall and live for more than 150 years. Their journey begins slowly, growing only about an inch in their first eight years. Arms typically don’t begin to appear until a saguaro is between 50 and 70 years old.

These cacti are essential to the desert ecosystem. Their beautiful white flowers, which bloom in late spring, provide nectar for bats, bees, and birds. After flowering, they produce a sweet, red fruit that has been a food source for native peoples for thousands of years.

The saguaro also serves as a “motel” for many desert animals. Birds like woodpeckers carve out nests in the cactus’s fleshy interior, creating homes that are later used by other birds like owls and finches. These towering figures are a critical part of life in the Sonoran Desert, which is why Saguaro National Monument was first created to protect them.

Understanding Saguaro National Park East vs. West

Saguaro National Park is divided into two distinct sections: the Tucson Mountain District (Saguaro West) and the Rincon Mountain District (Saguaro East). These two districts are separated by the city of Tucson and are about an hour’s drive from each other. Though they both protect the saguaro cactus, they offer very different experiences.

Saguaro West is known for its dense concentrations of cacti, while Saguaro East features higher elevations and a more diverse, alpine feel. Understanding their differences will help you decide which area to explore.

Tucson Mountain District (West): Highlights and Features

The Tucson Mountain District, or Saguaro West, is famous for having one of the densest stands of saguaro cacti in the world. This side of the park is characterized by rugged, rocky terrain and classic desert scenery. It’s easily accessible from the west side of the City of Tucson via Kinney Road. The Red Hills Visitor Center is your starting point for information and maps.

One of the must-see attractions is the Bajada Loop Drive, a 6-mile graded dirt road that takes you through the heart of the cactus forest. This scenic drive is suitable for most cars and offers access to several key trailheads and picnic areas.

While exploring Saguaro West, don’t miss these highlights:

  • Valley View Overlook Trail: A short, 0.8-mile trail that leads to a beautiful viewpoint of the sprawling valley.
  • Signal Hill Petroglyphs: A brief walk takes you to a hilltop covered with rock art created by the Hohokam people over 800 years ago.
  • Desert Discovery Nature Trail: A paved, 0.5-mile loop that provides fascinating information about the Sonoran Desert ecosystem.

Rincon Mountain District (East): Highlights and Features

The Rincon Mountain District, known as Saguaro East, offers a vastly different experience. This district is larger and features more dramatic changes in elevation, rising from the desert floor to over 8,600 feet in the Rincon Mountains. This elevation gain results in a more diverse landscape, including grassy areas and even pine forests at higher elevations. Start your visit at the Rincon Mountain Visitor Center.

The main paved road here is the Cactus Forest Drive, an 8-mile, one-way loop that winds through the lower elevations of the park. Along this scenic drive, you’ll find numerous pullouts and trailheads. This district is also the only place in the park where you can go backcountry camping, with designated campgrounds like Manning Camp accessible only to hikers.

Key features of Saguaro East include:

  • Cactus Forest Loop Drive: A paved scenic drive perfect for seeing the landscape and accessing trails.
  • Javelina Rocks: A popular pullout with large rock formations that you can climb for panoramic views.
  • Mica View Trail: An easy, 2-mile round trip trail that offers great views of the mountains and close-ups with saguaros.

Planning Your Visit: Essential Information

A little planning goes a long way when visiting Saguaro National Park. Both areas of the park have separate entrances, visitor centers, and unique features, so it’s helpful to decide in advance which district you want to explore. You’ll need to pay entrance fees, which are valid for seven days and grant access to both districts.

The visitor center in each district is your best source for maps, current conditions, and safety information. Park rangers are available to answer your questions and help you make the most of your visit. Now, let’s get into the specifics of how to get there and what to expect.

How to Get There and Which Entrance to Use

Getting to Saguaro National Park is straightforward, as both districts are located on opposite sides of the city of Tucson. The entrance you choose depends on which part of the park you wish to visit and the type of experience you’re seeking.

For Saguaro National Park West (Tucson Mountain District), you’ll travel west of Tucson. The main entrance and the Red Hills Visitor Center are located on Kinney Road. For Saguaro National Park East (Rincon Mountain District), you’ll head to the southeast side of Tucson, with the entrance and Rincon Mountain Visitor Center located on Old Spanish Trail.

Here’s a quick comparison to help you decide which entrance to use:

Feature Saguaro West (Tucson Mountain District) Saguaro East (Rincon Mountain District)
Location West of Tucson Southeast of Tucson
Main Access Road Kinney Road Old Spanish Trail
Key Scenic Drive Bajada Loop Drive (dirt road) Cactus Forest Drive (paved road)
Best For Dense saguaro forests, petroglyphs Higher elevations, longer hikes, diverse scenery

Park Hours, Visitor Centers, and Amenities

Saguaro National Park is accessible for much of the day. While you can walk or bike into the park 24/7, vehicle access is generally from 7 AM to sunset daily in both districts. It’s always a good idea to check the park’s official website for the most current park hours before you go.

Yes, there are visitor centers in both districts of the park. The Red Hills Visitor Center serves the west district, and the Rincon Mountain Visitor Center serves the east. At both locations, you can find friendly park rangers, interpretive exhibits, bookstores, and restrooms. These centers are the perfect place to start your adventure and get oriented.

Looking for a spot to relax and have a meal? The park offers several picnic areas for visitors to enjoy.

  • Visitor Centers: Both the Red Hills and Rincon Mountain visitor centers are open daily, with slightly shorter hours in the summer.
  • Picnic Areas: You can find designated picnic areas, like the Signal Hill Picnic Area in the west and Mica View Picnic Area in the east.
  • Restrooms: Facilities are available at both visitor centers and at select trailheads and picnic areas.

When to Visit for the Best Experience

Choosing the right time to visit Saguaro National Park can greatly enhance your experience. The best months are typically from November through April, when cooler temperatures make hiking and exploring the Sonoran Desert much more comfortable. Summer can be extremely hot, but it also brings the dramatic monsoon season.

Each season offers something unique, from blooming wildflowers in spring to spectacular stargazing on clear winter nights. Let’s explore the seasonal weather and what natural events you can look forward to.

Seasonal Weather and Climate Considerations

The best time of year to visit Saguaro National Park is generally from fall through spring. During these months, daytime temperatures are mild, ranging from the high 50s to low 80s Fahrenheit, which is ideal for outdoor activities. Winter and spring are considered the peak season, so expect more visitors.

Summer, from June to September, brings extreme heat, with summer temperatures often soaring above 100°F. If you visit during this time, plan your activities for the early morning or evening. This is also monsoon season, which brings afternoon thunderstorms, flash flood risks, and much-needed rain to the Sonoran Desert.

The higher elevations in the Rincon Mountain District (East) offer a slight escape from the heat, with cooler temperatures than the desert floor. No matter when you visit, always be prepared for the weather. Bring plenty of water, sun protection, and check the forecast before heading out.

Saguaro Cactus Flowering and Other Natural Events

Witnessing the desert in bloom is one of the highlights of a visit to Saguaro National Park. The timing of these natural events can vary slightly each year, but they offer a spectacular show of color. The saguaro cactus flower, Arizona’s state flower, is a delicate and beautiful bloom that appears in late spring.

These flowers are a vital food source for pollinators like bees, bats, and birds, including hummingbirds and woodpeckers. Following the bloom, the saguaro produces ruby-red fruit. Other cacti, like the prickly pear, also put on a vibrant display with their colorful flowers.

Keep an eye out for these key desert events:

  • Wildflower Season: Generally runs from mid-March through mid-April, painting the desert floor with color.
  • Saguaro Cactus Flowering: The main blooming season is from late April through early June.
  • Monsoon Season: From mid-June through September, witness dramatic thunderstorms and the desert turning green.

Beginner’s Guide to Exploring Saguaro National Park

If you’re visiting Saguaro National Park for the first time, you’re in for a treat! This is an incredibly accessible park, perfect for beginners. You don’t have to be an expert hiker to enjoy its beauty. With scenic drives, numerous pullouts, and a variety of short hikes, exploring the park is easy and rewarding.

This beginner’s guide will provide you with the essential information you need to feel confident and prepared for your adventure. From what to bring to which resources to use, we’ll walk you through the basics of a fun and safe visit.

What You’ll Need: Gear, Water, and Safety Basics

Proper preparation is key to a safe and enjoyable trip to Saguaro National. The most important of all safety basics is water. The desert is extremely dry, and dehydration is a serious risk. Plan on bringing at least one gallon of water per person, per day, especially if you’re planning on desert hiking.

Your choice of gear is also crucial. Wear lightweight, loose-fitting clothing to stay cool, and sturdy, closed-toe shoes to protect your feet from sharp rocks and cactus spines. A wide-brimmed hat, sunglasses, and sunscreen are absolute musts to shield you from the intense sun.

Here are some essentials to pack for your visit:

  • Water: More than you think you’ll need.
  • Sun Protection: A hat, sunglasses, and high-SPF sunscreen.
  • Snacks: Salty snacks help your body retain water.
  • First-Aid Kit: For minor scrapes or blisters.

Recommended Resources for First-Time Visitors

To make the most of your first visit, take advantage of the excellent resources available. Your first stop should be a visitor center, where you can get the latest information on park conditions and ranger-led programs. The National Park Service (NPS) website for Saguaro is also an invaluable tool for planning ahead.

Park rangers are a fantastic resource. They can provide recommendations for trails and activities that match your interests and fitness level. Don’t hesitate to ask them questions—they are there to help! You can also find information about the park’s history and ecology, some of which stems from early interest by naturalists at the University of Arizona.

Here are some of the best resources to use:

  • Park Map: Grab a free map at the entrance or visitor center.
  • National Park Service Website: Check for alerts, hours, and event schedules.
  • Visitor Centers: Talk to a ranger for personalized advice.
  • Ranger-Led Programs: Join a guided walk or talk to learn more about the park.

Step-by-Step Guide: Making the Most of Your Trip

Ready to plan your perfect day at Saguaro National Park? This step-by-step guide will help you organize your visit, whether you have a few hours or a full day. Making a few key decisions before you go will ensure your road trip to this national park is smooth and memorable.

Following these simple steps will help you navigate the different areas of the park, choose the right activities, and stay safe while you explore. Let’s get started on planning your adventure!

Step 1: Choose Your District and Plan Your Route

The first step is deciding which part of the park to visit. Do you want to see the dense saguaro forests of the Tucson Mountain District (Saguaro West) or the higher, more varied terrain of the Rincon Mountain District (Saguaro East)? If you only have half a day, it’s best to choose one. Saguaro West is often recommended for first-timers due to its iconic cactus density.

Once you’ve chosen your district, plan your route. Both areas of the park are easily accessible from Tucson, but they are about an hour apart. If you have a full day, you can technically visit both, but it’s often more rewarding to fully explore one district.

Consider these factors when choosing a district:

  • Time: Saguaro West is great for a shorter visit with its compact loop and numerous short trails.
  • Scenery: Choose Saguaro West for classic cactus landscapes or Saguaro East for mountain views and more varied vegetation.
  • Activities: Saguaro East is better for long hikes and backcountry camping, while Saguaro West is great for scenic drives and seeing petroglyphs.

Step 2: Select Trails and Attractions to Explore

With your district chosen, it’s time for the fun part: picking what to see and do. Saguaro National Park has many popular hiking trails and attractions for all interests and abilities. Whether you want a leisurely walk through the cactus forest or a challenging climb, there’s something for you.

In Saguaro West, the Bajada Loop Drive is the main artery, providing access to top spots. In Saguaro East, the Cactus Forest Drive offers similar access. Along these drives, you’ll find trailheads, scenic overlooks, and shady picnic areas perfect for a lunch break.

Here are some popular trails and attractions to consider:

  • Signal Hill Petroglyphs (West): A short trail to see ancient rock art.
  • Valley View Overlook Trail (West): An easy walk to a fantastic viewpoint.
  • Desert Discovery Nature Trail (West): A paved, accessible trail with informational signs.
  • Mica View Trail (East): A flat, easy hike with great views of the Rincon Mountains.

Step 3: Prepare for Wildlife and Plant Encounters

Part of the thrill of visiting a national park is the chance to see wildlife. In the desert scrub environment of Saguaro, you may encounter a variety of fascinating creatures. While exciting, it’s important to treat all wildlife with respect and caution. Never approach or feed animals, and always observe from a safe distance.

You should be aware of potentially dangerous wildlife. Rattlesnakes, Gila monsters, and scorpions are native to the area. Always watch where you place your hands and feet. In the higher elevations of the Rincon Mountains, you might even spot black bears. It’s also critical to respect the plants, especially the saguaro cactus. Do not touch or damage them in any way.

Look out for these notable inhabitants:

  • Reptiles: Gila monsters and several species of rattlesnakes.
  • Mammals: Javelinas, coyotes, and potentially black bears in the mountains.
  • Birds: Roadrunners, cactus wrens, and various hummingbirds.

Step 4: Follow Park Rules for Safety and Conservation

To ensure your safety and help preserve this special place for future generations, it’s essential to follow all park rules. These regulations are set by the National Park Service to protect the park’s fragile ecosystem and its visitors. One of the most important rules is to practice Leave No Trace principles: pack out everything you bring in.

Stay on designated trails to avoid damaging delicate desert soils and plants. This also helps you avoid encounters with snakes and spiny cacti. Pets are very restricted in the park and are generally only allowed on paved roads and in picnic areas, but not on trails.

Always check for the most current park rules at a visitor center or on the NPS website before your visit. By following these simple guidelines, you contribute to the conservation of Saguaro National Park and ensure a safe and enjoyable experience for everyone.

Outdoor Activities and Top Things to Do

Saguaro National Park offers a wide range of outdoor activities for every type of visitor. Whether you prefer a leisurely scenic drive or a strenuous backcountry hike, there are plenty of ways to experience the park’s beauty. Hiking and scenic drives are among the top things to do, allowing you to immerse yourself in the stunning desert landscape.

From family-friendly nature walks to photography and stargazing, the opportunities for adventure are endless. Let’s explore some of the most popular activities and programs available in the park.

Popular Hiking Trails for All Skill Levels

Yes, Saguaro National Park is a hiker’s paradise, with more than 165 miles of hiking trails. There are options for every skill level, from paved, accessible paths to rugged mountain treks. Many of the most popular short hikes are located right off the main scenic drives, making them easy to access.

For beginners or those short on time, the park offers numerous easy trails. These walks provide a great introduction to the Sonoran Desert without requiring a major time commitment. The trails are well-marked and often include interpretive signs to enhance your experience.

Here are a few popular hiking trails to check out:

  • Desert Discovery Trail: A 0.5-mile paved loop in Saguaro West, perfect for all ages and abilities.
  • Valley View Overlook Trail: A 0.8-mile round-trip hike in Saguaro West with a rewarding view.
  • Signal Hill Trail: A 0.5-mile round-trip trail in Saguaro West leading to ancient petroglyphs.
  • Mica View Trail: A 2-mile flat loop in Saguaro East that is great for families.

Family-Friendly Activities and Programs

Saguaro National Park is definitely suitable for kids and families. The park offers many family-friendly activities that are both fun and educational. Short, easy trails like the Desert Discovery Nature Trail are perfect for little legs, and the scenic drives allow everyone to enjoy the views from the comfort of the car.

One of the best programs for children is the Junior Ranger program. Kids can pick up an activity booklet at either visitor center, complete the activities as they explore the park, and earn a special badge. It’s a wonderful way to engage children with the natural world.

For a fun day, consider these family-friendly options:

  • Become a Junior Ranger: A free, engaging program for kids.
  • Have a Picnic: Enjoy a meal at a designated spot like the Signal Hill Picnic Area.
  • Visit the Arizona-Sonora Desert Museum: Located near Saguaro West, this world-class zoo and natural history museum is a fantastic addition to your trip.

Conclusion

In conclusion, Saguaro National Park offers a stunning blend of unique desert landscapes and the iconic saguaro cactus, providing visitors with an unforgettable experience. Whether you choose to explore the Tucson Mountain District or the Rincon Mountain District, each area presents its own set of highlights and opportunities for adventure. By planning your visit with essential information about park hours, amenities, and safety, you can make the most of your time in this beautiful desert oasis. So gather your gear, embrace the spirit of exploration, and immerse yourself in the natural wonders that await you at Saguaro National Park. For personalized assistance in planning your visit, don’t hesitate to reach out and book a free consultation with our experts!

How Do the Scenic Views of Saguaro National Park Compare to the Wildlife Experience in Masai Mara?

The scenic views of Saguaro National Park, with its towering cacti and dramatic sunsets, offer a stark contrast to the vibrant landscapes of the Masai Mara. While the park captivates with its unique flora, the masai mara safari experience immerses visitors in thrilling wildlife encounters, showcasing the rich biodiversity of Africa.

Frequently Asked Questions

Can I camp overnight in Saguaro National Park?

Yes, but only in the backcountry of the Rincon Mountain District (Saguaro East). Saguaro National Park offers six designated campgrounds, such as Manning Camp, which are only accessible by hiking. There is no car or RV camping available within the national park. A permit is required for all overnight backcountry camping.

Is Saguaro National Park suitable for kids and families?

Absolutely! Saguaro National Park is very family-friendly. It offers short, easy trails, scenic picnic areas, and engaging Junior Ranger programs at the visitor center. These activities make it easy and fun for children to learn about and enjoy the desert environment.

What are the differences between Saguaro National Park East and West?

The two districts, separated by the city of Tucson, offer different experiences. The Tucson Mountain District (Saguaro West) is smaller and known for its very dense saguaro forests. The Rincon Mountain District (Saguaro East) is larger, has higher elevations with more varied terrain, and offers more extensive hiking.

Can I camp overnight in Saguaro National Park?

Overnight camping is available in Saguaro National Park, but it is limited to backcountry hiking. There are no drive-in campsites for cars or RVs. All six designated campgrounds, including Manning Camp, are located in the Rincon Mountain District (East) and require a hike to reach and a permit to use.

Key Highlights

Here is a quick look at what makes Malibu Creek State Park a must-visit destination:

  • Explore over 8,000 acres of stunning landscapes nestled in the Santa Monica Mountains.
  • Hike to iconic Hollywood filming locations, including the set of MASH and the famous rock wall from Planet of the Apes*.
  • Discover beautiful spots like Century Lake and the Rock Pool, perfect for a scenic break.
  • Enjoy a wide range of activities, from easy walks and challenging hikes to rock climbing and bird watching.
  • The park offers a great place for a day trip from Los Angeles, with camping options for a longer adventure.
  • Malibu Creek provides a unique blend of natural beauty and cinematic history.

Discovering Malibu Creek State Park: An Overview

Nestled in the scenic Santa Monica Mountains, Malibu Creek State Park offers a spectacular escape just a short drive from the city. This park spans over 8,000 acres, featuring three designated natural preserves and miles of trails that follow Malibu Creek. It’s a landscape rich with jagged peaks, oak savannas, andsycamore-lined stream beds, providing a critical habitat for a variety of wildlife.

More than just a natural wonder, this state park has a storied past as a filming location for major Hollywood productions. You can walk through landscapes made famous on the silver screen before stopping by the visitor center to learn more. Whether you’re seeking a challenging hike to Century Lake or a peaceful walk, the state park website has all the information you need to get started. Now, let’s look at how you can get there and what to expect upon arrival.

Where Is Malibu Creek State Park and How to Get There

Finding your way to Malibu Creek State Park is straightforward, making it an accessible getaway from the greater Los Angeles area. The main entrance, which provides access to most hiking trails and campgrounds, is conveniently located just four miles south of Highway 101 on Las Virgenes/Malibu Canyon Road. This central location places it between the San Fernando Valley and the coast.

If you are driving from the coast, you can take the scenic Pacific Coast Highway and turn onto Malibu Canyon Road to reach the park entrance. The park is also accessible via Mulholland Highway, offering another beautiful route through the mountains. Its proximity to major urban centers like Los Angeles and even San Diego makes it a popular choice for nature lovers seeking a quick escape.

Planning your visit is simple once you know the route. The main entrance at 1925 Las Virgenes Rd, Calabasas, CA 91302, is your primary destination. From there, you can access the main parking areas and begin your adventure exploring the stunning scenery and historic sites the park has to offer.

Hours, Entrance Fees, and Parking Information

Before you head out for your day trip to Malibu Creek State Park, it’s helpful to know the operating hours and costs. The park gates are open daily from 8:00 AM to 10:00 PM, giving you plenty of time to explore. When you arrive, you will find an entrance kiosk where you can pay the entrance fee. If no one is present, an honor system is in place for self-payment.

Parking is available in two main lots. The first is ideal for picnickers, while the second, or lower lot, is closer to the trailheads. The main parking lot is the most common starting point for hikers. The state park website is the best resource for checking the status of other parking areas, such as Tapia Park, which may have temporary closures.

The parking fees vary based on the length of your stay, offering flexibility for different visit durations. Below is a breakdown of the current fees.

Duration Cost per Car
1 Hour $3.00
2 Hours $6.00
3 Hours $9.00
All Day $12.00

Hollywood Legends: The Park’s Cinematic History

Malibu Creek State Park isn’t just a haven for nature enthusiasts; it’s also a landmark of Hollywood history. For many years, this land was owned by 20th Century Fox and served as a sprawling outdoor studio. The rugged terrain and scenic vistas provided the perfect backdrop for countless movies and television shows, a legacy that is still visible today.

Walking through the park, you are literally stepping onto a film set. Famous productions like Planet of the Apes were filmed here, and landmarks such as Century Lake were created during the studio era. This cinematic past adds an exciting layer to any visit, allowing you to connect with both nature and pop culture. Let’s explore some of the specific films and locations that make this park a legendary spot.

Iconic Movies and TV Shows Filmed Here

The rich Hollywood history of Malibu Creek is one of its most unique features. Long before it became a state park, these dramatic landscapes were owned by 20th Century Fox and served as a versatile backlot for the film industry. The varied terrain, from rocky gorges to open plains, could double for locations all around the world.

Perhaps the most famous production associated with the park is the classic television series MASH*. The iconic opening sequence and many exterior shots were filmed here, and you can still hike to the restored filming site today. This connection to a beloved show draws fans from all over who want to see the real-life “Korea” depicted on screen.

Beyond MASH*, the park has been featured in numerous other films and shows. Its legacy is a testament to its timeless and adaptable beauty. Some of the most notable productions include:

  • Planet of the Apes (1968)
  • Butch Cassidy and the Sundance Kid (1969)
  • Pleasantville (1998)
  • Numerous other classic Westerns and adventure films

Famous Landmarks and Film Locations to Explore

Ready to see these famous filming spots for yourself? Malibu Creek State Park is full of recognizable landmarks that have graced the big and small screens. One of the most popular hikes leads to the restored MASH* site, where you can see an informational display and a replica of the iconic signpost.

Another must-see location is the Rock Pool, a dramatic gorge where scenes from Planet of the Apes were filmed. The nearby “Planet of the Apes Wall” is a popular spot for rock climbers. You can also visit Century Lake, a man-made lake created by 20th Century Fox, which has appeared in many productions.

While exploring, you can also look for other historic sites, though some have been impacted by recent fires. Keep an eye out for these key locations:

  • The MASH Filming Location
  • Rock Pool and the “Planet of the Apes Wall”
  • Century Lake
  • The former Reagan Ranch area and remnants of the Sepulveda Adobe

Beginner’s Guide to Visiting Malibu Creek State Park

Planning your first trip to Malibu Creek SP can be an exciting experience. To make it as smooth as possible, it helps to know where to start. The park’s visitor center, open on weekends, is a fantastic resource. Operated by the knowledgeable Malibu Creek Docents, it offers maps, exhibits on the park’s history, and helpful advice for your visit.

For certain volunteer activities, you may need to check for available time slots online, but for a general visit, the key is to prepare. Whether you’re planning a short hike on the Little Bulldog Loop or a full day of exploring, a little planning goes a long way. The following steps will guide you in preparing for your adventure, from choosing activities to understanding park rules.

What You’ll Need for a Great Visit (Gear, Maps, Essentials)

A little preparation ensures your visit to Malibu Creek is safe and enjoyable. The Southern California sun can be intense, even on cooler days, so packing the right gear is essential. Start with the basics: plenty of water, sunscreen, and a wide-brimmed hat to protect you from the sun. Comfortable hiking shoes are a must, as many trails are rocky and uneven.

Are there maps available for navigating the park? Yes, you can purchase maps at the visitor center, which is located about a one-mile walk from the main parking lot. It’s always a good idea to have a physical map, as cell service can be unreliable in some areas. You can also check the state park website for downloadable maps before you go.

To make sure you have everything you need, here’s a quick checklist of essentials to bring:

  • At least one quart of water per person
  • Sunscreen and a hat
  • Sturdy, comfortable shoes
  • A map of the park’s trails

Step-by-Step Guide: How to Plan Your First Visit

Organizing your first trip to Malibu Creek State Park is easy with a simple, structured approach. Thinking about your visit in a few clear steps will help you make the most of your time and ensure you’re well-prepared for whatever adventure you choose. Start by deciding what you want to do and see.

A great way to structure your plan is to follow a process similar to how the Malibu Creek Docents organize their events. First, you’ll want to select a category of activity that interests you. Then, you can determine how much time you have and which trails or sites fit your schedule. Finally, checking conditions before you leave is always a smart move.

Here is a simple, three-step plan to get you started:

  • Step 1: Choose your activities and trails based on your interests and fitness level.
  • Step 2: Check the official park website for current conditions, closures, and accessibility information.
  • Step 3: Prepare for the environment by packing essentials and understanding safety rules.

Step 1: Choose Your Activities and Trails

Malibu Creek State Park offers a diverse range of activities to suit every visitor. Are you an avid hiker? The park boasts over 35 miles of trails and fire roads with varying difficulty. For a gentle walk, the Crags Road/High Road Loop is a great option. If you’re looking for a challenge, the Bulldog Road trail offers a strenuous climb with 1,700 feet of elevation gain and rewarding views.

Beyond hiking, you can enjoy horseback riding on most trails, with guidelines in place to ensure safety for everyone. The park is also a fantastic spot for bird watching, with the San Fernando Valley Audubon Society hosting monthly walks. For those seeking more of a thrill, rock climbing is popular around the Rock Pool area, with routes ranging from moderate to difficult.

Whether you choose a moderate hike like the Grasslands Trail or a more relaxed activity like fishing, there’s something here for you. With so many options, you can easily tailor your day to match your interests and energy level, making every visit a new adventure.

Step 2: Check Park Conditions and Accessibility

Before you finalize your plans for a day trip, one of the most important steps is to check the current park conditions. The official state park website is your best source for real-time alerts, including trail closures due to weather, fire damage, or maintenance. This is especially critical as parts of the park were affected by the Woolsey and Franklin fires.

The park is committed to providing access for all visitors. The website also provides information on accessibility, including details on accessible parking, restrooms, and campsites. The Ann Skager Trail is a wonderful accessible trail, offering a 0.58-mile paved and compacted surface path with views of Las Virgenes Creek. This trail is generally flat and suitable for wheelchairs.

Planning ahead by checking the website ensures you won’t be met with unexpected surprises. You can even find helpful resources like a walkthrough video for signing up for docent-led activities, demonstrating the park’s commitment to a positive visitor experience. Always check online right before you leave for the most up-to-date information.

Step 3: Prepare for Wildlife, Safety, and Park Rules

A safe visit is a happy visit, so familiarizing yourself with park rules and potential hazards is key. Fire is a constant danger in Southern California, so smoking and fires are strictly prohibited outside of designated campground and picnic areas. Always check the daily fire level posted near the campground entrance before using any fire rings.

Be aware of the local wildlife and plants. Poison oak is common, so staying on marked trails is the best way to avoid it. You might also encounter snakes, including the native Southern Pacific Rattlesnake. They are a protected and vital part of the ecosystem, so if you see one, give it space and walk around it. Ticks are also plentiful, so check your clothing after your hike.

Understanding the park rules helps protect both you and the natural environment of Malibu Creek State Park. If you ever have an issue or need assistance, you can contact park staff or the Malibu Creek Docents. Providing a thorough description of the issue will help them respond effectively. Following these safety guidelines allows everyone to enjoy the park’s beauty responsibly.

How Does Sandy Point State Park Compare to Malibu Creek State Park for Hiking and Scenic Exploration?

For hikers seeking diverse landscapes, sandy point adventure awaits at Sandy Point State Park. With its stunning coastal views and lush trails, it offers a unique experience compared to Malibu Creek State Park, which features rugged canyons and iconic rock formations. Both parks promise unforgettable scenic exploration.

Frequently Asked Questions

Are dogs allowed at Malibu Creek State Park?

Yes, dogs are allowed at Malibu Creek State Park, but with some restrictions. Your furry friends are welcome on a leash in the campground, day-use picnic areas, and on paved roads. However, to protect wildlife and the natural landscape, dogs are not permitted on any of the dirt roads or hiking trails.

What are the best things to do at Malibu Creek State Park?

The park offers a wide array of activities for everyone. Top things to do include hiking to the historic MASH* filming site, visiting the scenic Rock Pool and Century Lake, and enjoying outdoor pursuits like rock climbing, bird watching, and horseback riding along the park’s many trails.

What wildlife can I expect to see in Malibu Creek State Park?

The park is a rich habitat for wildlife within its natural preserves in the Santa Monica Mountains. While bird watching, you may spot some of the 400 bird species found here. The park is also home to mule deer, bobcats, coyotes, and various reptiles and amphibians, so keep your eyes peeled.

Are there picnic areas or places to eat inside Malibu Creek State Park?

Yes, there is a designated picnic area near the main parking lot equipped with tables, benches, and barbecue pits for a perfect lunch spot. The group campground also offers picnic tables and grills. Just remember to adhere to the daily fire rules, especially concerning the use of fire rings.

Key Highlights

Welcome to a land of fascinating turmoil and beauty! Before you plan your trip, here’s a quick look at what makes Lava Beds National Monument so special.

  • Explore over 20 developed lava tube caves, a unique feature of the lava beds.
  • Discover ancient history at Petroglyph Point, one of the largest panels of Native American rock art.
  • Learn about the historic Modoc War and visit key sites like Captain Jack’s Stronghold.
  • Immerse yourself in a high desert wilderness experience with unique hiking and wildlife viewing.
  • Venture through a rugged volcanic landscape created by eruptions over thousands of years.
  • Enjoy a variety of activities managed by the National Park Service for a memorable visit.

Discovering Lava Beds National Monument

Nestled in northeastern California, Lava Beds National Monument invites you to explore a truly unique corner of the United States. This rugged landscape, managed by the National Park Service, was forged by volcanic eruptions over half a million years. Before starting your adventure, be sure to stop by the visitor center to get the latest information, maps, and cave permits. For trip planning, always refer to the official websites for the most current details.

The monument is a place of stark contrasts, where a harsh volcanic landscape gives way to incredible natural wonders and deep historical significance. You can explore dark lava tube caves, hike across vast lava flows, and reflect at historic battlefields. What are the main attractions at Lava Beds National Monument? From ancient art to underground adventures, let’s look at what you can’t miss.

Main Attractions and Must-See Landmarks

Your journey into the Lava Beds National Monument is packed with unforgettable sights. The primary draw for many visitors is the chance to explore the extensive network of lava tube caves. With over 20 developed caves open for public exploration, you can spend days discovering these underground marvels. Each cave offers a different experience, from easy walks to more challenging scrambles.

Beyond the caves, the monument holds significant cultural and historical landmarks. The Modoc War sites, including Captain Jack’s Stronghold, offer a somber look into the area’s turbulent past. In contrast, Petroglyph Point showcases one of the largest collections of Native American rock art in the country, with some carvings dating back 6,000 years.

To make the most of your visit, be sure to check out these must-see spots:

  • Lava Tube Caves: Explore famous caves like Mushpot Cave, the only lighted cave, and the massive Skull Cave.
  • Petroglyph Point: Witness thousands of ancient carvings on a sheer rock face.
  • Modoc War Sites: Walk the trails at Captain Jack’s Stronghold to understand its historical importance.
  • Schonchin Butte: Hike to this fire lookout for panoramic views of the entire monument.

How to Reach Lava Beds National Monument from Major Cities

Getting to Lava Beds National Monument requires a bit of a drive, but the journey through the scenic landscapes of Northern California is part of the adventure. The monument is situated in a remote area, so it’s wise to fuel up your vehicle and pack supplies before you head out. Many visitors access the park via the Volcanic Legacy Scenic Byway, a route that connects several national parks and volcanic wonders.

As an official government organization, the National Park Service provides detailed directions on its website (www.nps.gov/labe/index.htm). The nearest town with services is Tulelake, California. If you’re coming from a larger city, be prepared for a multi-hour drive through the beautiful surrounding area.

Here’s a quick look at approximate driving times from major hubs to help you plan your trip.

Starting City Approximate Driving Time
Redding, CA 3 hours
Reno, NV 4 hours
Sacramento, CA 5.5 hours
Portland, OR 6 hours

Exploring the Underground World

The real magic of Lava Beds National Monument lies beneath the surface. The park is home to the largest concentration of lava tubes in North America, with dozens of developed caves ready for you to explore. To begin your underground adventure, you must first obtain a free cave permit from the visitor center. This step is crucial for protecting the fragile cave environment and its inhabitants, especially the bats.

Most of the popular caves are conveniently located along the 2-mile Cave Loop road, making it easy to hop from one lava tube to the next. Whether you’re a seasoned caver or a curious first-timer, there are lava tube caves suited for every skill level. Read on to discover some of the most popular caves and how to explore them safely.

Popular Lava Tube Caves and Safety Tips

Ready to go caving? The developed caves are grouped by difficulty, so you can choose an adventure that matches your comfort level. A great starting point is Mushpot Cave, located right near the visitor center. It’s the only lighted cave and features interpretive signs that explain how these incredible lava tube caves formed. For a more challenging experience, you might try Catacombs Cave, a complex maze that requires careful navigation.

Your safety underground is the top priority. The cave floors can be uneven, wet, or icy, and ceilings are often low. It’s essential to be prepared before entering any of the lava tube caves. Always carry at least two reliable light sources, as the caves are completely dark without them.

Follow these safety tips for a fun and secure caving experience:

  • Wear sturdy, closed-toe shoes with good traction.
  • Protect yourself from scrapes by wearing long sleeves and pants.
  • Consider wearing a helmet to guard against head bumps.
  • Know your limits and don’t attempt the hardest section of the cave if you’re not prepared.
  • Never go caving alone and always tell someone your plans.

Guided Cave Tours and Self-Guided Adventures

Are there any guided tours available at Lava Beds National Monument? While the National Park Service offers ranger-led cave tours during the busy summer season, the primary way to experience the caves is through self-guided adventures. This approach allows you to explore at your own pace and choose the caves that interest you most. Remember, you must stop at the visitor center to get your free cave permit before heading out.

The freedom of self-guided exploration is one of the monument’s biggest appeals. You can spend an entire day on the Cave Loop, discovering a variety of caves that range from simple walk-throughs to complex crawls. The park provides maps and information that classify caves by difficulty, helping you make informed choices for your adventure.

Here’s how to prepare for a day of self-guided caving:

  • Pick up a map and cave permit at the visitor center.
  • Check the current status of caves, as some may be closed to protect wildlife.
  • Pack flashlights, extra batteries, water, and snacks.
  • Read the descriptions for each cave to understand its challenges before you enter.

The Monument’s Volcanic Past

The rugged landscape of Lava Beds National Monument tells a story of fire and force. The entire area sits on the flank of the massive Medicine Lake Volcano, where repeated volcanic eruptions over the last 500,000 years have sculpted the terrain. These powerful events produced vast lava flows that created the caves, craters, and cones you see today.

This dramatic geology set the stage for a rich human history. The natural lava trenches and caves provided shelter for Native Americans for millennia and later became a formidable fortress during the Modoc War. Let’s take a closer look at the specific geologic formations and the pivotal historic battlefields that define this park.

Geologic Formations and Lava Flows

The volcanic landscape at Lava Beds is a geologist’s paradise. As part of the Cascade Range, the area showcases a wide variety of features created by the Medicine Lake shield volcano. Unlike the explosive crater left by Mount Mazama, which formed Crater Lake, Medicine Lake Volcano produced fluid lava flows that spread out to create a vast, rugged terrain. These flows are responsible for nearly every feature in the monument.

You’ll encounter two main types of lava: smooth, ropy pahoehoe and sharp, jagged ʻaʻā. The Devil’s Homestead flow is a perfect example of the rough ʻaʻā texture. The park also features cinder cones like Schonchin Butte and spatter cones such as Fleener Chimneys, each formed by different types of volcanic eruptions. These formations offer a visible timeline of the region’s fiery past.

Key geologic features to look for include:

  • Lava Flows: Notice the different textures of pahoehoe and ʻaʻā lava.
  • Cinder Cones: Formed by explosive eruptions that pile up cinders around a vent.
  • Spatter Cones: Built from thicker lava that creates chimney-like structures.
  • Lava Tubes: Tunnels formed when the surface of a lava flow cooled and hardened over a still-molten river of rock.

Historical Events—Indigenous History and the Modoc War

The history of Lava Beds is deeply intertwined with the Modoc people, who have inhabited this region for thousands of years. Their stories are etched into the landscape at sites featuring Native American rock art, with Petroglyph Point being a major cultural landmark. This area, listed on the National Register of Historic Places, has one of the largest collections of petroglyphs in the United States.

This land of turmoil also hosted the Modoc War of 1872-1873. A band of Modoc people, led by Kintpuash (also known as Captain Jack), resisted forced removal to a reservation. They used the natural lava trenches as a defensive stronghold, where about 53 warriors held off U.S. Army forces for five months. According to the National Park Service, this conflict highlights a significant chapter in American history.

Key historical points of interest include:

  • Captain Jack’s Stronghold: A natural fortress where the Modoc band made their stand.
  • Petroglyph Point: A testament to thousands of years of Indigenous presence.
  • Battlefields: Sites of major skirmishes during the Modoc War.
  • Hospital Rock: An area used by the U.S. Army during the conflict.

Outdoor Activities & Wildlife Encounters

Beyond the caves, Lava Beds offers a fantastic high desert wilderness experience. Numerous hiking trails wind through diverse volcanic features, offering spectacular views and a chance to connect with nature. Whether you’re looking for a short, interpretive walk or a challenging backcountry trek, you’ll find a trail that suits your style. The monument also provides camping options for those who want to sleep under the stars.

As you explore, keep an eye out for the local flora and fauna. The park is home to a surprising variety of wildlife adapted to this harsh environment. You might spot mule deer grazing among the sagebrush or catch a glimpse of a raptor soaring overhead. The following sections will give you more detail on the best trails, camping, and the plants and animals you might encounter.

Hiking Trails, Camping Options, and Best Times to Visit

Lava Beds National Monument has 13 hiking trails with varying levels of difficulty, ensuring there’s something for everyone. For a popular short hike with a big reward, try the Schonchin Butte Trail. It’s a steep 0.9-mile climb, but the panoramic view from the top is worth the effort. For a historical short walk, the Captain Jack’s Stronghold Trail loops through the heart of the Modoc War battlefield.

Is camping available at Lava Beds National Monument? Yes, the Indian Well Campground offers year-round camping options on a first-come, first-served basis, providing a perfect base for exploring the park.

The best times to visit are spring and fall when temperatures are mild and pleasant for both hiking and caving. Summers can be very hot, while winters bring cold temperatures and snow, which may limit access to some areas.

Popular Hiking Trails:

  • Bunchgrass Trail (1 mi): An easy loop near the campground.
  • Schonchin Butte Trail (0.9 mi): A steep climb to a fire lookout with incredible views.
  • Captain Jack’s Stronghold Trail (1.1 mi): An interpretive loop through a historic site.
  • Whitney Butte Trail (3.3 mi): Offers great views of Mount Shasta and the Callahan lava flow.

Flora and Fauna of the Monument

What wildlife can you expect to see? Despite its rugged appearance, the flora and fauna at Lava Beds are surprisingly diverse. Animals here have adapted to the semi-arid conditions and diverse volcanic features. Mule deer are commonly seen browsing in the grasslands, while smaller creatures like kangaroo rats and jackrabbits are masters of survival in this dry environment. The monument is also an important habitat for several bat species, which you can learn about at the visitor center.

The plant life is just as resilient. In the rocky lava fields, you’ll find aromatic purple desert sage and colorful yellow blazing stars. The entrances to caves create unique microclimates that support a variety of ferns, species that are typically found much closer to the coast. This mix of plant life adds splashes of color to the dark volcanic rock.

Keep an eye out for these species:

  • Mammals: Mule deer, coyotes, bobcats, and American badgers.
  • Birds: Prairie falcons, scrub jays, and wintering bald eagles near the surrounding area of Tule Lake.
  • Reptiles: Western rattlesnakes and Great Basin fence lizards.
  • Plants: Desert sweet, purple desert sage, and various ferns.

What Unique Geological Features Can Be Explored in Lava Beds National Monument Compared to Baxter State Park?

Lava Beds National Monument offers a distinct experience with its vast lava tube caves, volcanic formations, and rugged terrain. Unlike the gentle mountains of Baxter State Park, here you can witness the unique geological features born from ancient lava flows. For diverse landscapes, make sure to also explore baxter state park.

Frequently Asked Questions

What should I bring for a visit to Lava Beds National Monument?

For a day at Lava Beds National Monument, be sure to bring plenty of water, as there are no sources in the park. For caving, you’ll need at least two flashlights with extra batteries, sturdy shoes, and protective clothing like long sleeves. Always check official websites before your visit for current conditions.

What are the main attractions at Lava Beds National Monument?

The main attractions are the park’s network of over 20 explorable lava tube caves, the historic battlefields of the Modoc War, and Petroglyph Point, a significant site of Native American rock art. These landmarks offer a unique blend of natural wonders and deep historical significance for every visitor to experience.

Is camping available at Lava Beds National Monument?

Yes, camping options are available at the Indian Well Campground. It operates on a first-come, first-served basis and offers a fantastic high desert wilderness experience. Camping allows you to be close to the developed caves and trails, making it easy to explore all the monument has to offer.

Key Highlights

Here’s a snapshot of what makes Crater of Diamonds State Park a must-visit destination.

  • Explore the world’s only public diamond mine where you can search for real diamonds.
  • Anything you find is yours to keep, a unique policy for a state park.
  • Dig in a 37-acre plowed field, the eroded surface of a volcanic crater.
  • Learn to identify gems at the Diamond Discovery Center with help from park staff.
  • Use different methods like wet and dry sifting in the diamond search area.
  • Enjoy other park facilities, including hiking trails and a seasonal water park.

Introduction

Are you looking for a truly unique outdoor adventure? Imagine digging in the dirt and uncovering a real diamond that you can take home. At Crater of Diamonds State Park in Murfreesboro, Arkansas, this isn’t just a dream—it’s a reality. This is one of the only places on the planet where you can go on a diamond hunt in a public search area. Whether you’re a seasoned gem hunter or a curious first-timer, the park offers an unforgettable experience for everyone.

Getting to Crater of Diamonds State Park

Planning your journey to this one-of-a-kind state park is the first step in your diamond search adventure. Located just a couple of hours from Little Rock, Crater of Diamonds State Park is an easy and exciting road trip destination for park visitors looking to try their luck.

The park is conveniently situated for those exploring Arkansas, and the drive itself is part of the fun. Once you arrive, you’ll check in at the visitor center and Diamond Discovery Center to begin your quest. Let’s look at the specific directions and accessibility information.

Location and Directions

Crater of Diamonds State Park is located at 209 State Park Rd, Murfreesboro, AR 71958. Its position makes it an accessible trip from several key locations in Arkansas. Have you ever wondered where this unique state park is located and how to get there?

If you’re driving from Little Rock, the journey takes approximately 1.5 to 2 hours. You’ll take Interstate 30 South towards Texarkana, then use Exit 73A for U.S. Highway 70 West. From there, it’s a scenic drive that leads you to Arkansas 301 South, with clear signs guiding you to the park. Visitors coming from Hot Springs National Park can expect about an hour’s drive east on U.S. Highway 70.

For those traveling from farther away, the closest airports are Texarkana Regional Airport (about an hour away) and Bill and Hillary Clinton National Airport in Little Rock (about 1.5 hours away). No matter how you travel, reaching the park is a straightforward part of your adventure.

Parking and Accessibility Info

Once you arrive at the state park, you will find ample parking available for cars, RVs, and travel trailers. The main parking area provides convenient access to the visitor center, where your diamond digging journey officially begins. What about getting around the park?

The park facilities are designed with accessibility in mind. Most buildings, including the visitor center and restrooms, are accessible to all visitors. The park also features paved pathways to help everyone navigate the main areas comfortably. This ensures that everyone can enjoy the park’s amenities before heading to the field.

However, accessibility in the diamond search area itself can vary. The 37-acre field is plowed regularly, and its condition depends on the weather. After rain, the field can become muddy and difficult to navigate.

  • Accessible visitor center, restrooms, and gift shop.
  • Paved trails connect some park facilities.
  • The diamond search area’s terrain changes with the weather.
  • Ample parking for various vehicle sizes.

Entry Fees, Permits, and Park Hours

Before you start your treasure hunt, it’s important to know about the park’s admission details. An entry fee is required to access the diamond search area, but you won’t need any special permits for your hunt. Your admission ticket gives you all-day access to the field.

Park hours can change depending on the season, so it’s always a good idea to check the official state park website before you go. Below, you’ll find more specific information on admission costs and the park’s operating schedule.

Admission Costs and What’s Included

The entry fee for a day of diamond hunting is quite reasonable and provides access to the main attraction: the 37-acre diamond field. Is there an entry fee or special permit required for Crater of Diamonds State Park? Yes, there is a daily fee, but no special permits are needed for recreational searching.

Your admission covers your entrance to the search area and access to park facilities like the Diamond Discovery Center, where staff can identify your finds for free. If you need equipment, you can rent it for an extra cost, which typically requires a security deposit. You can purchase your tickets online in advance or at the park itself.

Here is a breakdown of the typical admission costs. Remember to check the official park website for the most current pricing.

Age Group Entry Fee
Adults (13+) $15.00
Children (6-12) $7.00
Children (Under 6) Free

Park Hours and Seasonal Changes

Knowing the park hours is key to planning a successful visit. The state park generally operates year-round, but there are seasonal changes to be aware of. The visitor center and Diamond Discovery Center are typically open from 8 a.m. to 5 p.m., while the diamond search area itself is open from 8 a.m. to 4 p.m.

It’s wise to arrive early to make the most of your digging time, especially during summer when temperatures can climb. The park is open daily with a few exceptions. It closes for major holidays to allow staff to be with their families.

Be sure to check the park’s official website for any unexpected closures or adjusted hours due to weather or other events.

  • The park is open daily.
  • It is closed on New Year’s Day, Thanksgiving Day, Christmas Eve, and Christmas Day.
  • Hours may vary by season, so always confirm before your trip.

Essential Things to Know Before Your Visit

A little preparation can make your diamond hunting adventure much more enjoyable. The diamond search area is a large, open field, and being ready for the conditions will give you the best shot at a fun and successful day. What should you know before visiting Crater of Diamonds State Park?

First-time visitors and seasoned pros alike should familiarize themselves with the park rules and the best techniques for finding gems. Knowing what to bring and what to expect from the diamond field will set you up for a great experience. Let’s cover the essentials you’ll need and the policies you should follow.

What to Bring for Diamond Hunting

Packing the right gear is crucial for a comfortable and productive day in the diamond search area. The terrain is essentially a giant dirt field that can get muddy, so dress in clothes and shoes you don’t mind getting dirty. Sturdy, waterproof boots are a much better choice than sneakers.

For the actual diamond digging, you’ll want some basic tools. A small shovel or trowel, a bucket, and a sifting screen are essential. You can bring your own or rent a basic or advanced kit at the park. For your best chance at success, especially if you plan on wet sifting, these tools are a must.

Don’t forget personal items for comfort and safety. The search area has limited shade, so sunscreen, a wide-brimmed hat, and plenty of water are non-negotiable. Bringing snacks or a packed lunch is also a smart idea.

  • Clothes and shoes that can get muddy
  • Small shovel, bucket, and sifting screens
  • Gardening gloves to protect your hands
  • Sunscreen, a hat, and plenty of water
  • Snacks and a cooler

Rules and Policies for Visitors

To ensure a safe and enjoyable experience for everyone, the state park has a few important rules for visitors. Before you begin your diamond search, you must purchase a ticket at the visitor center. This is also where you can get information and rent equipment.

The park has a generous pet policy, allowing leashed pets on the grounds. However, pets are not permitted in most buildings, including the gift shop and bathhouses, or in the Diamond Springs Water Park. Following these rules helps keep the park clean and safe.

If you think you’ve found a diamond, the park staff at the Diamond Discovery Center are there to help. They offer free identification services and will certify any genuine diamonds you find. Remember to be respectful of other hunters and the land as you search.

  • All visitors must have a valid ticket for the search area.
  • Pets are allowed on a leash but are restricted from certain areas.
  • The park staff will identify your finds for free.
  • Keep what you find, but be mindful of park property and other visitors.

Facilities and Amenities at the Park

Crater of Diamonds State Park offers more than just a field for digging. The park is equipped with a range of facilities and amenities to make your visit comfortable and entertaining. From the informative visitor center to shaded picnic areas, you’ll find everything you need for a full day of fun.

After a few hours of searching, you might want to cool off at the Diamond Springs Water Park or enjoy a packed lunch with your family. Let’s explore the different amenities available, including restrooms, equipment rentals, and the gift shop.

Restrooms, Picnic Areas, and Visitor Center

The main hub of park facilities is the visitor center. Here, you’ll find clean restrooms, helpful staff, and fascinating exhibits about the park’s history and geology. You can see real diamonds found in the park, including the famous Strawn-Wagner diamond, which is a truly cool sight.

When you need a break from digging, there are several picnic areas with picnic tables where you can relax and refuel. While there is a small café with limited options, bringing your own food and drinks is a popular choice. These shaded spots offer a welcome respite from the sun.

The park also features the Diamond Springs Water Park, a mining-themed aquatic park perfect for cooling off on a hot day. It requires a separate admission fee but is a fantastic amenity for families.

  • Clean restrooms located in the visitor center.
  • Shaded picnic areas for meals and breaks.
  • Exhibits and found diamonds on display at the visitor center.
  • A seasonal water park for family fun (separate admission).

Equipment Rentals and Gift Shop

Don’t have your own digging tools? No problem. The park offers equipment rentals on a first-come, first-served basis. You can rent everything from a basic kit with a shovel, bucket, and screen set to a more advanced kit for serious searching.

A security deposit is required for all equipment rentals, which is refunded when you return the items. This is a convenient option if you don’t want to bring your own gear or decide to try a different sifting method during your visit. You can find more details on the park’s website.

Before you leave, be sure to stop by the gift shop. It’s a great place to find souvenirs to remember your trip. While this guide doesn’t use affiliate links, it’s worth noting that the gift shop is the perfect spot to grab a memento of your diamond hunting adventure.

  • Basic and advanced digging kits available for rent.
  • Rentals include items like a bucket, small shovel, and screen set.
  • A refundable security deposit is required for all rentals.
  • The gift shop offers souvenirs and memorabilia.

The Diamond Search Experience

The heart of your visit is the diamond search itself. Walking onto the 37-acre plowed search area, you’ll see a mix of families, hobbyists, and dedicated prospectors. The atmosphere is one of excitement and anticipation, as anyone could be the next to find real diamonds.

There are three primary methods for diamond hunting: surface searching, dry sifting, and wet sifting. Each technique offers a different approach to uncovering gems, and many visitors try a combination of all three. Let’s dig into the tips that can increase your chances of success.

Tips and Techniques for Finding Gems

How can you search for diamonds at Crater of Diamonds State Park? The simplest method is surface searching. This involves walking slowly through the diamond field and scanning the top of the ground for shiny stones that stand out. Diamonds here have a metallic luster and are often smooth and rounded. Going after a heavy rain gives you the best chance with this method, as the water washes away loose soil.

For a more hands-on approach, try dry sifting. This works best when the soil is dry and powdery. You use a screen to sift loose soil, then carefully check the remaining gravel for gems. For the most productive technique, however, many experts recommend wet sifting. This involves taking a bucket of dirt to one of the covered washing pavilions or open sluice boxes.

You’ll use a screen set and water to wash the dirt away, leaving behind heavier gravel. Carefully inspect the remaining material for diamonds, which are denser than most other minerals. Diamonds found here are typically white, brown, or yellow and about the size of a match head.

  • Surface Searching: Look for shiny, lustrous rocks on the ground.
  • Dry Sifting: Use a screen to filter dry dirt.
  • Wet Sifting: Wash dirt with water to isolate heavier gravel.
  • Look for smooth, rounded stones with a greasy or oily appearance.

What Happens If You Find a Diamond

The most exciting part of the diamond search is the possibility of finding a genuine gem. So, what happens if you find a diamond? The park has a straightforward and thrilling policy: you get to keep what you find. This applies to any diamonds, semi-precious stones, or minerals you unearth from their original volcanic source.

If you find a stone you think might be valuable, take it to the Diamond Discovery Center. The park staff there are experts and provide a free identification service. They will examine your finds, let you know what you have, and if it’s one of the real diamonds, they will weigh and certify it for you free of charge.

There have been incredible success stories over the years. Since 1972, over 35,000 diamonds have been found by park visitors. Notable discoveries include the 40.23-carat “Uncle Sam,” the largest diamond ever unearthed in the United States. While most finds are small, the chance of a big discovery keeps the dream alive.

  • You get to keep any diamond or gem you find.
  • Take your finds to the Diamond Discovery Center for free identification.
  • Park staff will certify your diamond, providing its weight and characteristics.
  • Famous large diamonds have been found here, making it a place of legendary discoveries.

Conclusion

In conclusion, visiting Crater of Diamonds State Park offers a unique adventure for gem enthusiasts and families alike. From understanding the park’s layout and facilities to mastering tips for successful diamond hunting, this guide is designed to enhance your experience. Equip yourself with the right knowledge, adhere to the park’s rules, and enjoy the thrill of searching for real gems in the natural beauty of Arkansas. Whether you’re a seasoned prospector or a curious beginner, every trip to this remarkable park can lead to unexpected treasures. Ready to dig into your own adventure? Book a free consultation with us to plan your perfect trip today!

How Do the Gem-Digging Opportunities at Crater of Diamonds Compare to the Natural Wonders at Devil’s Den State Park?

Gem-digging at Crater of Diamonds offers a unique adventure for treasure seekers, while the natural wonders at Devil’s Den State Park provide breathtaking landscapes and hiking experiences. Visitors can enjoy the thrill of searching for gems, but should also take time to explore devil’s den caves for a stunning geological experience.

Frequently Asked Questions

When is the best time to visit Crater of Diamonds State Park?

The best time to visit the state park is during the spring and fall. The cooler temperatures make the diamond search more comfortable. The peak season sees more visitors, but your best chance of finding a diamond is often after a good rain, which washes away dirt and exposes gems.

How do I book camping or lodging at Crater of Diamonds State Park?

To book camping or lodging at the state park, you should visit the park’s website. You can check availability for the 47 AAA campsites and make reservations online. The advantage of the campground is its proximity to the diamond field, allowing you to start your search early.

Are there guided tours or educational programs at Crater of Diamonds State Park?

Yes, the state park offers interpretive programs and educational resources. At the visitor center, you can watch instructional videos and sometimes see live demonstrations. The knowledgeable park staff are always available to answer questions, identify finds, and share information about the park’s unique history and geology.

Key Highlights

Are you ready to explore Washington’s most-visited state park? Here’s a sneak peek at what makes it so special.

  • Marvel at the breathtaking views from the historic Deception Pass Bridge, which connects Fidalgo and Whidbey Island.
  • Explore over 38 miles of hiking trails through coastal forests and along dramatic cliffs.
  • Discover vibrant sea life in the tide pools at Rosario Beach during low tide.
  • Enjoy water activities like kayaking, fishing, and swimming in both saltwater and freshwater lakes.
  • Camp under the stars at one of the park’s three scenic campgrounds.
  • Experience the raw beauty of the Pacific Northwest, with opportunities to see bald eagles, seals, and even whales.

Overview of Deception Pass State Park and Its Scenic Bridge

Welcome to Deception Pass State Park, a true gem in the state of Washington. Spanning nearly 4,000 acres across two islands, Fidalgo Island and Whidbey Island, this park offers an incredible diversity of landscapes. From rugged coastlines to serene freshwater lakes, there is something for every nature lover in this corner of the Pacific Northwest.

The islands are connected by the magnificent Deception Pass Bridge, an architectural wonder completed in 1935 by the Civilian Conservation Corps. Standing 180 feet above the swirling waters, this iconic structure is listed on the National Register of Historic Places and is a destination in itself. Ready to learn more about the park’s famous bridge and natural wonders?

The Iconic Deception Pass Bridge

The Deception Pass Bridge is undoubtedly one of the must-see attractions in Washington State. This impressive structure is actually two separate spans, the Deception Pass Bridge and the smaller Canoe Pass Bridge, that connect Fidalgo Island to Whidbey Island. Its completion was a major feat of engineering, and it was rightfully added to the National Register of Historic Places in 1982.

Walking along the bridge’s pedestrian path is a thrilling experience you won’t want to miss. Positioned 18 stories above the turbulent waters, you get a bird’s-eye view of the powerful currents below. The walkway is narrow and right next to traffic, so it’s an adventure best suited for those comfortable with heights. Have you ever felt the wind whip around you from such a staggering height?

From this unique vantage point, you can spot kayakers navigating the pass, watch for bald eagles perched in nearby trees, and get a fantastic overview of the state park. It’s the perfect spot to begin your exploration and appreciate the grand scale of this incredible landscape. The bridge itself is a central highlight of any visit.

Natural Beauty and Unique Features

The beauty of this state park lies in its incredible variety. You can wander along North Beach with its views of the bridge, then hike up to the top of Goose Rock for a panoramic look at the surrounding islands and mountains. The landscape is a stunning mix of dramatic cliffs that plunge into the sea, dense evergreen forests, and peaceful freshwater lakes like Pass Lake and Cranberry Lake.

One of the most magical experiences is exploring the tide pools, especially at Rosario Beach. During low tide, you can discover a hidden world of sea stars, colorful anemones, and other fascinating creatures. What kind of wildlife can you see at Deception Pass State Park? You might spot harbor seals basking on rocks, porpoises playing in the waves, and majestic bald eagles soaring overhead.

For a more relaxed experience, head to an observation deck to soak in the scenery. The Sand Dunes Interpretive Trail at West Beach offers fantastic views of the Rosario Strait. Whether you’re an active hiker or simply want to enjoy the quintessential Pacific Northwest scenery, the park’s natural features offer endless opportunities for discovery.

Essential Information for First-Time Visitors

Planning your first trip to this beautiful state park is exciting! Before you go, there are a few key details to know. To park your vehicle anywhere within the park, you will need a Discover Pass. This pass is required for all Washington State Parks and helps maintain these beautiful natural spaces for everyone to enjoy.

You can purchase a pass online before you arrive or at the park itself. With several campgrounds, including some with utility sites, and its close proximity to towns like Oak Harbor, the park is well-equipped for both day-trippers and overnight guests. The following sections will provide more detail on park fees, directions, and how to get here.

Park Hours, Entrance Fees, and Parking Details

Are there any entrance fees or parking charges at Deception Pass State Park? While there’s no per-person entrance fee, a Discover Pass is required for all vehicle access and parking within the park. If you plan on camping, the parking for one vehicle at your site is included in your camping fee. The park is open from 6:30 a.m. to dusk in the summer and 8 a.m. to dusk in the winter.

You have a couple of options for purchasing your pass. You can buy an annual pass online, which is a great value if you visit Washington State Parks often, or opt for a one-day pass. Automated pay stations are conveniently located in major parking lot areas like West Beach, Cornet Bay, and the lot just south of the bridge. You can also pay with cash at self-registration stations found throughout the park.

Here is a simple breakdown of your pass options:

Pass Type Cost (subject to change) Validity
One-Day Discover Pass $10 One calendar day
Annual Discover Pass $30 One year from date of purchase

Remember to display your pass clearly on your vehicle’s dashboard to avoid a ticket.

Location, Directions, and Accessibility

Getting to this popular state park is straightforward, as Highway 20 runs directly through it. Your route will depend on whether you are coming from the north or the south. If you’re traveling from the north, near Burlington, you can connect to Highway 20 from Interstate 5 and arrive on Fidalgo Island, where you can access areas like Rosario Beach and Bowman Bay.

Coming from the south, you have the scenic option of taking the Mukilteo-Clinton ferry to Whidbey Island. From there, you will drive north on Highway 525, which becomes Highway 20. The main park entrance is on Whidbey Island, off Cornet Bay Road. This side of the park is home to Cranberry Lake, North Beach, and the Goose Rock trail system.

This park is a great place for everyone, offering a mix of easily accessible spots and more remote trails. If you’re planning an overnight stay, you can book campsites online through the Washington State Parks reservation system. It’s best to reserve well in advance, especially for summer weekends. How do I make a camping reservation at Deception Pass State Park? Simply visit the official state parks website to check availability and secure your spot.

What to Pack for Your Trip to Deception Pass State Park

Packing correctly can make all the difference for your visit to this state park. The Pacific Northwest weather can be unpredictable, so it’s wise to prepare for a little bit of everything, even on a sunny day. Layers are your best friend here, allowing you to adjust to changing temperatures as you move from a windy observation deck to a sheltered forest trail.

Whether you’re planning a quick day trip or have a camping reservation for a longer stay, having the right gear will ensure your comfort and safety. From hiking essentials to simple day-use items, a little preparation goes a long way. Let’s look at what you should bring for a day visit and what extra gear you might need for more in-depth exploration.

Day Trip Essentials

What should I pack for a day trip to Deception Pass State Park? A perfect day trip starts with a well-packed bag. Since the weather can change quickly, it’s always a good idea to be prepared. Even if the forecast calls for sun, the wind on the bridge or along the coast can be chilly. Thinking ahead ensures you can comfortably enjoy everything from the observation deck views to a visit to the Civilian Conservation Corps Interpretive Center.

Your packing list doesn’t need to be extensive, but a few key items will make your visit much more enjoyable. Think about comfort, sun protection, and staying hydrated. A good pair of walking shoes is a must, as you’ll likely be covering varied terrain between the beaches, trails, and viewpoints.

Here are a few essentials to bring for your day trip:

  • A wind-breaking jacket, as it’s almost always windy on the Deception Pass Bridge.
  • Comfortable shoes or hiking boots for walking on rocky beaches and trails.
  • A sun hat (preferably with a chinstrap!), sunglasses, and sunscreen.
  • Binoculars to get a closer look at wildlife like birds and seals.
  • A reusable water bottle and snacks to keep your energy up.

Recommended Gear for Hiking and Exploration

If your plans include hiking and deeper exploration of the park, you’ll want to bring some specific gear. The park features 38 miles of trails, ranging from easy beach walks to more challenging climbs like the Goose Rock summit trail. Wearing the right footwear is critical for navigating rocky shorelines and forested paths safely and comfortably.

Beyond sturdy shoes, having a small pack with essentials can make your hike worry-free. This is especially true if you’re tackling longer routes like the Pacific Northwest Trail segment that runs through the park or the popular loop to Lighthouse Point. Even on trails considered among the best for beginners, being prepared is key.

Consider packing these items for your hiking adventures:

  • Sturdy, broken-in hiking shoes or boots with good traction.
  • A map of the park’s trails, which you can get at the park entrance.
  • Plenty of water and high-energy snacks.
  • A small first-aid kit for minor scrapes or blisters.
  • Headlamps if you plan to be out near sunset, especially at scenic spots like Rosario Head.

Step-by-Step Guide: How to Experience Deception Pass State Park for Beginners

Feeling overwhelmed by all the options at Deception Pass State Park? Don’t worry! This simple step-by-step guide will help you plan the perfect visit. We’ll walk you through how to prepare for your trip and highlight the must-see attractions so you can make the most of your time in this spectacular park.

From reserving a campsite to exploring the best places on both Whidbey Island and Fidalgo Island, this guide is designed for first-time visitors. By following these steps, you’ll be ready to discover the beautiful trails of Deception Pass and create lasting memories. Let’s start with the first step: planning your visit.

Step 1: Planning Your Visit and Reserving Campsites

The first step to a great trip is planning ahead, especially if you want to camp. Deception Pass is Washington’s most-visited state park, and campsites are in high demand. How do I make a camping reservation at Deception Pass State Park? You should book your spot through the Washington State Parks online reservation system. Reservations open up to nine months in advance, so it’s best to book as early as possible to get your preferred dates.

The park offers three different campgrounds. The Bowman Bay Campground on Fidalgo Island is small and secluded, with 18 tent sites and two utility sites. On Whidbey Island, you’ll find the Quarry Pond Campground, which is open year-round, and the large and popular Cranberry Lake Campground, perfectly situated between the lake and North Beach.

Whether you need simple tent sites or one of the park’s utility sites for an RV, securing your camping reservation early is the key to a stress-free stay. If you’re planning a summer visit, be aware that campgrounds are often fully booked every day of the week.

Step 2: Exploring Must-See Attractions and Activities

Once your visit is planned, it’s time for the fun part: exploring! What are the must-see attractions at Deception Pass State Park? With so much to see, it helps to have a list of highlights. A great place to start is the iconic bridge itself, offering unforgettable views from its pedestrian walkway.

After you’ve taken in the bridge, you can explore the diverse areas on both sides of the pass. Head to North Beach for a classic view of the bridge from below, or hike to the top of Goose Rock, the highest point on Whidbey Island, for breathtaking panoramas. Each location offers a unique perspective of the park’s stunning beauty.

Here are some must-see spots to add to your itinerary:

  • Rosario Beach: A great spot for tide pooling at low tide and hiking to Rosario Head.
  • Bowman Bay: A protected bay perfect for launching a kayak and exploring the coastline.
  • Lighthouse Point: Offers dramatic cliffside views and a fantastic perspective of the bridge.
  • Cranberry Lake: A peaceful freshwater lake ideal for swimming, fishing, or paddling.
  • West Beach: A popular and easily accessible beach with an interpretive trail.

Top Activities and Experiences at Deception Pass State Park

Deception Pass State Park is an outdoor adventurer’s paradise. The diverse landscapes provide a natural playground for a wide range of activities. Whether you prefer a peaceful walk on the beach or an exciting water adventure, you’ll find plenty to do. The park’s walking trails wind through forests and along shorelines, offering new discoveries at every turn.

For those drawn to the water, kayaking and boating are popular ways to experience a different part of the park. The calm waters of Cornet Bay, Pass Lake, and Cranberry Lake are perfect for paddling, while guided tours with groups like Anacortes Kayak Tours offer adventures in the more dynamic parts of the pass. Read on to discover some of the best activities for beginners and families.

Best Hiking Trails for Beginners

What are the best hiking trails for beginners in Deception Pass State Park? You’re in luck, as the park has many trails that are perfect for those new to hiking or families with young children. These trails offer incredible scenery without requiring a strenuous effort, making them a great place to start your adventure.

A fantastic option is the North Beach Trail, which provides stunning views of the bridge from below as you walk along the shoreline. Another easy and rewarding hike is the Sand Dunes Interpretive Trail at West Beach, a 0.8-mile loop with an observation deck. For a slightly more challenging but still manageable climb, the trail up Goose Rock offers some of the best views in the park.

Here are a few top trail recommendations for beginners:

  • Rosario Head Trail: A short 1.3-mile loop from Bowman Bay with amazing sunset views.
  • Sand Dunes Interpretive Trail: An easy 0.8-mile walk with informative signs about coastal plants.
  • Lighthouse Point Trail: A 5-mile hike that follows dramatic coastline cliffs.
  • Cranberry Lake Loop: A mellow trail that circles the peaceful freshwater lake.

Kayaking, Boating, and Swimming Opportunities

The waters of the state park are just as inviting as its trails. Is swimming allowed in Deception Pass State Park? Yes! For a refreshing dip, head to Cranberry Lake, a calm freshwater option that is much warmer and safer for swimming than the cold, turbulent saltwater of the pass. It’s a popular spot for families on warm summer days.

Can you rent a kayak or boat at Deception Pass State Park? Yes, rentals are typically available at both Bowman Bay and Cranberry Lake during the peak season, making it easy to get out on the water. Bowman Bay is a protected spot north of the bridge, perfect for beginner kayakers looking to explore the coastline without dealing with the strong currents in the main channel. For guided experiences, companies like Anacortes Kayak Tours offer trips in the area.

Here are some of the best ways to enjoy the water:

  • Kayaking in Bowman Bay: Explore sea cliffs and watch for harbor seals.
  • Paddling on Cranberry Lake: Enjoy a calm, freshwater paddle with views of the Olympic Mountains.
  • Boating from Cornet Bay: Launch your boat for fishing or exploring the wider Puget Sound area.
  • Freshwater Fishing: Cast a line in Pass Lake or Cranberry Lake for a relaxing afternoon.

Which Park Offers Better Scenic Views: Deception Pass or Golden Gate Canyon?

When considering scenic views, both Deception Pass and Golden Gate Canyon offer unique experiences. Deception Pass boasts stunning coastal cliffs and lush forests, while Golden Gate Canyon reveals expansive mountain vistas. For those eager to explore trails and vistas in colorado, both parks provide unforgettable landscapes to immerse yourself in nature’s beauty.

Frequently Asked Questions

When is the best time of year to visit Deception Pass State Park?

The best time to visit Deception Pass State Park depends on your preference. Summer offers the warmest weather but also the largest crowds. For a more peaceful experience with pleasant Pacific Northwest weather, consider visiting during the shoulder seasons of spring (April-May) or fall (September-October) on a weekday.

Are pets allowed at Deception Pass State Park?

Yes, pets are welcome at this state park, but they must be kept on a leash at all times, including on beaches and the trails of Deception Pass. To protect the fragile ecosystem, pets are not permitted in the Rosario Tide Pools area. Always remember to clean up after your pet.

What wildlife can you see at Deception Pass State Park?

The park is teeming with wildlife! Look for harbor seals and porpoises in the water, and you might even spot whales during migration season. Bald eagles are frequently seen soaring overhead or perched in trees. In the tide pools, you can find sea stars, crabs, and anemones.

How do I make a camping reservation at Deception Pass State Park?

You can make a camping reservation for this state park online through the Washington State Parks reservation website. Reservations can be made up to nine months in advance. Due to the park’s popularity, it is highly recommended to book your site at Bowman Bay Campground or another location as early as possible.